• Make Over Arena

Selling Things On Facebook - Sell Items On Facebook Group

Selling Things On Facebook – Facebook is fast becoming one of the most powerful online marketing platforms for promoting businesses, cond...

How to delete group message on facebook

 No comments   


When a group chat has served its purpose, then it may be time to delete it. Once a group chat is deleted, all conversations, files, links, and anything shared on it are deleted and are non-recoverable. If you want to learn how to delete group chat on Facebook Messenger, then this article can help you.
The Facebook Messenger app offers everybody to create a group chat. Group chats are designed to reach and communicate with more of your friends easily. They work as a common chat room where members are able to see every member’s message. It’s quite easy to create a group chat but it takes an effort to delete one.
The creator of the group chat is the only person responsible to delete it. If you are one of the creators, this article is for you. If you are one of the members, you may share this with the creator.

Delete Group Chat on Facebook Messenger

If you are the creator or an admin of a Messenger group chat, you can delete the group chat by following these steps:
1. Launch the Facebook Messenger app.Facebook Messenger icon
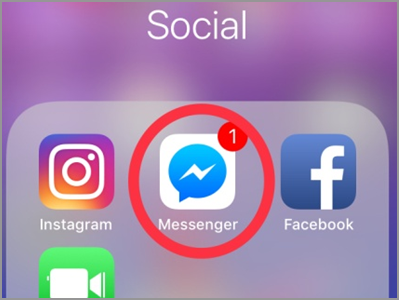
2. Under the Search box, tap the Groups tab. It’s in line with the Message, Active, and Calls tab.Facebook Messenger Groups
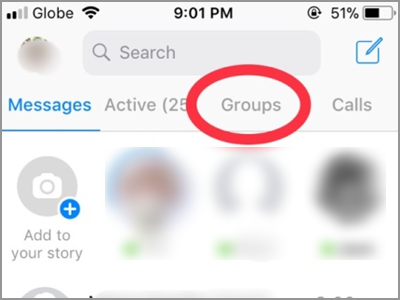
3. Select the Group you want to delete. Remember, you must be the admin or creator of the group chat.Facebook Messenger Choose Group Name
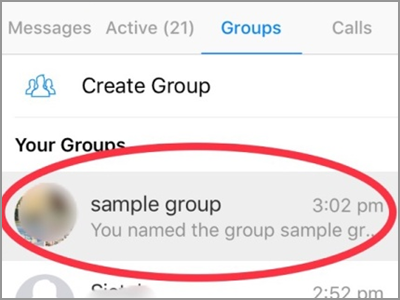
4. Tap the Group Name to open its menu.Facebook Messenger Group Name Selected
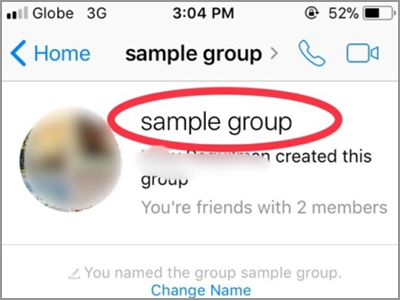
5. The screen will display the different settings and options regarding your group chat. Scroll down and look for all the members. Do not be confused by the Ignore Group and Leave Group option. From this part, it needs your patience and efforts as you have to manually remove all the members one by one. If you only have few friends in the group, then the task should be a breeze. The next steps will show you how to remove members.Facebook Messenger Group Chat Members
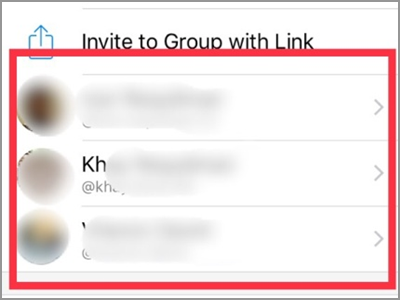
6. Tap the member’s name to make the other options available.Facebook Messenger Group Chat Members Select
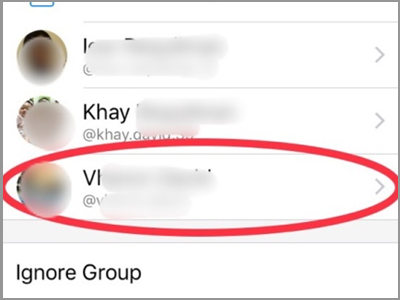
7. Under the member’s name and facebook link, there are four options. These are the Message, Audio Call, Video Chat, and View Facebook Profile. While on the bottom part you will only see the Remove from Group and the Block option. Tap the Remove from Group.Facebook Messenger Group Chat Members Select Remove From Group
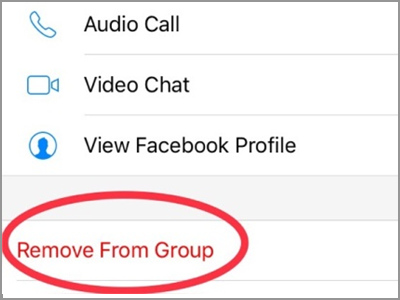
8.. Confirm your action by tapping the Remove button. Do the Step 6 up to Step 8 for all the members. Do these until it remains only the creator. Then follow the next step.Facebook Messenger Group Chat Members Select Remove From Group Confirm
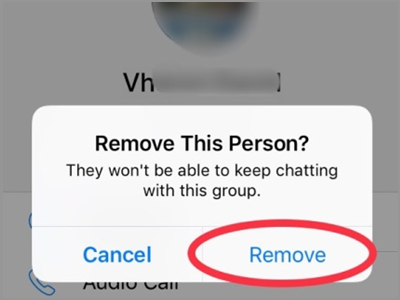
9. Now it’s the time for you, the creator, to leave the group. There are two ways to access the Leave Group option. Tap your name from the list.Facebook Messenger Group Chat Member Select
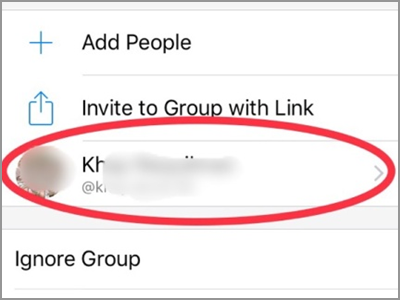
10. From the member list, scroll down a little bit. You will find the Leave Group tab after the Ignore Group.Facebook Messenger Group Chat Leave Group
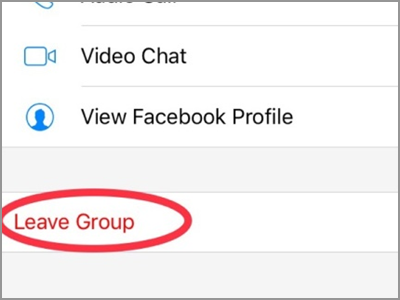
● Alternatively, on the bottom part of the screen, you will see the Leave Group button. This option is only available on the creator’s page.
11. Tap the Leave button to confirm. After the confirmation, your screen will be back on the Group page.Facebook Messenger Group Chat Leave Group Confirm
Tip: Anyone who is a member of the group chat can also remove a co-member.
Read More
  • Share This:  
  •  Facebook
  •  Twitter
  •  Google+
  •  Stumble
  •  Digg

Giphy gif upload - How To Share GIPHY GIFs On Instagram

 No comments   

GIPHY offers a one-click solution to turn any GIF into a perfectly looped fifteen-second .mp4 for you to upload directly to Instagram.
Step One: If you’re on the GIPHY website, click on the Instagram icon below any GIF. The GIPHY Glove will present you with an email form.
Step Two: Enter your email and hit send. GIPHY will email you a .mp4 version of your GIF.
Step Three: Download the .mp4 onto your phone and upload to your Instagram. GIFs inside Instagram!

--MOBILE--
Step One: If you’re on the GIPHY mobile app, pressing the Instagram icon located under any GIF will automatically open Instagram, giving you a screen with two options: to add the GIF as a post to your feed, or add the GIF as a story.
Step Two: If you select “feed”, a .mp4, 15 second GIF will be put into a post, ready for you to add a caption to!
Step Three: If you select “story”, a mp4, 15 second GIF will be pushed into the Story creation tools. The GIF is able to be resized by pinching or expanding the screen, to ensure the entire GIF is visible in the vertical format of Instagram Stories.

Read More
  • Share This:  
  •  Facebook
  •  Twitter
  •  Google+
  •  Stumble
  •  Digg

Aquarius month: Aquarius Zodiac Sign

 No comments   


Aquarius
Aquarians present themselves in one of two ways. One on hand, you'll see someone who is shy, and quiet. On the other, an Aquarian can be boisterous, eccentric, and energetic. Both are deep thinkers with a love of helping others. Highly intellectual, this is a sign of fierce independence that prizes intuition tempered with logic. Both personality types have an uncanny ability to see both sides of an argument without prejudice, making them excellent problem-solvers. While very much attuned to the energies around them, Aquarians have a deep need to take time out alone and away to rejuvenate themselves. The keyword for this sign is imagination. The Aquarian can see a world of possibilities even when there appears to be none.
Read today's horoscope

Strengths

Progressive, original, humanitarian, independent.

Weaknesses

Runs from emotional expression, uncompromising, temperamental, aloof.

Likes

Fun with friends, fighting for causes, helping others, intellectual conversation, a good listener.

Dislikes

Limitations, being lonely, broken promises, dull or boring situations, people who disagree with them.

Charismatic marks

Good looks, beautiful eyes, angular faces, thin build.

Best environment

Any gathering of people to exchange ideas.
Read More
  • Share This:  
  •  Facebook
  •  Twitter
  •  Google+
  •  Stumble
  •  Digg

My instagram analytics

 No comments   

Using Instagram for marketing purposes is rapidly growing in popularity, with over 70% of companies using the platform in 2017, compared to less than 50% in 2016.
It's important that you leverage Instagram for your own business, but once you start, it can be difficult to discern whether you're truly successful. Without the right metrics, you'll never know if you could be doing more to engage your audience or grow your following.

There are plenty of Instagram analytics apps to help you keep track of your progress and discover areas for improvement. Here, we'll focus on the best free Instagram analytics apps, so you can focus your money and efforts on the Instagram content itself.

Free Instagram Analytics Tools

1. Instagram Insights

If you have a business account on Instagram, you automatically have access to their free analytics tool, Instagram Insights. The Insights tool can show you when your audience is on Instagram, which of your posts are most popular, and your account's impressions and reach.
Additionally, you can compare your original post with a promoted version of the post to figure out if your paid efforts are working. Unfortunately, you can only use the tool within the app (there's no desktop version), and it's not the most user-friendly, but it provides a good basic overview of your Instagram analytics for both individual posts, and your account as a whole.

2. Squarelovin

Squarelovin's free Instagram Insights tool provides most of the information you'd need to conduct an analysis on your progress over the year -- for instance, you can obtain a monthly analysis on your posts, or a history of your posts broken down by month, day, or even hour. Additionally, the tool offers insights into your followers' interests, and how to drive further engagement to your posts. You can even figure out the best time to post, depending on when your followers are most likely on the app.

3. Pixlie

Used by Kenneth Cole, Sonos, and plenty of other big brands, Pixlie offers an impressive free tool. It allows you to create shareable reports that you can distribute to your entire marketing team, and analyze metrics to figure out how to drive more engagement and attract new followers. Additionally, the tool helps you find influencers or brand advocates promoting your products, so you can create more effective influencer campaigns.

4. Union Metrics

While it doesn't provide its Instagram Analytics tool for free, Union Metrics does offer a free monthly Instagram checkup. The checkup tells you which hashtags will increase your engagement, which posts resonate best with your audience, and what time your followers use the app. While the tool can't give you analytics beyond 30 days, it's a useful option for taking a look at short-term themes and patterns, and learning how you can quickly improve your metrics.

5. Socialbakers

While admittedly not the most visually appealing tool in the list, Socialbakers still offers critical information, including your most liked and most commented on posts, and your top performing filters. Additionally, Socialbakers offers an Instagram Report, which compares your own Instagram account to your competitors', to see where you fall in the industry and what you can do to improve.
Read More
  • Share This:  
  •  Facebook
  •  Twitter
  •  Google+
  •  Stumble
  •  Digg

How to recover facebook

 No comments   


If you don’t use a password manager, those complex passwords can be pretty hard to remember. If you’ve forgotten your Facebook password, you can’t really recover that same password, but it’s easy enough to recover your account by resetting your password to something new.
Whether you’ve forgotten your Facebook password, or have had someone else change it without your permission, Facebook offers a pretty simple way to recover. And what we’re talking about here is recovering your account if you’ve totally forgotten your password. Changing your Facebook password is a little different—that’s when you know your current password, but just want to change it to a new one.
RELATED: How to Change Your Facebook Password

Recovering Your Password

After an unsuccessful login attempt, Facebook should show you a “Recover Your Account” button under the password field. Go ahead and click that.
Note: If you’ve forgotten both the email (or phone number) and your password, you’ll have to head to the Facebook homepage, and click the “Forgotten Account” link under the login fields instead of using the technique we’re talking about in this article.
Next, enter the email address you used to sign up for your Facebook account, and then click the “Search” button.
If Facebook finds a match, it shows you on the results screen. Click the “This Is My Account” button.
Depending on what type of information you provided when you set up your account (and the security settings you configured), you may be presented with different options to reset your password. Choose a method, and then click the “Continue” button.

Have Facebook Send a Code by Email

After you receive the code in the email you used to set up your account, you can click the “Click here to change your password” link, and then copy the reset code and paste it into the Facebook site. But, it’s easier to just click the “Change Password” button in the email and circumvent the whole code entry process.
Either option will take you to the same place—a screen prompting you to type a new password. Choose a strong password, and then click the “Continue” button.
RELATED: Your Passwords Are Terrible, and It’s Time to Do Something About It

Using Gmail To Login

If you connected your Gmail account to Facebook when you signed up, you also can log into Google to gain immediate access to reset your Facebook password. This bypasses the confirmation email and code being sent to your email address at all.
A pop-up window will open with a secure login screen for your Gmail account. Click on the account you signed up with.
On the next screen, type your Google password, and then click the “Next” button.
Type the new Facebook password you want to use, and then click the “Continue” button.

Resetting Active Sessions After Changing Your Password

After you’ve reset your password, Facebook gives you the option to log out of active sessions on other devices or stay logged in.
If you just forgot your password, believe your account is safe, and don’t want to hassle with signing in again on other devices, go ahead and choose the “Stay Logged In” option.
If you suspect at all that your account was compromised, choose the “Log Out Of Other Devices” option instead. All current sessions on your PC, phone, tablet, and so on will be signed out, and you’ll need to sign in on them again using your new password.
Next you’ll be taken through a couple steps to help secure your account. If you suspect that someone may have had access to your account, Facebook can check to see whether there are any recent changes to your basic information (name, profile picture, and so on), installed apps, and your activity.
That’s it. Click “Go To News Feed” and you’re done.

Setting up Better Security

Facebook provides multiple options for keeping your account secureother than just using a standard password. You can set up two-factor authentication, specify authorized devices on which you can sign in, name trusted contacts, and more. Reviewing these settings can really help keep your Facebook account secure.
Read More
  • Share This:  
  •  Facebook
  •  Twitter
  •  Google+
  •  Stumble
  •  Digg

How to get messenger app

 No comments   

Facebook Messenger allows you to use the messaging feature of Facebook without having to launch your browser. The app makes communicating with your Facebook contacts quick and simple. Your contacts are displayed in a list, and all you have to do is click one to start a conversation. The app also sends notifications to your device when you have received a message from one of your contacts.

When you install the latest version of the Messenger app, you get the newest features. Updating the Messenger app may also help to fix problems when something's not working.

To install or update the Messenger app:
Android
  • Messenger for Android from the Google Play store
iPhone or iPad
  • Messenger for iPhone or iPad from the App Store
Read More
  • Share This:  
  •  Facebook
  •  Twitter
  •  Google+
  •  Stumble
  •  Digg

How to remove mobile number in facebook

 No comments   


Make sure the phone field is blank. Screenshot by Matt Elliott
If you have been on Facebook recently, you may have seen a few of your friends update their status with this warning:
ALL THE PHONE NUMBERS of your contacts are now on Facebook! Go to the top right of the screen, click on ACCOUNT, click on EDIT FRIENDS, left side of screen and click CONTACTS. You will see all phone numbers from your phone (FB friends or not) are published that you have stored in your mobile phone. TO REMOVE, go to the right column, click on 'this page.' Please repost this on your status, so your friends can remove their numbers and thus prevent abuse if they do not want them published.
This isn't the first time that Facebook has published personal information about its users, and I don't know how recently this change to sync phone contacts, too, took place. But I can tell you that on my Phonebook Contacts list (Account > Edit Friends > Contacts), many but not all of my Facebook friends' phone numbers--both mobile and sometimes home--are listed. According to Facebook, this Phonebook "displays contacts you have imported from your phone, as well as your Facebook friends." Below this quote in the right-hand column of the Phonebook page, it offers instructions and a link to disable this feature and remove your mobile contacts.
That's all well and good, but unless all of my Facebook friends disable this feature, my number will still be out there, in the Facebook ether. In this tutorial, I will show you how to delete your phone number. And if you'd like, how to delete those of your Facebook friends as well.
I am an iPhone user, and I certainly didn't voluntarily provide my cell phone number to Facebook. (Just because I am Facebook friends with someone doesn't necessarily mean I want them calling me.) I don't know for sure, but I'm guessing my number got added when I installed the Facebook app on my iPhone.

To delete your phone number (or see if your number is listed), log in to Facebook and click the gray Edit Profile button in the upper-right corner of your profile page. Then, in the left-hand column, click on Contact Information. In the area labeled Phones, you'll see any numbers you've registered with Facebook, perhaps unknowingly. Remove any numbers you see there and click the blue Save Changes button below.
Your phone number(s) might be listed on your friends' Phonebook Contacts list. Screenshot by Matt Elliott
To delete your friends' phone numbers from Facebook's Phonebook Contacts list, click on Account in the upper-right corner of Facebook and then click on Edit Friends. Next, click on Contacts from the left-hand column and you should see many of your friends' phone numbers on the Phonebook Contacts page. In the right-hand column, Facebook provides a description of the page and how to remove your mobile contacts. Click on the linked words "this page" and then on the next page, hit the Remove button.
On the Remove page, Facebook says, "Before you click Remove, you need to make sure syncing is switched off" and gives instructions on how to find syncing on an iPhone.
Before you delete the numbers listed from Facebook's Phonebook contacts, you must first turn off Syncing on your mobile device.Screenshot by Matt Elliott

To do so, open the Facebook app on your iPhone. From the main menu, tap the Friends icon, then the Sync button in the upper-right corner, then the Sync Contacts button, and then next to Syncing move the slider to Off.
Read More
  • Share This:  
  •  Facebook
  •  Twitter
  •  Google+
  •  Stumble
  •  Digg

Delete fb account permanently immediately

 No comments   

In this guide, we’ll walk you through the process of how to delete Facebook step-by-step, including outlining the difference between ‘deactivating’ your account, and deleting it entirely.
If you’re thinking about deleting your account then you’re not alone. Between the Cambridge Analtyica scandal and increasing worries about the effect social media has on our individual and societal health, people are increasingly turning away from these sites that have come to dominate the internet.
Whatever your reason, deleting or deactivating your account is actually pretty easy. Here’s how you do it.

How to delete or deactivate a Facebook account – what’s the difference?

There are two different ways to get your Facebook account offline. The first is deactivating, which means:
  • You can reactivate your account whenever you want
  • People can’t see your Facebook Timeline, or search for you
  • Some information may remain visible (like messages you’ve sent)
  • Facebook saves your account info (like friends and interests) in case you reactivate

But deleting your account is a much more serious matter. If you delete your account:
  • Facebook delays deletion for a few days after the request is made. If you log in during the grace period, the deletion is cancelled
  • You can’t regain access to your Facebook account once it’s deleted
  • It can take up to 90 days for your data that’s stored in backup systems to be deleted. However, your info isn’t accessible on Facebook during this time
  • Some things aren’t stored in your account, like messages that you’ve sent to friends – these will remain active
  • Copies of some material (like log records) may remain in Facebook’s database, but are “disassociated from personal identifiers,” according to the company
Basically, deactivating is a way to cool off from Facebook for a while, while deleting is a permanent solution that you should think carefully about before choosing.

How to deactivate Facebook account

To deactivate your Facebook account, follow these four steps:
1. Click the account menu down arrow at the top right of any Facebook page in your web browser
2. Select ‘Settings’
3. Choose ‘General’ in the left column
4. Click ‘Manage your account’
5. Press ‘Deactivate your account’, and then follow the steps to confirm your decision
To reactivate your account after deactivating it, simply log into Facebook your e-mail and password. Your profile will be entirely reinstated.
Related: How to undo Snapchat’s 2018 update

How to delete Facebook account

Deleting your Facebook account is a serious decision, so make sure it’s something you really want to do. Whether you like it or not, social media is ingrained in society, and your Facebook profile can affect friendships, job prospects, and social opportunities. Remember that there are also ways to secure your Facebook privacy settings., if that’s your particular concern.
Plus, you may miss out on some ‘dank memes’ by deleting Facebook, and however grating it is in places, it’s also useful for plenty of things, such as keeping up with friends from abroad and organising events.
If you’re set on binning the social network off for good, click the following link and choose the ‘Delete my account’ option:
  • Delete my Facebook page
Before deleting your account, it may be worth downloading your Facebook data. To do this, follow these steps:
1. Click the account menu down arrow at the top right of any Facebook page in your web browser
2. Click ‘Download a copy of your Facebook data’ at the bottom of your General Account Settings
3. Choose ‘Start My Archive’
The file that begins downloading will contain your Facebook profile information, so be very careful about where you keep it.
Read More
  • Share This:  
  •  Facebook
  •  Twitter
  •  Google+
  •  Stumble
  •  Digg

Delete my facebook id permanently

 No comments   


delete-facebook-permanently
Is it time to #deletefacebook?
Just in case you’re not aware, Facebook isn’t a social networking website. In other words, as Edward Snowden says, it’s a surveillance company. It knows which places you visit, which advertisements you’ve interacted with, or what your friends are doing and eating. The recent Cambridge Analytica debacle has reinforced the notion that Facebook could be misused to profile users and sell their data. As a result, #deletefacebook is trending and it’s high time you get rid of your account.
The original tutorial continues from here:
Sometimes you want to get out of the Facebook world. Most of the people know about deactivating their Facebook. But it is also possible to permanently delete your Facebook account. Do remember to download a copy of your Facebook data before deleting your account.
Facebook is the biggest social network in the world with around 1.4 billion active users per day. An uncountable number of profiles come into existence every day. Many people post almost all of their life activities on Facebook. For some people, it’s only a medium to remain connected with their old friends and remember their birthdays.
Sometimes you want to get out of your Facebook life and enjoy the real world. You do this by deactivating your Facebook account. But you can also delete your Facebook account permanently if you want to leave Facebook for the rest of your life.

Backup your Facebook data

Before saying goodbye to your Facebook life, you should backup your data in case you need it at a later point in time.
  1. Go to Settings.
  2. While in the General tab. Click Download a copy of your Facebook data.
  3. Click Start My Archive.
    download copy of facebook data
  4. Enter your Facebook account password. Click Submit.
  5. Click Start My Archive in the Request My Download box.
Facebook will then gather all your data and send the copy to your registered email address.

How to deactivate your Facebook account?

It’s simple. You might be thinking why I am telling you such simple thing. If you know how to deactivate your Facebook account, it’s good. But some people might not be aware of this. Here are the steps to deactivate your Facebook account:
  1. Go to Settings.
  2. Click General in the left pane. Earlier the option to deactivate Facebook account was on the Security page (now Security and Login).
  3. Click Manage Account on the screen. Then click Deactivate your account.
    facebook account deactivate

How to delete Facebook account permanently?

One thing that most users want to know is how to delete Facebook account permanently. For this, follow the steps:
  1. Log into your Facebook account.
  2. Visit this link, https://www.facebook.com/help/delete_account
  3. Click Delete My Account.
    facebook account delete
  4. I can’t go further as I don’t want to delete my Facebook account. So, go ahead yourself.

Important things to consider before you close Facebook account

Make sure you’ve downloaded a copy of your Facebook data before deactivating or permanently deleting it. You might be aware of the fact that you can gain access to your Facebook account after you’ve deactivated it. But be careful, you won’t get the chance to change your mind after you’ve deleted your Facebook account permanently. So, take your decision wisely.
It will take 90 days for Facebook to delete all your photos, videos, posts, likes, comments, messages, and everything else. Other Facebook users won’t be able to visit your profile during the deletion process. However, the text messages, images you’ve sent to your friends via chat will reside at their end because they’re a part of their account also. You can ask them to delete your messages.
Read More
  • Share This:  
  •  Facebook
  •  Twitter
  •  Google+
  •  Stumble
  •  Digg

How to look at facebook messages without them knowing

 No comments   

Facebook Messenger has a great many uses, but when you don't feel like being contacted or getting into a conversation it's a pain. You can't ignore that message notification on your phone, but if you read the message you'll feel compelled to reply immediately - and sometimes that's just not practical. We'll show you how to secretly read Facebook messages without being seen.

Read Facebook messages on your phone without sender knowing

When you send a message on Facebook Messenger you’ll see a blue circle with a tick inside appear next to it. Then, if the recipient opens it, this will disappear. That’s how you know it’s been read. Facebook doesn’t have a setting that allows you turn off the read receipts the sender receives when you open up a message from them, but there are workarounds that can give you some control over this feature.
The most effective way of stopping read receipts is to prevent the app itself talking to the internet. To do this you just need to use Airplane mode. When you want to read the message but don’t want the sender to know the first thing to do is turn on the mode. 
On Android this is found in the settings menu you drag down from the top of the screen, or from the Settings app itself where it might be called Flight mode.
How to read facebook messages without the sender knowing
iPhone users can swipe up from the bottom of the screen and then tap the airplane icon on the left hand side.
How to read Facebook messages without them knowing
With Airplane mode engaged you can now open the Messenger app, read the messages, and the sender won’t know you’ve seen them. Close the app, turn Airplane mode off and you’re free to carry on as you were.

Read Facebook messages on your PC or laptop without sender knowing

Just like on the mobile side of things Facebook doesn’t provide an easy way for you to hide the fact you’ve read a message. That’s where third-party plugins for your browser come in.
If you use Chrome then there are a fair number of choices. Open up a new tab then click on the colourful square grid in the upper left hand corner marked Apps. This opens a menu of Chrome and Google related options.
If you use Chrome then there are a fair number of choices. Open up a new tab then click on the colourful square grid in the upper left hand corner marked Apps. This opens a menu of Chrome and Google related options. Double click on the Web Store icon and then search for Unseen. This is a clever extension that will automatically block read receipts being sent when you open a message.
Double click on the Web Store icon and then search for Unseen. This is a cunning extension that will automatically block read receipts being sent when you open a message.
If you use Chrome then there are a fair number of choices. Open up a new tab then click on the colourful square grid in the upper left hand corner marked Apps. This opens a menu of Chrome and Google related options. Double click on the Web Store icon and then search for Unseen. This is a clever extension that will automatically block read receipts being sent when you open a message.
Click the Add to Chrome button and the extension will install. You’ll see a blue circular icon appear to the right of your search bar and if you click on it there are various options offering a more granular control over how Messenger behaves.

Firefox users can try Message Seen Disable which does the same job. To install it open up a new tab in Firefox, click the three lines up the top right corner then select Add-ons from the menu that appears. Now search for the app and click the Add to Firefox button.
How to read Facebook messages without them knowing

So there you go. The words Facebook and privacy might seem at odds with each other, but at least using these tips you can claw back a small amount of privacy in Messenger.
Read More
  • Share This:  
  •  Facebook
  •  Twitter
  •  Google+
  •  Stumble
  •  Digg

How to make my new facebook account

 No comments   

Want to join the ever-growing Facebook community? Creating a Facebook account is free, and will only take a few minutes. Once your account is created, you can share interesting things with friends, upload images, chat, and much more.

Part 1
Creating Your Account

  1. Image titled Set up a Facebook Account Step 1
    1
    Open the Facebook homepage. You will need to be at least 13 years old to create a Facebook account. Facebook accounts are free, but you can purchase things for your Facebook account. You can only create one Facebook account per email address.
  2. Image titled Set up a Facebook Account Step 2
    2
    Enter in your information. On the Facebook homepage, enter in your first name, last name, email address, password, birthday, and gender. You must use your real name for your account. Nicknames are allowed as long as they are a variation on your real name (Jim instead of James, for example).
  3. Image titled Set up a Facebook Account Step 3
    3
    Click the "Sign Up" button. If all of your information is correct, you will be sent a verification email to the address you provided.
  4. Image titled Set up a Facebook Account Step 4
    4
    Open the verification email. It may take a few minutes for the email to get delivered. Click the link in the email to activate your account.

Part 2
Setting Up Your Profile

  1. Image titled Set up a Facebook Account Step 5
    1
    Add a profile picture. The first thing you should do after creating an account is add a profile picture. This will allow others to quickly see who you are, making conversations between friends and family easier.
  2. Image titled Set up a Facebook Account Step 6
    2
    Add friends. Facebook is nothing if you don't have friends and family to share with. You can search for people by their name or email, import your contact lists, and invite friends that aren't currently using Facebook.
    • When you find someone that you want to add, you will need to send a friend invite. Once they accept your invitation, that person will be added to your Friends list.
  3. Image titled Set up a Facebook Account Step 7
    3
    Manage your privacy settings. There are countless horror stories of people posting things that they don't want others to see, or losing a job because of something controversial they shared. Take some time to set up your privacy settings to prevent the wrong people from seeing what you post.

Part 3
Using Facebook

  1. Image titled Set up a Facebook Account Step 8
    1
    Share and post. You can post to your own timeline or post to your friends' timelines. You can also share content from elsewhere on the internet, including links, images, and videos.
  2. Image titled Set up a Facebook Account Step 9
    2
    Chat on Facebook. Facebook allows you to chat with anyone on your friends list. If the person you are chatting with is not online, they will receive your message the next time they log in. You can also download the Messenger app for your phone to chat on the go.
  3. Image titled Set up a Facebook Account Step 10
    3
    Upload photos. Facebook allows you to upload your photos to post to your profile and share with friends and family. You can upload single photos or organize your photos into albums. Make sure to not upload anything containing questionable content.
  4. Image titled Set up a Facebook Account Step 11
    4
    Create an event. You can use Facebook to create events and invite people. You can set the date and time, enter a location, make posts for people that will be attending, and invite specific people. Facebook events are quickly becoming one of the main ways that people organize gatherings.
Read More
  • Share This:  
  •  Facebook
  •  Twitter
  •  Google+
  •  Stumble
  •  Digg
Newer Posts Older Posts Home

Blog Archive

  • ►  2019 (502)
    • ►  July (5)
      • ►  Jul 08 (2)
      • ►  Jul 07 (2)
      • ►  Jul 06 (1)
    • ►  February (368)
      • ►  Feb 12 (33)
      • ►  Feb 11 (21)
      • ►  Feb 09 (37)
      • ►  Feb 08 (40)
      • ►  Feb 07 (45)
      • ►  Feb 06 (40)
      • ►  Feb 05 (23)
      • ►  Feb 04 (49)
      • ►  Feb 02 (25)
      • ►  Feb 01 (55)
    • ►  January (129)
      • ►  Jan 31 (78)
      • ►  Jan 30 (20)
      • ►  Jan 29 (11)
      • ►  Jan 20 (4)
      • ►  Jan 19 (3)
      • ►  Jan 18 (4)
      • ►  Jan 17 (5)
      • ►  Jan 16 (1)
      • ►  Jan 12 (1)
      • ►  Jan 11 (1)
      • ►  Jan 10 (1)
  • ▼  2018 (2465)
    • ►  November (64)
      • ►  Nov 25 (4)
      • ►  Nov 24 (4)
      • ►  Nov 23 (7)
      • ►  Nov 22 (9)
      • ►  Nov 21 (11)
      • ►  Nov 19 (14)
      • ►  Nov 15 (7)
      • ►  Nov 03 (6)
      • ►  Nov 01 (2)
    • ►  October (178)
      • ►  Oct 31 (9)
      • ►  Oct 30 (1)
      • ►  Oct 26 (1)
      • ►  Oct 24 (16)
      • ►  Oct 23 (21)
      • ►  Oct 22 (26)
      • ►  Oct 19 (5)
      • ►  Oct 16 (50)
      • ►  Oct 15 (36)
      • ►  Oct 14 (12)
      • ►  Oct 13 (1)
    • ▼  September (771)
      • ►  Sep 27 (58)
      • ►  Sep 26 (50)
      • ►  Sep 25 (70)
      • ►  Sep 24 (70)
      • ►  Sep 20 (50)
      • ►  Sep 19 (80)
      • ▼  Sep 18 (50)
        • How to delete group message on facebook
        • Giphy gif upload - How To Share GIPHY GIFs On Inst...
        • Aquarius month: Aquarius Zodiac Sign
        • My instagram analytics
        • How to recover facebook
        • How to get messenger app
        • How to remove mobile number in facebook
        • Delete fb account permanently immediately
        • Delete my facebook id permanently
        • How to look at facebook messages without them knowing
        • How to make my new facebook account
        • How to find contact number in facebook
        • How to tell who looks at your facebook profile
        • How to add link to facebook page
        • How to see Who unfriended me in the past
        • How to block person on messenger
        • How do you delete your twitter account
        • How do you cancel your facebook account
        • How to use messenger without app
        • How to see who is following you on facebook
        • How to recover my fb password
        • How to access facebook desktop mode on android
        • How to block people out of your life
        • How to know who blocked me on facebook
        • How to find old friend requests on facebook
        • How can i see who unfriended me on fb
        • Type of facebook spam
        • How to activate my fb account
        • My facebook account disabled to get back
        • How to turn off iphone tracking
        • How can I check who blocked me on facebook
        • How to edit your name on facebook
        • Location enable: How to Enable or Disable Location...
        • How to get real facebook followers
        • How to view archived messages on facebook app
        • How to download videos from facebook to iphone
        • How to get instagram link
        • How to delete any facebook account
        • Facebook name change policy
        • I forgot my facebook password and email
        • How to take 360 degree photo
        • How to log out of facebook on android
        • How to: Facebook use as page
        • How to get facebook update iphone
        • How to turn off all live notification on facebook
        • How can i know who viewed my facebook
        • How to get phone no from facebook
        • How to change settings to english in Android
        • How to change name facebook mobile (Android)
        • How to recover facebook chat
      • ►  Sep 17 (43)
      • ►  Sep 14 (81)
      • ►  Sep 13 (39)
      • ►  Sep 12 (101)
      • ►  Sep 11 (69)
      • ►  Sep 10 (9)
      • ►  Sep 09 (1)
    • ►  June (215)
      • ►  Jun 07 (13)
      • ►  Jun 06 (5)
      • ►  Jun 05 (48)
      • ►  Jun 04 (49)
      • ►  Jun 03 (50)
      • ►  Jun 02 (50)
    • ►  May (1205)
      • ►  May 30 (50)
      • ►  May 29 (50)
      • ►  May 28 (43)
      • ►  May 26 (50)
      • ►  May 25 (50)
      • ►  May 24 (50)
      • ►  May 23 (50)
      • ►  May 21 (50)
      • ►  May 20 (100)
      • ►  May 18 (92)
      • ►  May 17 (98)
      • ►  May 16 (93)
      • ►  May 15 (25)
      • ►  May 14 (25)
      • ►  May 13 (90)
      • ►  May 12 (25)
      • ►  May 11 (50)
      • ►  May 09 (25)
      • ►  May 08 (25)
      • ►  May 07 (32)
      • ►  May 06 (21)
      • ►  May 05 (18)
      • ►  May 04 (25)
      • ►  May 03 (18)
      • ►  May 02 (25)
      • ►  May 01 (25)
    • ►  April (26)
      • ►  Apr 12 (25)
      • ►  Apr 10 (1)
    • ►  March (6)
      • ►  Mar 26 (6)

Search

Copyright © Make Over Arena