• Make Over Arena

Selling Things On Facebook - Sell Items On Facebook Group

Selling Things On Facebook – Facebook is fast becoming one of the most powerful online marketing platforms for promoting businesses, cond...

How To Reactivate Your Account on Instagram

 No comments   

  1. Open your Instagram App. To reactivate an account that has been disabled temporarily, you simply have to log onto your account again.
  • This action appears very simple, but it can be more complex than it seems. Instagram is very strict about reactivating accounts.
  • You must also consider that if you deactivate your account temporarily, Instagram disables it only for one week.
  1. Enter your username and password. If these credentials successfully restore your disabled account, that means that your account is active again!
If on the other hand, this step didn’t work out and you couldn’t sign in, you will need to reset your password.

Reset your Instagram password

If you couldn’t reactivate your account by logging in, you can try a second option: Reset your password.
Actually, if you don’t remember what your passcode was, this is also how you can recover it or change it for the future.
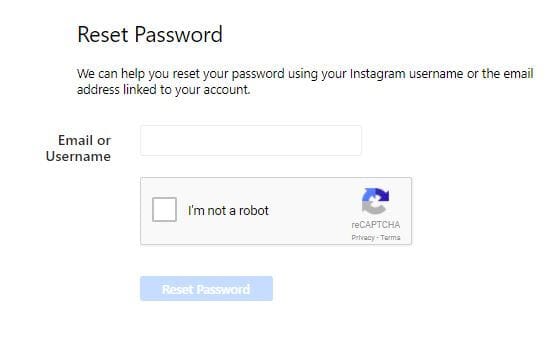
  1. Click on the link “forgot password?” below the log in button.
  2. Enter your username or the email address used to create your Instagram account. If you entered the info correctly, you will receive an email with the steps to reset your passcode.
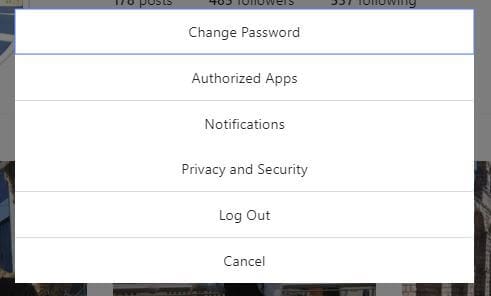
If you are already logged into your account and you want to change your password, you must access settings from your user profile. Tap on the three dots located on the top right corner of the screen. You will immediately find the option “Change Password”.

Instagram’s Terms of use

If you can’t recover your passcode, you didn’t deactivate your account and you don’t know why, you should review Instagram’s terms of use to determine if your account has been terminated. Depending on the gravity of the violation, you may or may not be able to reactivate your account.

Avoid violating Instagram’s community guidelines

You can avoid getting your account deactivated by publishing videos or photos that are aligned with the community guidelines established by this platform. These are some of them:
Post photos and videos that belong to you, that is, content that you can claim as yours.
Any photo or video that you upload must be appropriate for all ages. Don’t share sexual or violent content or nude images. Besides, avoid content that could encourage self-injury.
Be respectful with other members
Don’t send spam: Repetitive comments are not allowed, neither is manipulating the service for commercial purposes, discount codes or web pages.

Avoid violating Instagram’s terms of use

If you don’t follow the rules below, Instagram can terminate your account without previous notice:
  • You must be at least 13 years old
  • You must not sell or transfer your account to someone else
  • You must not ask for information to access other accounts
  • You may not post violent, discriminatory or sexual content
  • You must not send spam to other users
  • Don’t create accounts by non-authorized means like bots or automated devices
  • You must not restrict another user from using Instagram
  • You must not transfer any virus or code of destructive nature
  • You must not access Instagram’s private API
  • Never use Instagram for illegal purposes
  • You are responsible for any action that happens through your account
  • NEVER share your password with anyone, including tools: some apps help you programming your content but some might ask you for your passcode, this is not safe. You can click on this article about how to program on Instagram automatically if you want to know the pros and cons.
Back-up copy
Instagram lets you save all the files shared on its platform on your device So, all the photos and videos uploaded on Instagram will also be saved on your cell phone.

What happens if after following these steps you don’t recover your account?

If you couldn’t get access after following all these steps, the best you can do is to contact Instagram directly to know what’s going on. You can get in touch with them through the following:
  • Enter Instagram’s Help Center from the Internet: You can report broken features here, find instructions or report accounts that violate Instagram’s rules.
  • From your account you can tap on the option “something’s not working”. If you can’t log into your account, click on “I can’t log in” to find the instructions to restore your account.
  • Access to the Privacy and Safety Center and click on the option “Report Something” and you will be able to report the problem with other users or your own account.
  • Open Instagram Facebook page. You can go to www.facebook.com/instagramEnglish. This is the best way to send a direct message, since there is no support email.
To make sure you get a response from Instagram, there are a few things that you should consider when you write the message:
  • Try not to sound upset: there are more probabilities that you will receive an answer if you send a clear and impartial message.
  • Be specific: Don’t say simply “I can’t log in”. Try to be clear and state the problem and the measures you took to try to solve the problem.
  • Add a screen shot with the problem: This will help the support team to understand the problem
  • Make sure you include your username (but don’t add your password)
  • Don’t wait for an answer.
Read More
  • Share This:  
  •  Facebook
  •  Twitter
  •  Google+
  •  Stumble
  •  Digg

How To Change Name Before 60 Days on Facebook

 No comments   

Facebook is best place to interact with friends by chatting or using other activities. Facebook is also best way to spend extra time online. We can easily know what is in the trend and going viral. Basically we use Facebook to share status, images and our memories. But to use Facebook we need to add some personal information which is required by Facebook to make user experience better. We add personal details like bio, status, date of birth and use our name on the profile. So that, it will easy for someone to find us on Facebook.

Read also:
  • How to disable your fb account
  • How to undisable my facebook account
  • iPhone facebook apk

Every Facebook user has an intention that we want ours friends to give their comments, likes on our status and photos. In the same way we use different types of names to our make profiles unique and attractive. As we already posted trick about single name on Facebook Which is working great from a long time. But the problem which we face on Facebook is, We are not able to changes name on Facebook after 60 days limit. Facebook also provides official form to Change Profile Name After crossing limit. But the new issue on Facebook is that we are not even able to change name on Facebook before 60 days limit once we do it.

How To Change Name On Facebook Before 60 Days Limit.

  • First of all, go to ‘Account settings’ and click on ‘Edit name’ and confirm that Limit is currently present or not.
  • If the limit will be present Name will not be clickable and there should be a note about name change limit Which looks like.
You can’t change your name right now because you’ve already changed it within the last 60 days. Learn more.
  • After checking out limit if you want to continue to change name th
  • Click on the Continue Button. This link is actually for securing and recovering account from hacking. So we will use it to recover our account and it will let us to change name in further steps.
Facebook account recovery to name change
  • Change your Account password and but you don’t need to change any other information like email, mobile no etc.
  • After continuing they will show that you have recently changed your account name.
  • Then all the previously used names will displayed and select any of the listed name available there.
facbook change name before days limit
Note:- By Using this method you can change name infinite time whenever you want but the limitation is that we cannot use a new name. So if you want to use new name then you can check.

We hope you enjoy this trick about change name on facebook before 60 days and don’t forget to share this with others also. For any query or suggestions, write to us in comments below. 
Read More
  • Share This:  
  •  Facebook
  •  Twitter
  •  Google+
  •  Stumble
  •  Digg

Facebook download in iphone

 No comments   

This teaches you how to download the Facebook application onto your iPhone..

Steps

  1. Open your iPhone's
    Image titled Iphoneappstoreicon.png
    App Store. Tap the App Store icon, which is a light-blue app with a stylized, white "A" on its front.

  2. Image titled Download the Facebook Application for the iPhone Step 2
    2
    Tap Search. It's the magnifying glass icon in the bottom-right corner of the screen.

  3. Image titled Download the Facebook Application for the iPhone Step 3
    3
    Tap the search bar. It's at the top of the screen; you'll see the phrase "App Store" in this bar.

  4. Image titled Download the Facebook Application for the iPhone Step 4
    4
    Type facebook into the search bar. This is the app's official name in the App Store.

  5. Image titled Download the Facebook Application for the iPhone Step 5
    5
    Tap Search. It's a blue button in the bottom-right corner of your iPhone's keyboard. Doing so will search the App Store for the Facebook app, which should be the top item on the results page.

  6. Image titled Download the Facebook Application for the iPhone Step 6
    6
    Tap GET. This button is to the right of the Facebook app icon, which resembles a white "f" on a dark-blue background. A pop-up menu will appear.
    • If you've downloaded Facebook before and then deleted it, you'll see a download
      Image titled Iphoneappstoredownloadbutton.png
      icon instead of GET.
    • If you see OPEN instead of GET, Facebook is already installed on your iPhone.

  7. Image titled Download the Facebook Application for the iPhone Step 7
    7
    Enter your Apple ID password or Touch ID. If your iPhone has Touch ID enabled for the App Store, you'll be prompted to scan your fingerprint; otherwise, you'll have to input your Apple ID password. The Facebook app will begin downloading onto your iPhone.
    • This process can take a few minutes if you're using cellular data or a slow Internet connection.
    • You may not be prompted to enter your Apple ID or Touch ID if you've downloaded Facebook before.

  8. Image titled Download the Facebook Application for the iPhone Step 8
    8
    Wait for the download to complete. Once Facebook is done downloading, the progress circle on the right side of the screen will be replaced with an OPEN button.
    • You can open Facebook by tapping OPEN here, or you can tap the Facebook app icon on your iPhone's Home Screen.
Read More
  • Share This:  
  •  Facebook
  •  Twitter
  •  Google+
  •  Stumble
  •  Digg

Limit Of Following On Instagram

 No comments   

We love Instagram and all that it does for our businesses. But you might not be aware of some (or any) of the limits Instagram actually imposes on its site. For a variety of reasons, Instagram caps numerous functions on their site. And to make sure you don’t get stuck unexpectedly, I’ve put together a list of all the limits on Instagram.


Following

Yes, there is a limit on the number of people you can follow on Instagram. According to Instagram, in order to “reduce spam”, they limit the number of people you can follow to 7500.
Not that many of us will follow that many people, but keep this in mind if you’re an active follower on Instagram. If you’re approaching that limit, it might be time to go through and determine if there are people worth unfollowing. There may be delinquent accounts or irrelevant accounts that you could stop following.
You can check IconoSquare (formerly Statigram) and other sites to determine who you follow who doesn’t follow you back. These might be good people to unfollow and allow yourself to follow more new people.
Instagram will also limit how many people you can follow within a period of time. If you follow too many people within an hour, or even a day, you will receive a message telling you the limit has been reached. As far as I’ve been able to confirm, Instagram only allows you to follow/unfollow 160 people per hour.
 According to multiple people, but with no official word from Instagram, there is now a new limit restricting users to follow and unfollow no more than 20 people per hour.
There is no limit on how many people can follow you.

Likes

There is a limit on the number of likes you can perform on Instagram. This limit is 350 likes per hour. Chances are, unless you’re using an automated tool or are highly active on Instagram, you won’t hit this limit.
But if you are this active, it is recommended that you keep the likes to less than 300 per hour to avoid getting locked up.
Updated 12/6/14 If you want to go back and look at the “likes” you’ve given, you can see your last 300 likes in Instagram.

Hashtags

Personally, I’m glad this one exists! ðŸ˜‰ Yes, there is a hashtag limit on Instagram. You cannot post more than 30 hashtags per post. In my opinion, if you’re using this many, you’re using too many!

Characters

There are some limits to the number of characters you can use throughout Instagram. I’ve been trying to confirm a limit on usernames but haven’t been able to verify this information. However, I believe that an Instagram username cannot exceed 30 characters.
Your Instagram bio cannot exceed 150 characters.
There is no limit to the number of characters you can use in your captions/comments on Instagram. This doesn’t mean you should be writing a novel under your images (people aren’t here to read a thesis) but you do have freedom to write what you need to say.
Updated 6/16/2014: I have heard reports that some people are experiencing limits to their post caption length. I have not seen any info from Instagram regarding this limit. However, a reader named Rob (see his comments below) did some dutiful research for all of us and found that the caption limits and comment limits are now set at 2200 characters. I can confirm that I ran the same type of test and that, yes, the limit for captions on the photo and subsequent comments caps at 2200 characters.
Updated 6/16/2014: As of recently, Instagram has also started cutting off comments (only those following the original caption) in the feed with a […] symbol. This just keeps the feeds shorter, but if you open the comments, you can read the full comments there. As far as I can tell, the comments get cut off give or take around 240 characters (they don’t cut off mid-word). But original captions are still displayed in their entirety.

Posts

There is no limit to the number of posts you can share. There is no photo limit on Instagram – whether per day or total.
If you want to delete posts, you can only delete them one at a time. And while I can’t confirm a limit on the number of posts you can delete at a time, you may receive an error message if you try to delete too many posts. For some people this happens after 5-10 deletions. If you receive this message, wait and come back later to resume deleting more images.
Your Instagram feed shows the last 200 posts of those you follow. Anything past this limit will not be viewable from your feed.

If you do reach any of these limits on Instagram, you will receive an error message that will look something like “Rate Limit Exceeded Instagram Error.” If you receive this error, determine which limit you’re violating and either wait for the time restriction to pass or take the steps to lower your activity.
As I mentioned above, most of you using Instagram for business or personal use won’t reach most of these limits. Please make sure you are avoiding the use of automation tools (bots) to quickly follow and unfollow users or to hyper-actively like other posts. This is not the way to use Instagram. You should be interacting authentically and generating real relationships with your audience. If you’re doing this right, limits on Instagram shouldn’t be a big concern for you.
Read More
  • Share This:  
  •  Facebook
  •  Twitter
  •  Google+
  •  Stumble
  •  Digg

Facebook disabled my account - How to get it back

 No comments   

If your account was disabled by Facebook, however, you'll need to submit an appeal to get your account back; depending on the circumstances of the disabling, they may or may not grant your request. You cannot recover an account that has been deleted..

 1
Recovering a Self-Disabled Account

  1. Image titled Recover a Disabled Facebook Account Step 1
    1
    Make sure you can still recover the account. If you temporarily deactivated your account, you can recover it whenever you like. If you nominated your account for deletion, however, you have 14 days from the time you nominate it to change your mind and log back in.
    • If your account has been nominated for deletion for more than 14 days, it's gone, and you can't recover it. Try creating a new Facebook account.
  2. Image titled Recover a Disabled Facebook Account Step 2
    2
    Open the Facebook website. Go to https://www.facebook.com/. This will open the Facebook home page.
  3. Image titled Recover a Disabled Facebook Account Step 3
    3
    Enter your email address or phone number. Do so in the "Email or Phone" text box in the upper-right side of the page.
  4. Image titled Recover a Disabled Facebook Account Step 4
    4
    Enter your Facebook password. Type the password you use to log into Facebook into the "Password" text box to the right of where you typed in your email address (or phone number).
  5. 5
    Click Log In. It's in the upper-right side of the page. Doing so will take you to your account if it's still accessible.
  6. Image titled Recover a Disabled Facebook Account Step 6
    6
    Click Cancel Deletion if prompted. If your account was nominated for deletion, click the Cancel Deletion button to proceed to your Facebook account. You can now resume using your Facebook account the way you did before disabling it.

 2
Submitting an Appeal

  1. Image titled Recover a Disabled Facebook Account Step 7
    1
    Make sure your Facebook has been disabled. Go to the Facebook website at https://www.facebook.com/, enter your email address and password, and click Log In. If you see a message that says "Account disabled", your account is being blocked by Facebook, which means you can send in an appeal.
    • If you're able to access your account normally, your account isn't disabled.
  2. Image titled Recover a Disabled Facebook Account Step 8
    2
    Open the "My Facebook account has been disabled" page. Go to https://www.facebook.com/help/www/103873106370583/. Do this on a computer.
  3. Image titled Recover a Disabled Facebook Account Step 9
    3
    Click submit an appeal. This link is just right of the "If you think your account was disabled by mistake, please" text that's near the bottom of the section. The appeal form will open.
    • If this form opens a page that tells you to log out, close your browser and then re-open it. You may also need to clear your browser's cookies before you can continue.
  4. Image titled Recover a Disabled Facebook Account Step 10
    4
    Enter your email address or phone number. Type the email address or phone number that you use to log into Facebook into the "Login email address or mobile phone number" field near the top of the page.
    • This needs to be an email address or phone number to which you currently have access.
  5. Image titled Recover a Disabled Facebook Account Step 11
    5
    Enter your name. Type the name you use on your Facebook account into the "Your full name" field.
    • This may be different than your legal name.
  6. Image titled Recover a Disabled Facebook Account Step 12
    6
    Upload a picture of your ID. This can be a driver's license, a learner's permit, or a passport. To do so:
    • Take a picture of your ID's front and back and move it to your computer.
    • Click Choose Files
    • Select the pictures to upload.
    • Click Open
  7. Image titled Recover a Disabled Facebook Account Step 13
    7
    Add details for your appeal. In the "Additional info" field near the bottom of the page, enter any extra information that you think Facebook should know. Some things to include are:
    • If your legal name is different than your Facebook name.
    • If you suspect that your account was hacked by someone.
    • If you have visual evidence that someone other than you is responsible for abusive or abrasive actions on your Facebook account.
    • If you have been harassed by someone whom you suspect is behind your account's behavior that led to it being disabled.
  8. Image titled Recover a Disabled Facebook Account Step 14
    8
    Click Send. It's in the bottom-right side of the form. Your appeal will be sent to Facebook. If they decide to revoke the deactivation, they will send you a message letting you know that your account is now available to access.
Read More
  • Share This:  
  •  Facebook
  •  Twitter
  •  Google+
  •  Stumble
  •  Digg

Reopen My Facebook Account

 No comments   


Some users decide to close or deactivate their Facebook accounts when they get tired of the social networking site. Facebook automatically stores the data for closed and deactivated accounts so that users can reopen them again easily if they have a change of heart. If you previously closed or deactivated your Facebook account but now want to reopen it, you can easily reactivate the account by logging in with your old username and password.

...

Get back in touch with your friends by reopening a closed Facebook account.

Step

Launch your Web browser, and navigate to Facebook.com.

Step

Type your username into the relevant input field on the Facebook login page. The username is the email address that you used when you first registered the account.
Read More
  • Share This:  
  •  Facebook
  •  Twitter
  •  Google+
  •  Stumble
  •  Digg

Download full version facebook iphone

 No comments   

This teaches you how to download the Facebook application onto your iPhone...

Steps


  1. Image titled Download the Facebook Application for the iPhone Step 1
    1
    Open your iPhone's
    Image titled Iphoneappstoreicon.png
    App Store. Tap the App Store icon, which is a light-blue app with a stylized, white "A" on its front.

  2. Image titled Download the Facebook Application for the iPhone Step 2
    2
    Tap Search. It's the magnifying glass icon in the bottom-right corner of the screen.

  3. Image titled Download the Facebook Application for the iPhone Step 3
    3
    Tap the search bar. It's at the top of the screen; you'll see the phrase "App Store" in this bar.

  4. Image titled Download the Facebook Application for the iPhone Step 4
    4
    Type facebook into the search bar. This is the app's official name in the App Store.

  5. Image titled Download the Facebook Application for the iPhone Step 5
    5
    Tap Search. It's a blue button in the bottom-right corner of your iPhone's keyboard. Doing so will search the App Store for the Facebook app, which should be the top item on the results page.

  6. Image titled Download the Facebook Application for the iPhone Step 6
    6
    Tap GET. This button is to the right of the Facebook app icon, which resembles a white "f" on a dark-blue background. A pop-up menu will appear.
    • If you've downloaded Facebook before and then deleted it, you'll see a download
      Image titled Iphoneappstoredownloadbutton.png
      icon instead of GET.
    • If you see OPEN instead of GET, Facebook is already installed on your iPhone.

  7. Image titled Download the Facebook Application for the iPhone Step 7
    7
    Enter your Apple ID password or Touch ID. If your iPhone has Touch ID enabled for the App Store, you'll be prompted to scan your fingerprint; otherwise, you'll have to input your Apple ID password. The Facebook app will begin downloading onto your iPhone.
    • This process can take a few minutes if you're using cellular data or a slow Internet connection.
    • You may not be prompted to enter your Apple ID or Touch ID if you've downloaded Facebook before.

  8. Image titled Download the Facebook Application for the iPhone Step 8
    8
    Wait for the download to complete. Once Facebook is done downloading, the progress circle on the right side of the screen will be replaced with an OPEN button.
    • You can open Facebook by tapping OPEN here, or you can tap the Facebook app icon on your iPhone's Home Screen.
Read More
  • Share This:  
  •  Facebook
  •  Twitter
  •  Google+
  •  Stumble
  •  Digg

How To Search Photos On Facebook

 No comments   


Facebook website through a magnifying glassSource
A Facebook picture search can be as simple as accessing the site's search bar. The site's search bar recognizes natural language, making it easy to find photos on Facebook, depending on your relationship with users and their privacy settings. There are also a few methods to look for pictures without being logged in to Facebook.

Finding Pictures on Facebook

Every day, Facebook users upload 300 million photos to the social media site. Despite this volume, searching with a few well thought-out phrases will yield valid results. Facebook's search bar combs through all the social platform's content. It differs from Google, which searches and indexes the web, in two important ways: (1) it searches only Facebook and (2) it respects privacy settings.
Related Articles
  • What Does It Mean to Poke Someone on Facebook?
  • How to Use Timehop
  • Best Free People Finder
Privacy settings on the user's Facebook account determine what images appear in search results. Photos with a public setting will always appear in the results. Photos with a privacy setting of 'Friends' will appear if you are friends with the person. Images with a privacy setting of 'Friend of a Friend' appear if the person posting the original photo is a friend of one of your friends. However, if a person is tagged in a photo - and the photo has a public setting - it will appear in the results, regardless of their connection to you.
To search for pictures on Facebook, sign into your account and use the search bar at the top, typing in key phrases based on what you are looking for. The best phrases to use vary based on your reasons for searching.

Looking for Pictures of Yourself in Others' Albums

Even though this feels like it should be easy, this is actually one of the trickier ones to find. This is because the settings on the album and photos are controlled by the person doing the posting.
  • Type 'Photos I am tagged in,' 'Photos of me,' or 'Tagged photos of me'.
  • You can also try 'Photos of me in friends albums,' or 'albums I am tagged.'

Searching for a Specific Photo

For this type of search, it is best to fall back on either the subject, event and/or person in the photograph.
  • Start by typing 'Photos of.' To find a photo of a friend or family member, this is the easiest method, even if they have a common surname like Smith, because the search tool will default to your list of friends. This method will also reveal any photos the user may have hidden from their timeline. As Business Insider points out, hiding a photo from a timeline does not mean other users cannot see it. The only method that keeps an image truly hidden is to remove tags connecting an image with a user or to adjust the privacy setting.
  • If you want to view photos of your aunt Sally, type in 'Photos of Sally [Surname].' If you are friends with Sally, this will return all the photos she shared with her friends. If you are not friends, the search will still return images she has shared with the public and, depending on her privacy settings, images tagged by or shared with a family member or mutual friend.
  • If you, or the person posting the original image liked the image, you can filter the search using that as a variable. If it was your aunt Sally, type 'Photos Liked by Sally [Surname],' or the name of the event, 'Photos of Sally Surname's Family Reunion.' If you liked the photo, type 'Photos liked by me.'
  • When you know the location and/or year the photo was taken, try 'Photos recently taken in [Place]' or 'Photos taken in [Place] in [Year]'.
  • If the photo is of you and another person, type 'Photos of me and [Person].' Add the year to the phrase or 'recently' to narrow down your results to the newest pictures.

Searching for Photos of Friends and Family

This may be the easiest Facebook picture search to conduct.
  • Since you probably know the person's username, use 'Photos by [Username]' to conduct a quick search. This will return photos posted by a person and, in the second grouping of results, photos they are tagged in.
  • Type 'Photos uploaded by my friends' to get a list of images your friends have uploaded. Click on an image in the search results to see which friend posted it.
  • Narrow down your results by changing 'my friends' to a particular person's Facebook name.
  • Search 'Photos liked by my friends' to return a list of images your friends have liked. However, it may not reveal which friend liked the image if a lot of people liked it, but it will show who originally posted the photo.

Checking up on Your Children

Use similar techniques to check up on photos shared or commented on by your friends.
  • The quickest way to do this is simply search using the phrase 'Photos by [Username],' but a more revealing search may be 'Photos commented on by [Username].' This will return the list of all images a person commented on and it will show the comment.
  • Since you are most likely friends on Facebook with your child, you can also search for 'Photos commented on by my friends.' This will broaden the search and may reveal comments your child's friends have made, if that is information you want to monitor.

Looking for Images Without a Facebook Account

You can attempt to find images on Facebook without logging in to the site, but it is not easy.
Facebook Directory screenshot
Facebook Directory
Source
  • Go to Facebook.com/directory (without logging in to the site) and use the tabs to narrow what you see by people, places or pages, then click the character names (letters and numbers) to target your results. You will only get results for people who have public search listings on Facebook. You will get a massive quantity of results, so trying to find a particular target this way can be very time-consuming and tedious.
Tip: It's free to open a Facebook account, so you can always set up a profile and log in to avoid having to use this method.

Off-Platform Facebook Picture Searches

Although the social media platform strives to keep images viewable only from within their site, there are a few possible ways to see Facebook photos without going to the site. In a practical sense, no one can view all Facebook images from outside the platform, but some photos can be seen through a general internet search or a reverse image search.

Checking for Stolen Images

If you think someone has posted images you own on Facebook without your permission, start by using a reverse image search. These search engines basically determine when and where the image has appeared online. Some popular ones include: Google Image Search, Tineye, or RevImg.
  • Either copy the image location (by right-clicking on the photo) or download the image to your machine. Input image location or upload photo to the search engine.
  • Submit to view search engine results. If the image has been used elsewhere, it will be noted by the search engine.
Tip: If you are concerned that your images are being stolen or reused, alter them before placing them online. You can do this by uploading very small image files or placing a watermark on your images. This does take some time, so you may only want to do it with images you definitely want protected.

Viewing Facebook Photos Without an Account

  • Do a Google string search by visiting Google and typing in 'Site: Facebook.com [Person's name]. This will return a list of profile images on Facebook for the inputted name.
  • Use Google's Social Search engine and set the search default to Facebook.
Note: A key limitation of these methods is the ability to fine-tune your results, especially if someone has a common surname.

Multiple Ways to Search


There are numerous options to search for pictures on Facebook, though, of course, user privacy settings definitely impact results. It's easiest to find images associated with people you are friends with on the site, though one or more of these techniques may help you find images associated with other individuals. Choose the search method(s) most appropriate for your particular situation.
Read More
  • Share This:  
  •  Facebook
  •  Twitter
  •  Google+
  •  Stumble
  •  Digg

Facebook customer service telephone number

 No comments   

Unfortunately, there is no way to directly contact Facebook–you can't call, text, email, or otherwise speak to an employee or affiliate of Facebook. You can, however, use Facebook's Help Center to diagnose and report a problem with your account...

 1
Using Facebook Resources


  1. Image titled Contact Facebook Step 1
    1
    Open the Facebook Help Center webpage. If you aren't already logged into Facebook, you'll need click the Log In button in the top right corner of the page to enter your Facebook email address and password.

  2. Image titled Contact Facebook Step 2
    2
    Review the options toolbar. This is at the top of the screen, directly beneath the search bar--you'll need to drag your mouse cursor over each option to view its subsections. Your options include the following:
    • Using Facebook - This section of the Help Center covers basic Facebook functionality, including how-tos on friending, messaging, and account creation.
    • Managing Your Account - Covers items such as your login and your profile settings.
    • Privacy and Safety - Addresses account security, unfriending people, and hacked/fake accounts.
    • Policies and Reporting - Covers basic reporting (abuse, spam, etc.) as well as handling a deceased person's Facebook account and reporting hacked or fake accounts.
    • You can also check out the "Questions You May Have" and "Popular Topics" sections on this page, since they cover common issues and complaints.

  3. Image titled Contact Facebook Step 3
    3
    Select a relevant section. For example, if you're having a problem with an impostor account, you'd select the "Privacy and Safety" section and then click Hacked and Fake Accounts.

  4. 4
    Review additional options. In keeping with the impostor account example, you might click the "How do I report an account that’s pretending to be me?" link. Doing so will bring up a series of steps that explain how to remedy your situation.
    • For example, Facebook recommends dealing with an impostor account by going to the account's profile page, clicking ..., and clicking Report, then following the on-screen instructions.

  5. 5
    Use the search bar to expedite your process. To do this, simply click on the search bar at the top of the Help Center page--it will say something like "Hi (Your Name), how can we help?"--and type in a few words related to your complaint. You should see several suggestions pop up in a drop-down menu below the search bar.
    • For example, you might type in "impostor account", then click on the "How do I report an account for impersonation?" result.
    • The search bar here only links to Facebook's pre-written articles--if you're looking for an answer to a specific issue not covered in the Help Center, skip ahead to the Community page.

  6. 6
    Open the Ads Help Center page. If your business or page is having issues with ads, your questions are usually addressed in this section.
    • To delve into advertising, you'll want to click Creating Ads or Managing Ads.
    • For problems with advertising, you'll need to click Troubleshooting Your Ads and then select an issue on the subsequent menu.

  7. 7
    Visit the Facebook Community page. If you can't find your current problem listed anywhere in the Help Center, your best bet is to look for it in the community forums here.
    • You'll see a search bar at the top of this page--you can look up topics (e.g., disabled accounts) from here.

 2
Submitting a Complaint via the Better Business Bureau


  1. 1
    Open Facebook's Better Business Bureau page.

  2. Image titled Contact Facebook Step 9
    2
    Scroll down and click Submit a Complaint. This is on the lower right side of the webpage next to the Submit a Review button.

  3. Image titled Contact Facebook Step 10
    3
    Click Click Here to File a Complaint. This is underneath the "I am looking to resolve a dispute with a business" heading on the left side of the page.

  4. Image titled Contact Facebook Step 11
    4
    Fill out the Qualification Questions form. Here, you'll need to click the "Yes" or "No" checkbox for each of the following questions:
    • Is this an employee/employer complaint?
    • Is this a discrimination or civil rights complaint?
    • Does your complaint allege a criminal act?
    • Is this a business with a complaint for collections purposes with another business?
    • Is this complaint in litigation?
    • Is this complaint based solely on dissatisfaction with a price?
    • Is this complaint about a purchase you wish you never made?
    • Are solely seeking an apology from the business?
    • Are you filing this complaint for BBB information only?

  5. Image titled Contact Facebook Step 12
    5
    Click Proceed to Complaint Form. You can also click Clear & Start Over to begin filling out the form again.

  6. Image titled Contact Facebook Step 13
    6
    Click Proceed. If you want to change the language of the following forms, you must first click the "Select Language" bar in the top left corner of the screen and then click your preferred language.

  7. Image titled Contact Facebook Step 14
    7
    Fill out the complaint form. This will differ from person to person based on one's personal information and the nature of one's complaint, but be sure to be as thorough as possible when filling out this form. You should include all of the following:
    • The problem you're encountering
    • The steps you took to resolve the problem
    • The issues you ran into while attempting to resolve the problem
    • Any potential solutions and/or suggestions you can think of

  8. Image titled Contact Facebook Step 15
    8
    Scroll down and click Submit Complaint.

  9. Image titled Contact Facebook Step 16
    9
    Wait for an email to arrive. Facebook operates on West Coast time, so expect your email to arrive accordingly within three to five business days.

 3
Submitting an Appeal for a Disabled Account


  1. Image titled Contact Facebook Step 17
    1
    Open the Disabled Facebook Account page. If your account hasn't been disabled (or isn't currently disabled), you won't be able to submit an appeal.

  2. Image titled Contact Facebook Step 18
    2
    Click the "submit an appeal" link. This is toward the bottom of the page's paragraph next to the "If you think your account was disabled by mistake" line.

  3. Image titled Contact Facebook Step 19
    3
    Type in your Facebook email address. You can also use a phone number here.

  4. Image titled Contact Facebook Step 20
    4
    Type in your full name. Make sure the name listed here directly matches the name on your account.

  5. Image titled Contact Facebook Step 21
    5
    Click Choose Files. You'll also need to upload a picture of an ID--be it a driver's license, a permit, or a passport photo.
    • If you don't have a picture of your ID available, take one now and send it to yourself via email so you can download it to your desktop.

  6. Image titled Contact Facebook Step 22
    6
    Click on a file location. For example, you might click Desktop here.

  7. Image titled Contact Facebook Step 23
    7
    Click your ID picture. This will upload it to the Facebook form.

  8. Image titled Contact Facebook Step 24
    8
    Type details into the "Additional Info" box. This is the space in which you can justify the reactivation of your account. Consider including details like the following:
    • Why your account shouldn't have been deactivated
    • Why you want your account to be reactivated
    • Any other extenuating factors that might help your account be reactivated (for example, malicious interference with your account)

  9. Image titled Contact Facebook Step 25
    9
    Click Send. Doing so will send your form to Facebook for review. Please note that you may not receive a response for several days.
    • If you don't receive a response within a week, try resubmitting your form.

 4
Recovering Your Password


  1. Image titled Contact Facebook Step 26
    1
    Open the Facebook website.

  2. Image titled Contact Facebook Step 27
    2
    Click "Forgot Account?". This option is beneath the "Password" field in the top right corner of your screen.

  3. Image titled Contact Facebook Step 28
    3
    Type in your name, email address, or phone number. Make sure you can access whichever platform you choose to go with.

  4. Image titled Contact Facebook Step 29
    4
    Hit Enter.

  5. Image titled Contact Facebook Step 30
    5
    Click Continue.

  6. Image titled Contact Facebook Step 31
    6
    Check your chosen medium of communication for a code. For example, if you listed your phone number, you should get a text with a code.
    • If you choose email, check your Spam folder.

  7. Image titled Contact Facebook Step 32
    7
    Type your code into the "Enter Code" field.

  8. Image titled Contact Facebook Step 33
    8
    Click Continue.

  9. Image titled Contact Facebook Step 34
    9
    Click Continue again. You can also choose to log out of your account on all devices if you think your account has been maliciously appropriated.

  10. Image titled Contact Facebook Step 35
    10
    Type in a new password.
  11. 11
    Click Continue. Your password has successfully been reset across all Facebook platforms (e.g., mobile and desktop alike).
Read More
  • Share This:  
  •  Facebook
  •  Twitter
  •  Google+
  •  Stumble
  •  Digg
Newer Posts Older Posts Home

Blog Archive

  • ►  2019 (502)
    • ►  July (5)
      • ►  Jul 08 (2)
      • ►  Jul 07 (2)
      • ►  Jul 06 (1)
    • ►  February (368)
      • ►  Feb 12 (33)
      • ►  Feb 11 (21)
      • ►  Feb 09 (37)
      • ►  Feb 08 (40)
      • ►  Feb 07 (45)
      • ►  Feb 06 (40)
      • ►  Feb 05 (23)
      • ►  Feb 04 (49)
      • ►  Feb 02 (25)
      • ►  Feb 01 (55)
    • ►  January (129)
      • ►  Jan 31 (78)
      • ►  Jan 30 (20)
      • ►  Jan 29 (11)
      • ►  Jan 20 (4)
      • ►  Jan 19 (3)
      • ►  Jan 18 (4)
      • ►  Jan 17 (5)
      • ►  Jan 16 (1)
      • ►  Jan 12 (1)
      • ►  Jan 11 (1)
      • ►  Jan 10 (1)
  • ▼  2018 (2465)
    • ►  November (64)
      • ►  Nov 25 (4)
      • ►  Nov 24 (4)
      • ►  Nov 23 (7)
      • ►  Nov 22 (9)
      • ►  Nov 21 (11)
      • ►  Nov 19 (14)
      • ►  Nov 15 (7)
      • ►  Nov 03 (6)
      • ►  Nov 01 (2)
    • ▼  October (178)
      • ►  Oct 31 (9)
      • ►  Oct 30 (1)
      • ►  Oct 26 (1)
      • ▼  Oct 24 (16)
        • How To Reactivate Your Account on Instagram
        • How To Change Name Before 60 Days on Facebook
        • Facebook download in iphone
        • Limit Of Following On Instagram
        • Facebook disabled my account - How to get it back
        • Reopen My Facebook Account
        • Download full version facebook iphone
        • How To Search Photos On Facebook
        • Facebook customer service telephone number
        • Delete Twitter Account On Iphone
        • How Can I Suggest A Friend On Facebook
        • How to find someone's facebook phone number
        • How to disable your fb account
        • How to know facebook mobile number of someone
        • iPhone facebook apk
        • How to undisable my facebook account
      • ►  Oct 23 (21)
      • ►  Oct 22 (26)
      • ►  Oct 19 (5)
      • ►  Oct 16 (50)
      • ►  Oct 15 (36)
      • ►  Oct 14 (12)
      • ►  Oct 13 (1)
    • ►  September (771)
      • ►  Sep 27 (58)
      • ►  Sep 26 (50)
      • ►  Sep 25 (70)
      • ►  Sep 24 (70)
      • ►  Sep 20 (50)
      • ►  Sep 19 (80)
      • ►  Sep 18 (50)
      • ►  Sep 17 (43)
      • ►  Sep 14 (81)
      • ►  Sep 13 (39)
      • ►  Sep 12 (101)
      • ►  Sep 11 (69)
      • ►  Sep 10 (9)
      • ►  Sep 09 (1)
    • ►  June (215)
      • ►  Jun 07 (13)
      • ►  Jun 06 (5)
      • ►  Jun 05 (48)
      • ►  Jun 04 (49)
      • ►  Jun 03 (50)
      • ►  Jun 02 (50)
    • ►  May (1205)
      • ►  May 30 (50)
      • ►  May 29 (50)
      • ►  May 28 (43)
      • ►  May 26 (50)
      • ►  May 25 (50)
      • ►  May 24 (50)
      • ►  May 23 (50)
      • ►  May 21 (50)
      • ►  May 20 (100)
      • ►  May 18 (92)
      • ►  May 17 (98)
      • ►  May 16 (93)
      • ►  May 15 (25)
      • ►  May 14 (25)
      • ►  May 13 (90)
      • ►  May 12 (25)
      • ►  May 11 (50)
      • ►  May 09 (25)
      • ►  May 08 (25)
      • ►  May 07 (32)
      • ►  May 06 (21)
      • ►  May 05 (18)
      • ►  May 04 (25)
      • ►  May 03 (18)
      • ►  May 02 (25)
      • ►  May 01 (25)
    • ►  April (26)
      • ►  Apr 12 (25)
      • ►  Apr 10 (1)
    • ►  March (6)
      • ►  Mar 26 (6)

Search

Copyright © Make Over Arena