• Make Over Arena

Selling Things On Facebook - Sell Items On Facebook Group

Selling Things On Facebook – Facebook is fast becoming one of the most powerful online marketing platforms for promoting businesses, cond...

How To Find Out Who Is Stalking Your Facebook Page

 No comments   


Have suspicions that someone is watching you? Think you are being monitored while on social media? Think your Facebook page might be under observation? You can often find out but it isn’t easy. Here is how you may be able to tell if someone is stalking your Facebook page.


We have all done it. Checked out an ex-partner, looked at a future partner’s page or visited a Facebook page of someone we just met. Employers do it, recruiters do it and anyone who runs an organization does it. In fact, I would imagine everyone does it.
A cursory check to see what you’re like as a person, who you hang out with or what you like to do in your free time is fine. If you’re the average Facebook user, your entire life is on there. What better way to see what you are like as a person or what you get up to when you’re not at school or work? Checking someone out is fine, stalking them is not.

Stalking

The popular term for checking out other people’s Facebook page to see what they are up to is Facebook stalking. However, technically it isn’t stalking. The definition of stalking is:
“The act or crime of willfully and repeatedly following or harassing another person in circumstances that would cause a reasonable person to fear injury or death especially because of express or implied threats; broadly : a crime of engaging in a course of conduct directed at a person that serves no legitimate purpose and seriously alarms, annoys, or intimidates that person”. Merriam-Webster.

Stalking is only stalking if the person you are checking out knows you’re doing it and feels threatened by it. Facebook stalking is technically neither of these.

Facebook stalking

We have all seen the headlines of someone who was stalked on Facebook. If they were lucky, a little harassment was all they suffered. If they weren’t so lucky, things got more serious. Fortunately, the vast majority of Facebook stalking is harmless and performed out of pure curiosity.
So can you tell if someone is stalking your Facebook page? Not really. Within the pages of terms on Facebook, you will see “Facebook doesn’t let you track who views your profile or your posts.” For once, it seems this promise from Facebook is true. The company may track everything you do but it doesn’t make that data available to others.

If you use LinkedIn, you will likely know that the network tells you how many visitors your page has had and who viewed your profile. Facebook doesn’t do that. There is only one definite way to tell if someone is lurking on your Facebook page and it isn’t an exact science. You need to bait them with a Facebook Story.
Last year Facebook introduced Stories like Snapchat and Instagram. You have to use the mobile app to create your montage, publish it and you can then track how many people view it. You can also see who. Like those other networks, Facebook Stories only last for 24 hours.
The downside of this is that if your stalker knows how Facebook Stories work, they will avoid viewing them. If they aren’t so savvy, you might catch them out.

Signs of Facebook stalking


Looking for signs of Facebook stalking is an inexact science but sometimes you can see patterns of behavior that give you pause. While not definitive evidence, they may arouse suspicions which you can act on as you see fit.

Someone who appears out of the blue and likes old posts

Sometimes someone sees an old post and likes what they read. Fair enough. Sometimes, a lurker has to scroll through your page to find something that gives them an in and has to use it.

Someone who likes your posts that appear on other pages

If the same person continually likes posts that appear on other people’s walls, this could be a sign of a lurker. If they aren’t a friend and don’t comment directly on your wall it is a good sign that they are either odd or lurking.

Friend requests out of the blue

I get friend requests out of the blue all the time because my name is out there on the internet. If you see one from someone you don’t know, don’t automatically friend them in case they are the lurker. They may not be of course, but they just might be.

Being tagged more often than usual

Constantly being tagged in games, apps or images is nothing new but if the person tagging you does it all the time, that’s different. Whether they are stalking your Facebook page or not, it’s time to unfriend or politely ask them to stop.
Those are the only ways I know of to spot stalker-ish patterns of behavior on Facebook. Do you know of any better ways to do it? Tell us about them below if you do!
Read More
  • Share This:  
  •  Facebook
  •  Twitter
  •  Google+
  •  Stumble
  •  Digg

How To Change Iphone 6 Language Settings

 No comments   

You can change the language setting on your iPhone, iPad, or iPod touch if it's incorrect or if you've accidentally changed the language to one you don't understand.

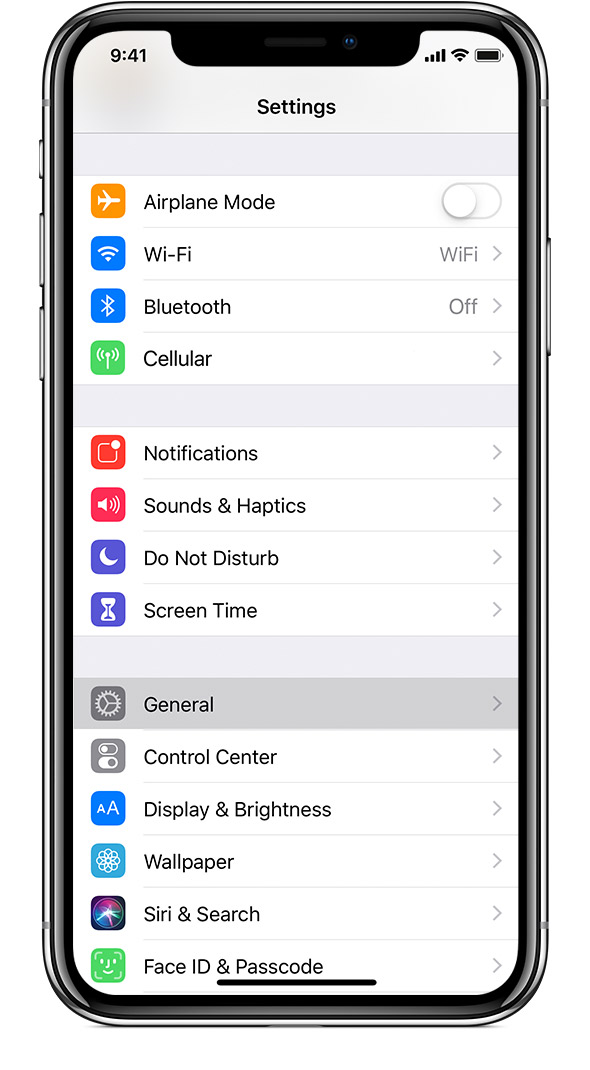
Open Settings

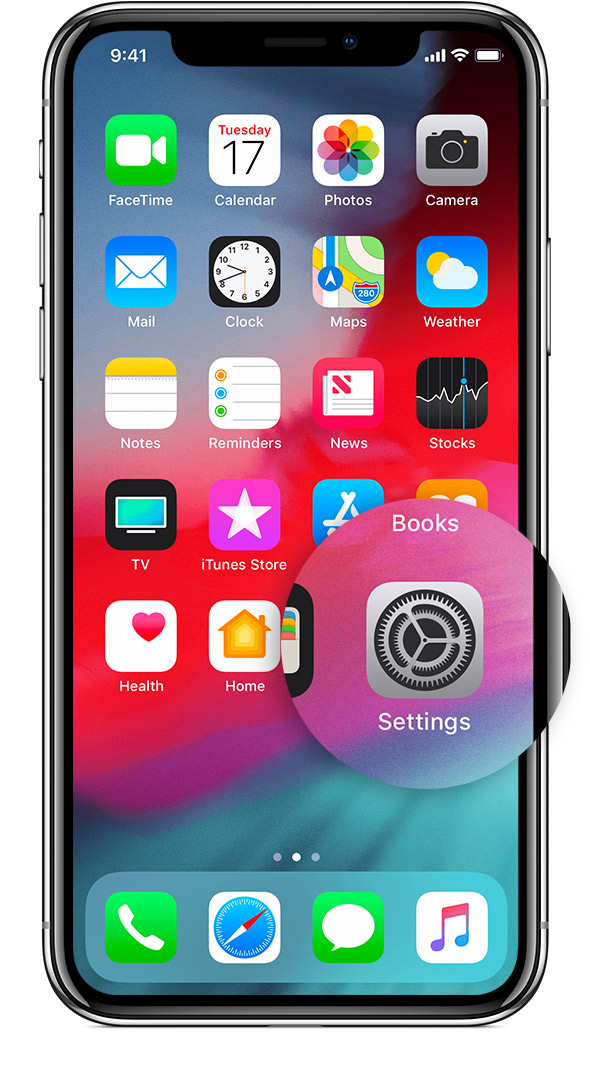
On the Home screen, tap Settings.


Tap General

On the next screen, tap General.


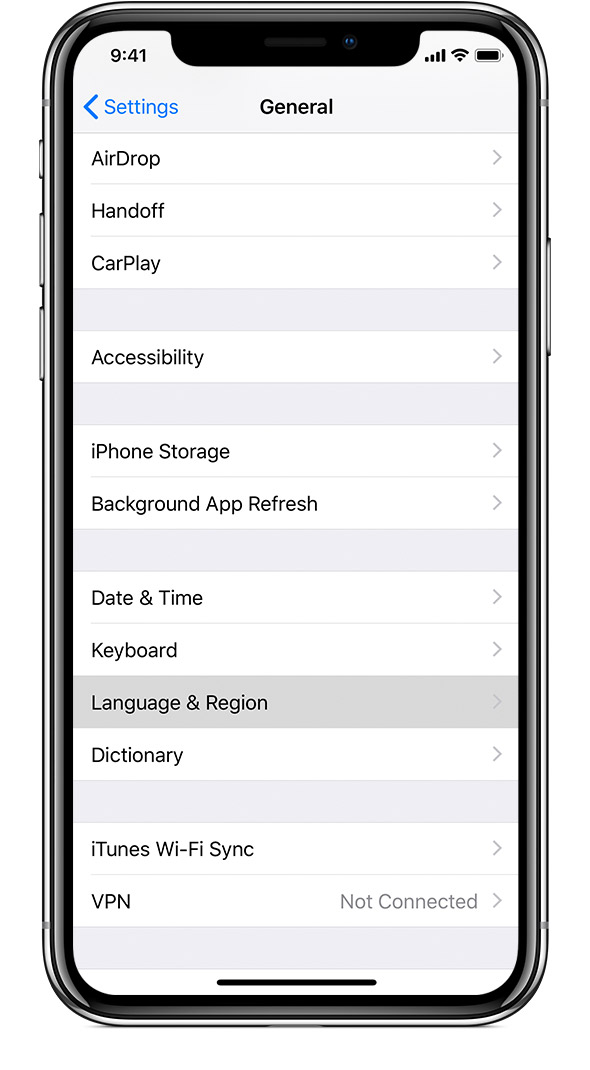
Select Language & Region

Scroll down and tap Language & Region.


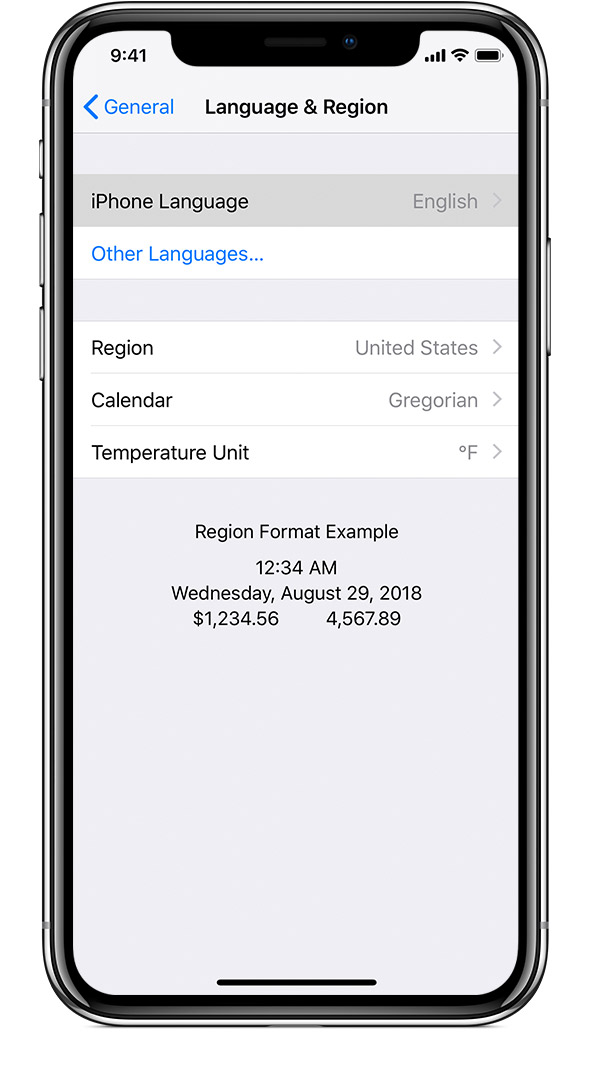
Tap Device language

On the next screen, tap "[Device] Language".


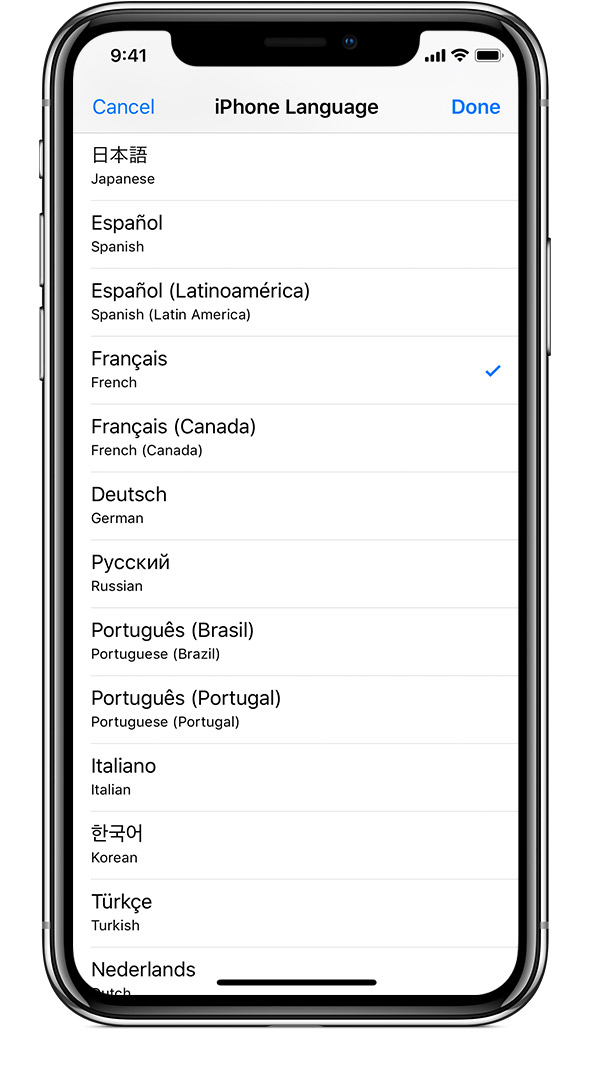
Select your language

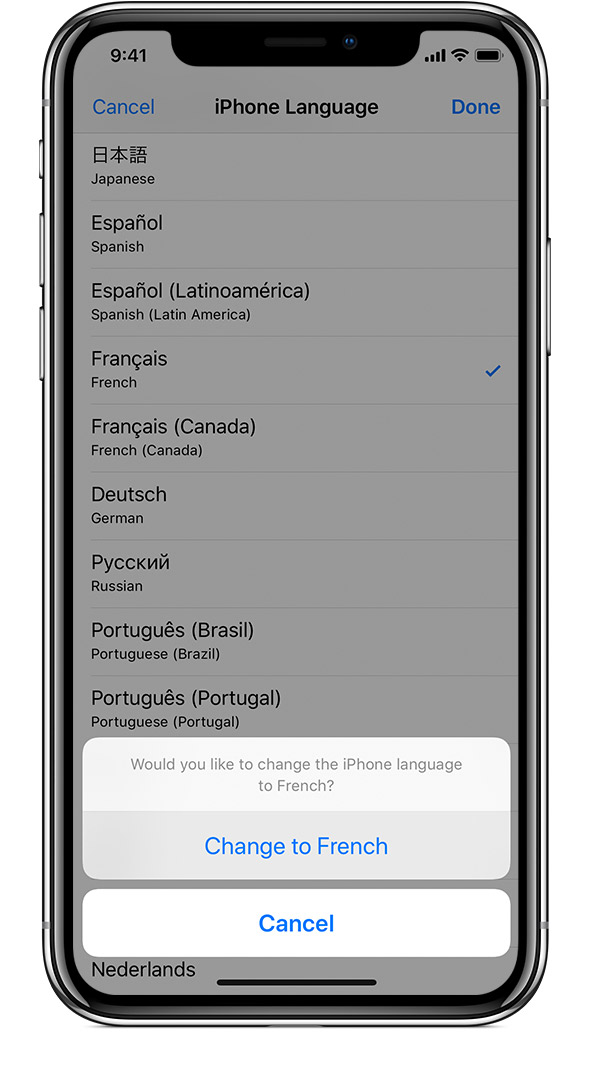
Pick your language from the list. Then tap Done.

Confirm your selection

An alert will ask you to confirm the new language. Tap the first option.

After your device updates the language, it should return to the Home screen and display the language you selected.
Read More
  • Share This:  
  •  Facebook
  •  Twitter
  •  Google+
  •  Stumble
  •  Digg

Who See My Facebook Profile Most

 No comments   

Following the Cambridge Analytica scandal and the resulting privacy concerns, Facebook has finally decided to let users see who viewed their profile.
Facebook is in full crisis management mode. Users are fleeing the platform following the revelations that personal data was shared in bulk with third-parties. Many think that the Cambridge Analytica scandal was only the tip of the iceberg and are asking for stronger privacy controls on Facebook.

One of the features that always tops conversations among users is the ability to know who has visited their profiles. LinkedIn has always had it – although you need to be a premium member to really access the full list of who has viewed your profile – but Facebook was always against sharing this information with users.

It seems however that the recent events have weakened the company’s position.
Yes, you can now see who has viewed your Facebook profile. The new feature lets you see who visited your profile in the past 30 days, past day as well as who has viewed your most recent posts.
wersm-facebook-who-viewed-my-profile-friends
The feature is buried deep in your privacy settings and is only available on the iOS app for now. To access the list of who has viewed your profile, open the main drop-down menu (the 3 lines) and scroll all the way down to “Privacy Shortcuts.”  There, just below the new “Privacy Checkup” feature, you will find the new “Who viewed my profile?” option.

It is not clear if this is a test and/or if this will be rolled out to all users in the coming days. We have reached out to Facebook for clarifications and will update this post as soon as we hear back from them.
Read More
  • Share This:  
  •  Facebook
  •  Twitter
  •  Google+
  •  Stumble
  •  Digg

How Do I Log Someone Off My Facebook

 No comments   


How To Log Yourself Out Of Facebook On Other Devices And Improve Your Security [Weekly Facebook Tips] facebook icon

For many Facebook users, it’s good to occasionally brush up on your security knowledge and see if there’s a better way you could be doing things. Despite Facebook’s tendency to expose your information as publicly as possible, they do take your login security seriously – and you should too. Do you know how to log out of Facebook remotely? Have you authenticated certain devices with Facebook so that you can be notified if someone tries to log in on another device?
These are things you can easily set up and which will help you to maintain control over your Facebook security. If you haven’t yet done so, take five minutes to read this guide and improve your security on Facebook now.

Accessing Your Facebook Security Section

All of the security tools are easily located within the Facebook Security section. Go to the arrow on the top right of Facebook, choose “Account Settings” and then “Security”.
How To Log Yourself Out Of Facebook On Other Devices And Improve Your Security [Weekly Facebook Tips] Facebook Account Settings

Remotely Log Out Of Facebook

In the Facebook Security section, you’ll see a section called “Active Sessions”. Clicking on that will show you all the places you are currently logged into Facebook. You should see your current session, followed by any other devices which are logged in as you. This could include your mobile, tablet or work computer.
For instance, if you’re at home and you can see you’re still logged in at work, you can click on “End Activity” to ensure none of your co-workers do anything silly or sly with your account. Other useful scenarios could involve leaving yourself logged in at a friend’s house or on a public computer.

How To Log Yourself Out Of Facebook On Other Devices And Improve Your Security [Weekly Facebook Tips] Facebook Active Devices
The same goes for any device you don’t recognise, as it could be someone accessing your account. Just click “End Activity” and it will log you out from that device. If you accidentally log out your own phone or tablet it’s no big deal to log in again from the device when you’re ready to use it again.

Set Your Recognised Devices

Facebook allows you to register your usual computers and devices so that it knows that it’s quite likely to be you logged in from that machine. It also allows you to approve or get notified if anyone logs in using any other device. To set up your recognised devices, you need to activate “Login Approvals” and add your devices. After a few devices are added, you can disable it if you prefer. See the next section for details.
How To Log Yourself Out Of Facebook On Other Devices And Improve Your Security [Weekly Facebook Tips] Facebook Recognized Devices

Approve Logins From Unknown devices

To set up approvals for unknown device Logins, you will first need to ensure you have registered a mobile phone with Facebook. Then go to the “Login Approvals” section in the Facebook Security, check the box and save. A code will be sent to your phone for verification.
How To Log Yourself Out Of Facebook On Other Devices And Improve Your Security [Weekly Facebook Tips] Facebook Login Approval
If your current computer isn’t registered yet Facebook will ask you to give it a name. Facebook will also give you the option to install a code generator on your smart phone to approve logins that way. It’s not required that you do this – it’s just another option you can use.
It’s a good idea to open a browser on your smart phone or tablet straight away and get those smaller devices registered.

Get Notifications About Logins From Unknown Devices

It’s possible for you to get a notification whenever someone logs into your account from an unknown device. This is a little less secure than the option requiring approval. In Facebook security, go to “Login Notifications” and check the box for email or text notifications as you wish to set this up. Note, you’ll need to give Facebook your phone number and authenticate it if you want text notifications. This is under Account Settings > Mobile.
How To Log Yourself Out Of Facebook On Other Devices And Improve Your Security [Weekly Facebook Tips] Facebook Login Notifications

What To Do If Someone Is Accessing Your Facebook Account

If you use these methods and see that someone is using your Facebook account, you can quickly view the active sessions and “End Activity” for anything suspicious. Then, immediately change your password for Facebook.
Read More
  • Share This:  
  •  Facebook
  •  Twitter
  •  Google+
  •  Stumble
  •  Digg

How To Close Facebook Account Temporarily

 No comments   


Facebook has two ways to disable your account. One is reversible and the other is permanent.
You can deactivate an account and then later reactivate it. While it’s deactivated, people can’t see your timeline or search for you, though some information, such as messages you sent, may still be visible.
If you delete your account, it’s gone forever and can not be reactivated. Facebook says that they “delay deletion a few days after it’s requested” and that a deletion request is canceled if you log back into your account during that period. They further say that it can take up to 90 days to delete data stored in backup systems.
To deactivate an account (with option to reactivate later)
  1. Click on the down arrow at top left of any page
  2. Select Settings
  3. Click in the general tab in left column
  4. Select Manage Account
  5. Scroll down to Deactivate your account
  6. Click Decativate your account
  7. You are then required to enter your password
To permanently close your account
You need to click here to notify Facebook of your intention to close your account and then select Delete My Account
Read More
  • Share This:  
  •  Facebook
  •  Twitter
  •  Google+
  •  Stumble
  •  Digg

App For Who Views Your Facebook

 No comments   


There are plenty of browser extensions, apps, and websites that claim to be able to tell you which of your Facebook Friends have recently visited your profile, and how much time they spent there. Unfortunately, none of these extensions or apps do what they claim.

These Browser Extensions Can’t Do What They Claim

You will not get what you want by installing one of these extensions. At best, they just don’t work, and at worst, they’re malware, stealing your information, mining Bitcoins using your browser, or otherwise doing something nefarious.


Sure, it may look legit, and it even has over 3,000 reviews and a decent average rating! But if you read the actual reviews, you’ll see an awful lot like this:


It’s a natural instinct to wonder who’s been visiting your Facebook Profile (has that cute Canadian boy you work with checked through your photos!?) but you should absolutely never install anything, or provide any personal details or login credentials, to any service that claims to do it. There is no reliable way for them to get that data from Facebook unless they were also able to spy on all those other users.

What If I’ve Already Installed An Extension or App?

If you’ve already installed a browser extension of Facebook app that claims to let you see who’s viewed your Profile, get rid of it now. If you need help, check out our guides on uninstalling extensions from any browser and removing third-party Facebook apps. They will walk you through the full process.

You should also change your Facebook password and take other steps to secure your account like adding login notifications. We’ve got a full guide on securing your Facebook account to take you through it.

The InitialChatFriendsList Method Is Also Fake

There are many websites out there that claim to show you how to see who’s visited your Facebook Profile, and most encourage you to install insecure browser extensions. A few, however, also suggest another method that you can do yourself in any browser. They tell you to view the page source of Facebook and then search for “InitialChatFriendsList”. Apparently the strings of numbers that follow it are the user IDs for the people who’ve recently visited your Profile.
Once again, however, that’s not the case. While the numbers are indeed user IDs, they’re not the people who’ve checked out your Profile. The clue is in the name: “InitialChatFriendsList”. The user IDs correspond with the people who appear in the Chat sidebar on the right hand side of Facebook.
These are the people who you’ve interacted with most recently or most often. While there’s a chance they have checked out your Profile in the last while, it’s just as likely you’ve had a conversation in Messenger or they’ve commented on one of your posts. A random person visiting your Facebook page for the first time certainly won’t show up in this list.
Read More
  • Share This:  
  •  Facebook
  •  Twitter
  •  Google+
  •  Stumble
  •  Digg

How To Permanently Delete Facebook Profile

 No comments   


Are you living life or are you just talking about it? One of the biggest problems with Facebook is the more time we spend updating our profile and following other people’s lives, the less time we actually spend living.
Of course, there are other concerns with Facebook, and there has been considerable controversy surrounding the company’s willingness to sell information to potential advertisers. Recently, a leaked document suggested that Facebook was offering advertisers the opportunity to sell to teenagers at times when their posts indicated they needed a bit of a confidence boost. In other words, indicating a proclivity to exploit young people at times when they were emotionally vulnerable. These accusations, alongside recent fines for breaking data collection laws in Europe, make the social media behemoth look a little less like a Facebook friend and more like his evil twin.
So, if you want to liberate yourself from the clutches of Facebook, how can you achieve this freedom?
Inevitably, it’s not as easy as it would initially seem. Just as your computer holds data, background information, and paths to documents, social media holds onto a network of information that lurks in the background and remains in cyberspace – gone, but not forgotten.
With Facebook constantly updating their privacy policies, you can’t simply hit delete and expect to disappear from the face of social media. Deactivating your account is straightforward, but this doesn’t mean it has been deleted. If you return at a later date wishing to reactivate your account, you’ll discover that all your information is still there, waiting to be restored. If you actually delete your account, there is no way to access it again in the future and the content will be irretrievable.
Here’s a step-by-step guide to how to perform the ultimate Facebook disappearing act:

1. Delete linked apps

One of Facebook’s useful functions is the ability to use our Facebook account to login to other applications, such as Instagram, Pinterest or Spotify. We often fail to consider that this function means we are giving out information every time we use it, letting others access and store our personal information. The first step to Facebook freedom is to remove those apps that are linked to your Facebook account.
  1. First, click on the arrow in the top right-hand corner of your Facebook page. Then select “Settings” and click on “Apps” situated in the column on the left-hand side of the page.
  2. Click on the edit button under the heading “Apps, websites and plug-ins”
  3. Once you have disabled the platform, you can begin deleting the apps that are linked to your account.
Facebook - disable platform
Facebook - remove apps

2. Remove activity history

Now you need to clear up your virtual footprints that leave a path of your recent activity. From the downward arrow menu, select “Activity Log” and then use the edit button to delete or unlike each action listed in your log.
Facebook - clear activity log

3. Backup data

If you want to keep hold of the information linked to your account, such as photos you have posted and the names of the friends you had within that account, you will want to download a backup of your account data.
  1. Once again, go to your settings menu.
  2. In “General Account Settings”, select the option that allows you to download a copy of all your data.
  3. You will then receive an email with a link to your download archive. The archive will be saved into your Downloads folder on your computer. This is a zip file which, when opened, reveals all your photos, as well as several html files listing your friends, advertisers and almost everything else that probably inspired you to exit Facebook in the first place.
Faceboook - download data 1 
Facebook - download data 2

4. Deactivate account

This next step is probably the most bewildering! Facebook wants to send you on a wild goose chase, making the option to deactivate your account easy to find and desperately pointing you in this direction. Why? Because deactivation is not deletion. Deactivation means you can just log in again and carry on as if nothing happened. So, if you’re not completely certain you want to depart from the world of Facebook forever, just deactivate your account and then, if you change your mind, you can always login again and carry on where you left off. While deactivated, your friends will not be able to post to your account or send messages.
  1. Once again, go to your settings menu.
  2. Select “General” at the top of the left-hand menu.
  3. Then click on “Manage your account” and scroll down to where it gives you the option to deactivate.
Facebook - deactivate account 1
Facebook - deactivate account

5. Delete account

Despite many efforts, finding the link to delete your account is virtually impossible. The only way I discovered it was by clicking on the help menu and then searching for “delete account”. In the answer, there is a link called “let us know”. Click on this link and it will redirect you to a page which will – finally – allow you to permanently delete your account.
Now all you must do is click on “delete my account”, enter your password and submit captcha and you are finally free… well, nearly!
Facebook - delete account 1
Facebook - delete account
Surely you didn’t think Facebook would let you go that easily, did you? Even though you have managed to unearth the hidden link that will allow complete deletion of your account, Facebook will hold onto the information and postpone the deletion for 14 days, in the hopes that you will change your mind and hurry back into the Facebook fold. If you should access Facebook or any affiliated site during these two weeks, the deletion request will be automatically removed and you’ll once again be a Facebook follower.
So, find your footprint, get rid of it and swap your virtual stories and Facebook friends for real life and physical friends who can actually give you a hug, rather than sending a half-hearted emoticon or a thumbs up!
Read More
  • Share This:  
  •  Facebook
  •  Twitter
  •  Google+
  •  Stumble
  •  Digg

How To Change Mobile Language

 No comments   

This teaches you how to change the default language on your Android phone or tablet, as well as how to change your Android keyboard's input language.

 1
Changing the Display Language


  1. Image titled Change the Language in Android Step 1
    1
    Open your Android's Settings. Swipe down from the top of the screen, then tap the gear-shaped "Settings" icon
    Image titled Android7settings.png
    that's in the top-right corner of the drop-down menu.
    • You may need to use two fingers to swipe down.

  2. Image titled Change the Language in Android Step 2
    2
    Scroll down and tap System. This option is near the bottom of the Settings page. If you're attempting to change the language on a phone that's currently in a language you don't speak, look for the "ⓘ" icon near the bottom of the page; the text to the right of it is the System option.
    • On a Samsung Galaxy, you'll scroll down and tap General management, which is next to three grey, horizontal lines with circles on them.

  3. Image titled Change the Language in Android Step 3
    3
    Tap Language & input. It's near the top of the System page, to the right of a globe-shaped icon.
    • On a Samsung Galaxy, you'll tap Language and input, which is the top result on the page.

  4. Image titled Change the Language in Android Step 4
    4
    Tap Languages. This is the top option on the page.
    • On a Samsung Galaxy, you'll tap Language at the top of the page.

  5. 5
    Tap Add a language. It's below the bottom language listed on this page, to the right of a large + icon.
    • On a Samsung Galaxy, you'll tap Add language next to the +icon.

  6. 6
    Select a language. Scroll down until you find the language you want to switch to, then tap it. Doing so will open the language's page if more than one dialect is available.
    • Your language will be written in its own language to make this step easier.

  7. Image titled Change the Language in Android Step 7
    7
    Select a region if prompted. Tap the region that pertains to the dialect of the selected language you want to use.

  8. Image titled Change the Language in Android Step 8
    8
    Tap Set as default when prompted. This option is in the bottom-right corner of the prompt for most languages, though if your Android's current language reads from right to left you'll find it in the lower-left corner of the prompt.
    • On a Samsung Galaxy, you'll tap SET AS DEFAULT.

  9. Image titled Change the Language in Android Step 9
    9
    Move the language to the top of the list if necessary. If the option you tapped in the last step didn't reset your Android's language to your selected one, you'll need to move it to the top of the language list by tapping and dragging the icon on the far-right side of the language to the top of the list.

 2
Changing the Input Language


  1. Image titled Change the Language in Android Step 10
    1
    Open your Android's Settings. Swipe down from the top of the screen, then tap the gear-shaped "Settings" icon
    Image titled Android7settings.png
    that's in the top-right corner of the drop-down menu.
    • You may need to use two fingers to swipe down.

  2. Image titled Change the Language in Android Step 11
    2
    Scroll down and tap System. This option is near the bottom of the Settings page.
    • On a Samsung Galaxy, you'll scroll down and tap General management instead.

  3. Image titled Change the Language in Android Step 12
    3
    Tap Language & input. It's near the top of the page.
    • On a Samsung Galaxy, you'll tap Language and input instead.

  4. Image titled Change the Language in Android Step 13
    4
    Tap Virtual keyboard. This option is in the middle of the screen.
    • On a Samsung Galaxy, you'll tap On-screen keyboards here instead.

  5. Image titled Change the Language in Android Step 14
    5
    Select a keyboard. Tap the keyboard for which you want to change the language.
    • This should be your default keyboard. If you don't change the language for your default keyboard, you won't find the language in the keyboard's menu when you go to type.

  6. Image titled Change the Language in Android Step 15
    6
    Open the keyboard's language settings. This will vary depending on your keyboard, so look for a Languages or Change input language option.
    • For example, if you selected the Samsung keyboard on a Samsung Galaxy, you would tap MANAGE INPUT LANGUAGEShere.

  7. Image titled Change the Language in Android Step 16
    7
    Enable the language you want to use. Tap the grey switch or checkbox next to the language you want to add to your keyboard, then disable any languages you don't want to use by unchecking them or tapping the colored switches next to them.
    • You may have to download the language you want to use by tapping Download or
      Image titled Android7download.png
      to the right of the language before you can apply it.

  8. Image titled Change the Language in Android Step 17
    8
    Use your keyboard's new language. Now that your keyboard has the language you selected applied to it, you can switch between languages by doing the following:
    • Open an app that lets you type.
    • Tap the app's text field to bring up your on-screen keyboard.
    • Long-press the "Languages"
      Image titled Android7language.png
      icon in your Android's keyboard.
    • Tap the language you want to use in the resulting pop-up menu.
Read More
  • Share This:  
  •  Facebook
  •  Twitter
  •  Google+
  •  Stumble
  •  Digg
Newer Posts Older Posts Home

Blog Archive

  • ►  2019 (502)
    • ►  July (5)
      • ►  Jul 08 (2)
      • ►  Jul 07 (2)
      • ►  Jul 06 (1)
    • ►  February (368)
      • ►  Feb 12 (33)
      • ►  Feb 11 (21)
      • ►  Feb 09 (37)
      • ►  Feb 08 (40)
      • ►  Feb 07 (45)
      • ►  Feb 06 (40)
      • ►  Feb 05 (23)
      • ►  Feb 04 (49)
      • ►  Feb 02 (25)
      • ►  Feb 01 (55)
    • ►  January (129)
      • ►  Jan 31 (78)
      • ►  Jan 30 (20)
      • ►  Jan 29 (11)
      • ►  Jan 20 (4)
      • ►  Jan 19 (3)
      • ►  Jan 18 (4)
      • ►  Jan 17 (5)
      • ►  Jan 16 (1)
      • ►  Jan 12 (1)
      • ►  Jan 11 (1)
      • ►  Jan 10 (1)
  • ▼  2018 (2465)
    • ►  November (64)
      • ►  Nov 25 (4)
      • ►  Nov 24 (4)
      • ►  Nov 23 (7)
      • ►  Nov 22 (9)
      • ►  Nov 21 (11)
      • ►  Nov 19 (14)
      • ►  Nov 15 (7)
      • ►  Nov 03 (6)
      • ►  Nov 01 (2)
    • ▼  October (178)
      • ▼  Oct 31 (9)
        • How To Find Out Who Is Stalking Your Facebook Page
        • How To Change Iphone 6 Language Settings
        • Who See My Facebook Profile Most
        • How Do I Log Someone Off My Facebook
        • How To Close Facebook Account Temporarily
        • App For Who Views Your Facebook
        • How To Permanently Delete Facebook Profile
        • How To Change Mobile Language
        • How To Log Out From Messenger
      • ►  Oct 30 (1)
      • ►  Oct 26 (1)
      • ►  Oct 24 (16)
      • ►  Oct 23 (21)
      • ►  Oct 22 (26)
      • ►  Oct 19 (5)
      • ►  Oct 16 (50)
      • ►  Oct 15 (36)
      • ►  Oct 14 (12)
      • ►  Oct 13 (1)
    • ►  September (771)
      • ►  Sep 27 (58)
      • ►  Sep 26 (50)
      • ►  Sep 25 (70)
      • ►  Sep 24 (70)
      • ►  Sep 20 (50)
      • ►  Sep 19 (80)
      • ►  Sep 18 (50)
      • ►  Sep 17 (43)
      • ►  Sep 14 (81)
      • ►  Sep 13 (39)
      • ►  Sep 12 (101)
      • ►  Sep 11 (69)
      • ►  Sep 10 (9)
      • ►  Sep 09 (1)
    • ►  June (215)
      • ►  Jun 07 (13)
      • ►  Jun 06 (5)
      • ►  Jun 05 (48)
      • ►  Jun 04 (49)
      • ►  Jun 03 (50)
      • ►  Jun 02 (50)
    • ►  May (1205)
      • ►  May 30 (50)
      • ►  May 29 (50)
      • ►  May 28 (43)
      • ►  May 26 (50)
      • ►  May 25 (50)
      • ►  May 24 (50)
      • ►  May 23 (50)
      • ►  May 21 (50)
      • ►  May 20 (100)
      • ►  May 18 (92)
      • ►  May 17 (98)
      • ►  May 16 (93)
      • ►  May 15 (25)
      • ►  May 14 (25)
      • ►  May 13 (90)
      • ►  May 12 (25)
      • ►  May 11 (50)
      • ►  May 09 (25)
      • ►  May 08 (25)
      • ►  May 07 (32)
      • ►  May 06 (21)
      • ►  May 05 (18)
      • ►  May 04 (25)
      • ►  May 03 (18)
      • ►  May 02 (25)
      • ►  May 01 (25)
    • ►  April (26)
      • ►  Apr 12 (25)
      • ►  Apr 10 (1)
    • ►  March (6)
      • ►  Mar 26 (6)

Search

Copyright © Make Over Arena