• Make Over Arena

Selling Things On Facebook - Sell Items On Facebook Group

Selling Things On Facebook – Facebook is fast becoming one of the most powerful online marketing platforms for promoting businesses, cond...

Creating A Instagram (update)

 No comments   


Creating A Instagram (update)

You can sign up Instagram account right into 2 means. Very first means using your phone number as well as 2nd means utilizing your e-mail address. It is your wish whether you utilize your contact number or e-mail address. Any sort of email address you can type there. That's not a problem that needs to be Yahoo, Gmail or Microsoft Account. Okay, allow's start Creating A Instagram for|represent|make up]@ the very first time?


Creating A Instagram
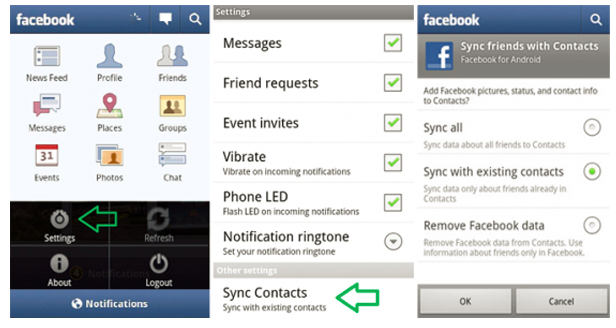
Step # 1. In order to sign up an Instagram account, you need to download it from the stores which I have actually informed you right above. Instagram is offered for iOS, Android and also Windows Phone. First download it on your device then we will certainly show you the way of producing account. Now click on Instagram app after that you will certainly be requested for Signup or Login. Here we are going to reveal you the best ways to sign up Instagram make up the first time so we choose to sign up.


Step # 2. First-way signup with contact number. If you have contact number click on signup with email or telephone number. Find your nation then kind your cell, click Next.


Step # 3. You will certainly get a six-digit code by message. Type the code on the area that is required and currently you have to click Next. If you did not get the code simply press on Resend code. Instagram once again will certainly send you a verification code.


Step # 4. Select a name for your Instagram or Press skip to avoid this process.


Action # 5. Create Username for your instagram after that click on Nextswitch.


Action # 6. Kind the password of Instagram. Attempt to make use of complicated password. It must be more than 8 personalities, top instance letter, lower situation letter as well as icons like (! @ #$% ^ & *).


Currently select profile Picture. You have 3 choices to deal with. Very first import from Facebook. Those pictures which you have actually shared on facebook, you can import from those image straight right into Instagram. Select take photo directly it use from your phone camera or choose from library, it will put from your gallery. Whatever you want just do it. If you do not want to pick profile photo merely click Skip switch and also top right-hand man side.


Currently just press Skip button quit this action. If you connect to facebook those point that you post on Instagram you directly it will certainly upload on your facebook web page as well. It will certainly be connected to your facebook however they will certainly not post anything without your approval.


The Best Ways To create Instagram Account utilizing Email Address?


As I discussed a little bit previously that you can create Instagram right into two methods, via contact number and also through e-mail address. This time I wan na tell you the second means, via email address.

Action # 1. So Currently press on Instagram application after that click on Sign up.


Action # 2. Kind your Email Address. It's extremely simple and straightforward means as opposed to the very first way. You are going to compose your email after that hit Next button.


The various other actions coincide first way that I have actually told you. Okay, It was all about the best ways to create Instagram on android tools. I really hope that you have actually got something.
Read More
  • Share This:  
  •  Facebook
  •  Twitter
  •  Google+
  •  Stumble
  •  Digg

How Do I Sync Facebook Contacts to My iPhone

 No comments   


How Do I Sync Facebook Contacts to My iPhone

How Do I Sync Facebook Contacts To My Iphone? contacts are of fantastic relevance because the mobile phone is constantly your interaction center. In addition to everybody around you is making use of Facebook, Facebook contacts look to be essential to you. Right here comes the concern, how you can make Facebook contact sync? In this write-up, we will inform you the very best method to sync Facebook contacts on iPhone and also Android phone.


How Do I Sync Facebook Contacts To My Iphone

How you can sync Facebook contacts to apple iphone


If you are an iPhone customer and intend to sync Facebook contacts to iPhone, you need to pay even more attention to this component. You could find out a straightforward way to make iPhone contact sync. Additionally, you can find 3 fantastic apps to assist you sync contacts from Facebook.


Sync Facebook contacts using Settings


You can utilize apple iphone Setup app to sync Facebook contacts with apple iphone. After log in to your Facebook account, you could obtain conveniently access to and synchronize Facebook contacts as well as Schedules. Maintain reviewing the following actions.

Action 1: Open your apple iphone and also open Settings app. Scroll to find Facebook tab.


Step 2: Input your Facebook User Name as well as Password. Faucet "Sign in".


Action 3: Slide Calendars and Contacts to ON.


Step 4: Tap Update All contacts to sync Facebook contacts to apple iphone.


The best ways to sync Facebook contacts with Android phone

Intend to sync Facebook contacts with Samsung Galaxy S7/S5, LG G5 or other Android phones? This part will show you how you can sync Facebook contacts to Android phone.

Sync Facebook contacts with Facebook application on Android.


Action 1: Release Facebook application on your Andorid phone.


Action 2: Click Menu > Settings > Sync Contacts.

Action 3: Pick Sync all contacts or Sync with existing contacts.

Tip 4: Click OK switch to earn the Facebook contact sync.

In this write-up, we primarily speak about the best ways to sync Facebook contacts. Whether you are using iPhone or Android phone, you can find the appropriate way or app in order to help you sync Facebook contacts to phone. Hope you can handily make the Facebook contact sync after reading this article.
Read More
  • Share This:  
  •  Facebook
  •  Twitter
  •  Google+
  •  Stumble
  •  Digg

Followers On Instagram Cheat Update

 No comments   


Followers On Instagram Cheat Update

Followers On Instagram Cheat: Instagram is a brand-new social sharing network; it is based upon photo sharing system. You could add more followers to you and your instagram account by using a most current method is cheat absolutely cost-free as well as without buying any instagram robots or followers. Certainly, this is the very best way for you to include more instagram followers. This is really easy approach to make use of there's no have to purchase followers. Through by doing this all requirement of your instagram account is fulfilled as well as you can take pleasure in limitless instagram followers.


Followers On Instagram Cheat
Getting more followers on instagram cheat is a tool, which assist you in gaining more sort as well as favorable comments as well. You also could increase your online reliability, ensured works well either on phones, tablets or computers as well. All followers are actual human and also you can get the followers within couple of hrs so you should need to try it.


This totally free instagram followers cheat can include any type of number of followers per day. This instagram fan's bot needs a great web link for working with no trouble. This robot was prepared to get fast followers on instagram without investing lots of hours by adhering to other instagram customers and expecting them to follow you back. So this is an end to all those agonizing hands-on things and also you obtain more instagram followers in gratuity. So you could utilize it effectively to run any kind of social campaigns as these followers were actual instagram followers.

Instagram is the leading social picture sharing connect with numerous site visitors every day. Having a huge quantity of followers in the site will assist you to get private fame, advertise a brand or acquire far better service income in your area. Many people look the web each day to know how to break out Instagram followers. If you are among them, you have lastly concerned the appropriate location. We have a device which hack the followers that were established by a team of experts. You could quickly increase your appeal and also acquire even more likes and also followers for your images in this manner.


The clients given by the Instagram followers hack are rather genuine as well as are genuine people who would certainly be viewing your blog posts on a regular basis. If you are troubled by various other tools online that assured you yet provided nothing, we realize your situation. Yet, don't worry. Connect with our website as well as the functioning hacking device with it. The program has completely secure to use, has no infection as well as ideally supplies exactly what you need without way too much waiting time. The advantage of having actual followers supplied by us is that when your pictures excel looking, you are bound to reach more audience when your followers share them and also subsequently your client base will gradually boost. You will certainly receive regular updates to earn certain it works with our tool.


Our website has a huge target market and also with our Instagram followers hack, you will certainly be able to take a significant share of the great deal in minutes. You might have the most effective images or have some useful pictures that have been lying as waste. Conserve on your own from this trouble and obtain hundreds of followers promptly to become a solid military in the social networks. The even more people follow you; your social networks existence will certainly be stronger. Become famous on Instagram as well as advertise your photos to the best audience.

The process is as well very easy. You have to download and install the latest version of the program from our official web site and run it. Give your needed information as well as a number for the quantity of followers that you want to include. Click generates and they will all be included in your account quickly.
Read More
  • Share This:  
  •  Facebook
  •  Twitter
  •  Google+
  •  Stumble
  •  Digg

Facebook Mass Friend Delete

 No comments   


Facebook Mass Friend Delete

Facebook Mass Friend Delete: Facebook has actually ended up being so widespread that virtually everyone you run into has an account. The amount of times have you satisfied someone and also invested a short time chatting, only to find yourself Facebook friends the following day. Every one of this "over-friending" can result in a loaded friends listing loaded with individuals you barely understand, making it hard to discover your real friends. Facebook recommends "unfriending" by mosting likely to a person's profile, yet you could mass eliminate friends by using the Edit friends menu.


Facebook Mass Friend Delete

Action 1: Log right into your Facebook account.


Action 2: Click the "Account" link in the top right edge of your homepage, after that click "Edit friends" from the drop-down menu.


Action 3: Find the friends you intend to eliminate either by scrolling or by keying a name into the search field.


Step 4: Click the "X" next to a buddy's name and after that click "Remove Friend" to remove the friend. You can get rid of as many friends as you such as on the Edit friends web page.

How you can Delete All friends On Facebook Tool

To do this thing you require a tool named as Facebook Social Toolkit [Download It From Your Chrome Internet Browser As Well As Activate It In Your COMPUTER]

Adhere to Some Steps To Eliminate All Your friends From Facebook:

-Download Facebook Social Toolkit From Your Chrome Internet Browser And Activate It In Your PC.
-Visit Your Facebook Account.
-Browse To Log In Or Sigh Up And Start Making Use Of Facebook Social Toolkit.
-Click On The Unfriend And Unfriend All Your friends.
-After that, Click OK Switch And You're Done.

Hope It Assists!
Read More
  • Share This:  
  •  Facebook
  •  Twitter
  •  Google+
  •  Stumble
  •  Digg

How to Send Videos Over Facebook

 No comments   


How to Send Videos Over Facebook

Facebook members use the social media network to get in touch with friends through status updates, comments and shared videos. How to Send Videos Over Facebook - Members are staying attached throughout the day using computer systems, mobile phones and also tablets. To fit a variety of individual preferences and modern technologies, Facebook has actually produced numerous alternatives for video sending out. Whether you choose to publish, email or text your videos, you could share them within the Facebook website, or externally, in just a couple of clicks.


How to Send Videos Over Facebook

Send out videos Via Upload


1. Sign in to your Facebook account using your e-mail address and password.


2. Select the "Add photo/Video" link that appears near the top of any type of web page. To send one video, click the "Upload photo/Video" option to choose a video from your computer system or mobile phone as well as click the "Browse" button to find and also pick your video. To send out multiple videos from your computer, click the "Create An Album" alternative as well as comply with motivates to pick several videos.


3. After video option, utilize the fall menu in the lower-right edge of the dialogue box to set video personal privacy to "Public" "Friends" "Only Me" or "Custom" or choose a friend list if you have actually established that attribute. Click "Post" to send the video( s).

Send videos Via Facebook Mobile Internet Email

1. Most likely to m.facebook.com as well as log in to your Facebook account.

2. Click the "video" option that shows up under the status update area on top of any type of web page. Discover your unique "Post-By-Email" address, which appears below the "Post It By Email" heading.

3. Open your email application and comply with motivates to make up a brand-new email. Enter your special "Post-By-Email" address in the recipient area and also include a video subtitle in the subject line, if desired. Send out the email.

Send out videos Via Text

1. Activate your mobile device if you haven't currently done so. Log in to your Facebook account and also click the "Account Settings" choice that shows up in the drop down menu under the triangular icon at the top of any page. Click the "Mobile" web link in the left column and also comply with motivates to include a phone, which include composing a sms message as well as obtaining a verification code.

2. Access the text feature from your mobile phone. Make up a message including the wanted video and go into "32665" in the recipient field.

3. Include a video subtitle in the subject line, if preferred, and also send the video.

Tip: Your one-of-a-kind email address could also be used to update your condition. Make up a message to "32665" having only your standing in the subject line as well as send out. Share a whole album on external sites utilizing the customized URL that shows up at the end of the cd's primary web page. When you "Tag" someone in a video or video remark, it is likely to be sent out to that individual by means of Information Feed, notice, email or text, relying on established personal privacy settings.

Caution: Note that videos posted via email have a default public personal privacy setup, which can be readjusted after invoice.
Read More
  • Share This:  
  •  Facebook
  •  Twitter
  •  Google+
  •  Stumble
  •  Digg

How to Schedule Posts On Facebook

 No comments   


How to Schedule Posts On Facebook

How To Schedule Posts On Facebook - No matter what kind of page you're running, an energetic stream of web content can assist keep your visitors involved. To stay clear of having to frequently release brand-new posts, routine posts in advance! You can do this with Facebook's integrated functions when you're publishing as a group, yet with third-party applications, it's possible to schedule personal account posts as well.


How To Schedule Posts On Facebook

Technique 1: Desktop Browser


1. Log In to your Facebook Account from your computer. If you're not currently logged in, you will need to be to start scheduling posts. Simply puts:


- Visit https://www.facebook.com/.
- Key in your e-mail address and password
-Click the "Log In" button to continue.


2. Gain access to your alternative Facebook page. It is very important to note that Facebook does not allow you schedule posts for your personal account. You can only schedule posts for pages you have produced-- things like teams, fan web pages, company web pages, and more. To obtain to one of these pages, click the tiny arrowhead in the top right of your major feed display (near the globe and also lock icons). In the drop-down menu underneath "Use Facebook as" click on the name of the page you've developed.

-If you haven't already made a page, you can do so with the "Create page" choice in the exact same menu. See our article on creating a small business page for additional information.

3. Make up a post. At the top of the page you have actually created, start inputting a standing upgrade in the message box. By default, this box should review "What have you been up to?" in greyed-out message. Do not make the post yet.

Now, you can also put media right into your post by clicking on the tiny "Photo/video" web link above the message box. Do this prior to scheduling the post.

4. Select "schedule" from the menu. When you've entered your post, click the arrow alongside heaven and also white "Post" switch. Click on "schedule" in the dropdown menu.

5. Pick a day and time. In the window that pops up, select a day with the calendar pop-up box (click on the small calendar icon to open up the pop-up.) Select the moment (to the minute) from the box on the right by clicking on the moment and making use of the up and down arrow keys on your keyboard.

-You must arrange your post at the very least 10 mins in the future. You could schedule your posts up to 6 months in advance.
-Perpetuity refer to your current timezone.

6. Click the "schedule" switch. Your post will now be arranged to upload instantly at the date as well as time you have actually provided. You will certainly see "1 Scheduled Post" on your page timeline.

-If you need to make changes, just click the "See Post" web link in the "1 Scheduled Post" box. From there, click on the little arrow in the leading right of the post's box to Edit, Publish, Reschedule, or Delete your post.
-You could additionally do this by clicking "Activity" at the top of your page, after that clicking "Scheduled posts" in the left column.
Read More
  • Share This:  
  •  Facebook
  •  Twitter
  •  Google+
  •  Stumble
  •  Digg

How to Put Picture On Facebook

 No comments   


How to Put Picture On Facebook

Facebook is greater than simply a location where you could publish details about on your own. You could Add Facebook images and also produce albums too. You could share your Facebook images with loved ones and also order prints - How To Put Picture On Facebook.


First, we're mosting likely to Add Facebook images.


Log in to Facebook.With either the desktop site or the mobile app, you could publish pictures as part of a blog post or status update. With the desktop computer site, you can also upload pictures via the Photos link on the left navigation menu.


If you are making use of the Facebook mobile application, the Photos menu lies under the major menu that is at the bottom right of the display.


How To Put Picture On Facebook
1. Add Photos on Facebook


Making use of the status update to post images, choose Photo/Video on the desktop site or tap Picture on the mobile app.

- This will access the folders on your computer or smart phone and also you can pick one or more photos to publish.
- The photo will certainly upload as well as you could select it to edit it to utilize filters, crop, Add message or stickers.
- You can Add a description of the image and also tag individuals.
- You could also pick whether making it public or limit accessibility to it.
- When you prepare, tap Post to upload the picture.

Including Photos From Photos menu of Desktop Website

This photo upload alternative is just available on the desktop computer site, out the mobile app. If you simply wish to Add a few photos from the Photos web link on the desktop site without developing an album, select "Add Photos". A home window will certainly available to select images from your computer system. Select one or numerous and choose "Open".

These will certainly currently publish and show up in an Add Photos window. You will certainly have the ability to Add a description of the images as well as Add who you were with at the time.

Click on any one of the images to mark friends, use filters, crop, Add message or sticker labels.

You could prefer to make the images public, visible just to friends, visible only to friends with the exception of acquaintances or personal.

2. Start a New Photo Cd on Facebook - Desktop Website

There are 2 ways to create an album utilizing the desktop computer site version of Facebook.

- You can start in the Photo menu, accessed from the left side menu. Select "Add Album".
- Or, you can start in the status posting box as well as pick "Photo/Video Album".

Creating an album takes a different course if you are utilizing the Facebook mobile app on your phone or tablet, so we will certainly talk about that at the end.

3. Pick Photos to Add - Facebook Desktop Computer Site

- For the desktop computer site: After you pick "Create Album", a Documents Upload pane will open up. You will see a box with 2 sides on the page. On the left are the files on your computer. Most likely to the folder where your pictures are from this list.
- When you locate the folder you will see your pictures on the right. Pick the images you wish to include in Facebook by clicking on the checkbox next to each picture you intend to Add.
- If you intend to Add them all click the "Select All" switch.
- After you have chosen the pictures you want to Add click on the "Open" button.
- You will certainly be offered the Develop Album home window where your pictures will certainly start posting and also will certainly be shown as they are posted.

4. Personalize Your Album Name and Summary - Desktop Computer Website

On the left side of the Create Album page you could give your cd a title as well as compose a description. You can Add a location for the album as well as tag friends.

- Shared Albums: You can make the album a common cd with Facebook friends so they can Add images. If you select this option, you can Add contributors that can likewise publish photos to this album.
- Choose who you want to be able to see the cd: everyone (public), your friends, friends except associates, or only you.

5. Add a Photo Caption

- Create something regarding the photo as a subtitle or summary.
- Click on among the people in the photo. Add their name to the box that pops up. Click "Tag" when you have actually included the name.
- Add names for everyone in the picture.
- Pick among the pictures as your cd cover photo utilizing the Settings icon below the picture.
- When you are ended up adding inscriptions to your pictures scroll to the bottom of the page as well as click "Post".

6. Add More Photos

If you wish to Add more pictures to your cd click the "Add More Photos" web link.

You can additionally modify or even delete your cds, or change their privacy setups any time.

7. View Your Photos

Click Photos in the left column of your newsfeed or in your profile to see your brand-new pictures and albums.

You can also download your albums, which is a good alternative for saving duplicates of your images.

8. Creating an Album - Facebook Mobile Application

To develop an album using the Facebook mobile application, you can do it in a number of means.

Producing an Album From the Facebook Application House Display:

- Starting at the Home display, tap on Photo as if you were mosting likely to merely upload a picture. Select images from your electronic camera roll or other folders, then tap Done.
- Currently try to find the +Cd button under your name to produce a cd from the pictures you selected.
- You will certainly have the ability to after that offer the album a name as well as summary, as well as choose whether it is public or has limited access, and to Add an area. Conserve the cd then you will certainly have the ability to modify and Add inscriptions to the pictures.

Developing a Cd From the Facebook Application Photos Screen:

- Most likely to the menu in the reduced left edge of the application and also scroll to Photos.
- Select Albums and tap Produce Album
-Provide the album a title and also Add a description. Establish the audience as well as Add or eliminate the place. Faucet Conserve.
-Currently you could access your video camera roll and also various other folders to choose as well as submit images to the new album.

You could modify a cd to enable others to contribute to it. Open the album, select Edit, and toggle the "Enable Contributors" to green. Then tap on Factors to open a listing of your Facebook friends to allow them to publish pictures to the album.
Read More
  • Share This:  
  •  Facebook
  •  Twitter
  •  Google+
  •  Stumble
  •  Digg

How to Add Instagram On Facebook Page (update)

 No comments   


How to Add Instagram On Facebook Page (update)

Instagram is the storybook of social media, Facebook is the book, and also Twitter is the note you pass to your good friends in class. Instagram is just one of the very best means to actually show your audience how effective your business can really be, as opposed to just telling them. How To Add Instagram On Facebook Page to make sure that you could cross-promote your Instagram posts to Facebook. This post will certainly stroll you through linking your business accounts to save you time marketing your business.


If you're trying to increase your target market's interaction on Instagram, it is essential to recognize the best ways to share and also repost pictures on your various other social media accounts. By reposting your pictures, you're offered complimentary power to reveal customers what you assume is wonderful regarding your business as well as highlight just what you take into consideration to be your best work.

How To Add Instagram On Facebook Page
How You Can Link Instagram to Your Facebook Page


1) Beginning with your Instagram account


Your initial step is to pull up your own Instagram account on your phone and also select the profile symbol in the lower ideal corner. Then, touch the gear icon in the upper right corner. (This might look like 3 upright dots if you're utilizing an Android tool.).


That will take you to your alternatives, where you can readjust a number of your preferences, including social settings.


2) Set up (or update) your connected accounts


When you get to your options, you'll want to scroll down to where it claims "settings" > "Linked Accounts" That's where you'll configure where else you want your Instagram images to turn up on social media.


Faucet "Linked Accounts" as well as you'll see all of your options for which social media networks you could link with Instagram.


3) Connect to Facebook


In the image above, you'll discover that Instagram account is currently connected to Facebook-- if you're not already connected to that network, you'll need to go via the approvals to share web content there. You'll should be logged into Facebook on your phone for this action to work-- once that's done, faucet "Facebook" on your Share settings display.

You'll be asked to proceed as yourself-- faucet that switch.


Next off, you'll be requested for your personal privacy preferences. Because you'll be simply be sharing your photos on a service Page, you could pick "Friends" - the people who will really be seeing your photos are the ones who like the Page you'll be publishing to, which we'll get to in later steps.


As soon as you strike "OK" you'll be repossessed to your Share settings, where Facebook should now be chosen. Otherwise, make certain you pick it - the logo should appear in blue to suggest that you're now sharing your posts on Facebook.


4) Choose where you're sharing on Facebook


When you've linked Facebook to Instagram, you'll want to use your Share settings to figure out where on Facebook you'll be sharing Instagram posts. If you've only just currently licensed Facebook to relate to Instagram, photos will be shared on your personal Facebook account by default.


Faucet "Share To"-- that will display all the position on Facebook where your Instagram pictures can be uploaded. It includes your personal timeline, or any kind of business web pages where you have a manager function.


Here, we've selected my page. Once you've chosen the Facebook Page where you want your photos to be published, go back to your Share settings.


Currently, it needs to be specified that your Instagram photos are being published to your Facebook business Page of option.


5) Make certain you're sharing properly

If you're utilizing Instagram for both personal as well as business accounts, remember: You'll need to customize these settings each time you intend to alter where your photos are being posted.

If you're actually concerned on the feasible drawbacks of using the same Instagram represent both-- as well as we've all seen just how multi-tasking on social media could fail-- you could intend to Set up a company-specific Instagram manage that's totally separate from your personal one.

If that holds true, you'll need to adhere to the very same actions to connect your Instagram account to Facebook. The good news? Instagram has a cool attribute that enables you to switch over backward and forward between numerous accounts-- check it out here.

6) Begin sharing!

You're all connected! Currently, you could go back to your residence screen, and pick which picture you want to publish.


When you prepare to share your picture, just make certain you have actually Facebook picked as one of the areas where you want your image to be posted.


Linking Instagram account from Facebook Page | Connect Facebook Page To Instagram


When Facebook bought Instagram for 1 billion dollar after that they have to be upto something large. I believe there are two reasons for this.

1 - Instagram is all about sharing photos as well as during that time Facebook was likewise more concentrated on picture sharing, so they recognized that Instagram will certainly be a huge competitor very soon.

2- To get even more data for mobile advertisements: As Instagram is all on mobile app and also photo sharing, to make sure that was a golden goose for advertising and marketing Facebook advertisements to bigger mobile customers with no additional effort.

And that's the best part of connecting Instagram account from Facebook Page. You not only have the ability to promote your Facebook posts to Instagram individuals, You could currently take care of all your Instagram post remarks right from the Facebook inbox.

Here is how you link your Instagram from Facebook Page.

1- Most likely to settings on the leading right corner of your Facebook Page and after that scroll to "Instagram ads" from the left menu.


2- Click "Add an account" switch on the ideal panel.


3- Then simply fill in your Instagram account details and you are done.


So currently with this you will certainly have the ability to display your Facebook ads to Instagram individuals also by utilizing your linked Instagram account and you can currently handle any type of comments on your Instagram post right from the Facebook Inbox.


Conclusion

Facebook and Instagram are both most powerful social networks web sites today. So I make sure as a company owner you do not wish to miss out to have profiles on both the internet site as well as linking them together to get the most effective out of it.
Read More
  • Share This:  
  •  Facebook
  •  Twitter
  •  Google+
  •  Stumble
  •  Digg

See who See Your Facebook Profile

 No comments   


See who See Your Facebook Profile

Who Viewed My Facebook Profile? See Who See Your Facebook Profile? Is there a genuine means to see Who watches your account on facebook? Does this questions come into your mind? If yes, you reached the right destination. I want to notify you that this function is against Facebook policies yet the option is there. You will enable to examining Who visited your facebook profile lately. See below-provided methods/ways to See Who Views Your Facebook Account


See Who See Your Facebook Profile

It is easy to do. Just adhere to these steps and also you will prosper in learning Who visited your Facebook Account!


-Technique 1: Using Chrome Extension


-Approach 2: Hands-on method to see Who viewed my facebook account


Making Use Of Google Chrome Extension


- Profile visitors for Facebook is a totally free Google Chrome Extension that allows you to track Who watches your FB Account.
- So, to start with, download/install profile visitors for Facebook in your Google Chrome web browser.
- Then visit to your Facebook profile, and also you will certainly observe that an extra 'visitors' tab is located alongside the left side of 'home' on the topmost blue bar.
- Click it, after that a pop-up menu will certainly be shown exposing you the recent visitors of your FB profile along time.
- As discussed it will only reveal those visitors Who currently have actually mounted the Extension.


Guidebook Method To See Who saw your FB Account

- Most likely to Your Facebook timeline.
- Right click your timeline and also click "View Page Source".


- After that, you will certainly be redirected to a new Page with whole lots codes.
- Press CTRL+F on your keyboard, a text box appears in the right corner, in that box, type- "InitialChatFriendsList" (Without Quotes).
- And after that you will certainly see a list of numbers, these are the account ID's of people Who visit your timeline.
- This huge listing of account IDs (each separated by commas) is in fact your full list of good friends.
- Simply go to "facebook.com" and paste the ID number close to it with a "".


For instance: if the ID is 1234, you have to place it as-- facebook.com/1234.

- After that you will find visitors Who have visited your facebook account.

We hope you figured out Who sees your profile frequently! If you like this article please show to your good friends by utilizing social sites i.e. Twitter, Facebook, Pinterest, and so on.


Read More
  • Share This:  
  •  Facebook
  •  Twitter
  •  Google+
  •  Stumble
  •  Digg

Best Instagram Editing Apps

 No comments   


Best Instagram Editing Apps

In this short article, I will certainly tell you regarding the very best picture editing and enhancing apps for iOS and also Android. Utilize these applications for improving your Instagram pictures-- or any kind of images for that matter. I personally use a lot of these applications myself so I know what I'm talking about - Best Instagram Editing Apps.


You will certainly locate that several of the applications below are paid, however not costly. The fact is that you have to pay if you want high quality-- also when it involves applications. Having said this, the free ones in my list are definitely worth setting up, specifically if you are on a spending plan and also use Instagram just for enjoyable.


In the list below you will certainly discover numerous applications for iphone as well as Android phones that let you modify your pictures (semi-) professionally, create gorgeous collections and even proper lens distortion that you could use to create completely balanced photos. I make sure that this listing consists of something for everybody.


Where possible, I have actually consisted of a video clip showing the main features of the application-- I wish you will certainly appreciate this.


Best Instagram Editing Apps
Applications for taking selfies and portaits


Facetune (iphone/ Android)

Paid Application.

Looking remarkable can be essential for Instagram success. Facetune is an effective image editor that assists you ideal your selfies-- even ones that just weren't that fantastic from the start. If selfies are your thing, then this is the application for you. The Facetune application is paid, yet is worth it. Is it any type of good? Well, let's simply state that pointless applications do not end up being the # 1 Photo and Video App in 127 nations.

Stand-out attributes:

- add make-up: apply blush and also shadow; include quantity to lashes.
- smooth the skin.
- remove spots as well as acnes.
- brighten your eyes; eliminate the dark circles under your eyes.
- easy-to-use teeth lightening device.
- alter the shade of the eyes as well as hair.
- modification of facial framework: jaw line, cheek, brows, nose and so on.

My personal note: The application does not appear to such as the png-format, they are not displayed properly for one reason or another. If you intend to use Facetune on a tablet computer, note that the application is not absolutely maximized for tablet computers, so every little thing will certainly look simply a little bit pixelated on a bigger display. Yet after you have actually processed the picture and saved it, the end-result will be just as good as on a phone.

Perfect365 (iphone/ Android)

Rate: complimentary (in-app acquisitions available).

Perfect365 calls itself a digital makeup application, much alike Facetune. It lets you retouch as well as include virtual makeup to your images and already has greater than 80 million customers. I have actually checked out that even Kim Kardashian uses this application, however I'll allow you decide if that's a good idea.

Stand-out functions:.

- get rid of skin defects and the bags under your eyes.
- teeth-whitening.
- alter the shade of your eyes as well as hair.
- change your face framework.
- add makeup to your photos.

Effective All-In-One Image Editors

Pixelmator (iphone/ Mac OS)

Paid Application.

Pixelmator is my favorite image editor. It works like on iPhones and iPads, but you could buy it also for your Mac. All my friends who tried the application on the phone can not resist to install it on the computer-- that's how excellent this app is It functions a little bit like Photoshop and also uses Photoshop-like pro attributes, but it has a much easier and also extra intuitive interface. Additionally, unlike Photoshop, the price of Pixelmator is in fact budget friendly.

There are countless methods to make use of Pixelmator, so picking noteworthy features is tough work Thankfully, there are lots of great tutorials on Youtube in order to help you get started with your new image task.

Stand-out functions:

- full paint app included.
- advanced editing and enhancing features: filters, impacts, collections, including message to the picture.
- expert color adjustment device, fixing device, duplicate tool, misshape device etc.
- different layer designs.
- expert retouch.

About the Mac app: If you want the Mac application, you could would like to know that Pixelmator enables you to import PSD files (used by Photoshop) as well as completely work with them, along with export the finished data in Photoshop layout. Really hassle-free for such an excellent value product.

Snapseed (iphone/ Android)

Cost: Free

Snapseed is an instead powerful, free application for modifying photos on a phone or tablet-- and it is created by Google itself. Many think about Snapseed the very best image editing application for Android. It is, nevertheless, readily available on iphone, as well.

You will certainly locate a lot of functions in Snapseed: 26 tools and filters (incl. lens blur, vintage, HDR scape) as well as you could also utilize it with RAW DNG files. Nevertheless, it is not as refined as the previously stated Pixelmator, so do not expect it to replace Photoshop.

MOLDIV ™ (iOS/ Android)

Price: complimentary (in-app purchases offered).

MOLDIV is a all-in-one picture editor that is additionally maximized for tablets (at least iPads). It has a number of the functions featured in the previous apps, however just what establishes it in addition to the competitors is the elaborate collection feature as well as the 560 stickers consisted of in the application. The application is suitable for everyone: from newbies to digital photography masters. I would personally suggest this one specifically for creating collections.

Noteworthy attributes:

- Pro Electronic camera in-camera photo editor: 180 real-time filters (12 motifs); real-time blur and so on
- greater than 300+ font styles.
-560 sticker labels as well as 92 history patterns.
- collections: the capability to incorporate up to 9 (Android)/ 16 (iphone) pictures in one frame.
- Elegance Cam for selfies: soften the skin, expand your eyes, deal with slimming.

Enlight (iOS only)

Paid App.

Enlight, an additional all-in-one image editor, was chosen "2015 App of the Year" by the App Shop in the UK, Australia and also a number of other countries. The application is paid and flaunts actually great scores in the Application Shop (4,3 stars with 4671 rankings).

In the app you will certainly find a vast array of tools for improving your pictures, as well as a multitude of art filters as well as impacts.

Noteworthy attributes:

- smart image adjustment tool (repairs underexposed and overexposed images).
- overlay of 2 photos for a double direct exposure result.
- meme function for producing memes for social media.
- exports JPEG, PNG and TIFF.

Imaginative filters

Mextures (iOS just)

Paid App.

The Mextures photo editor has actually been included in many technology publications, including Mashable, as well as CNET. In Mextures you could add grainy photographic movie, textures, lighting impacts as well as slopes to your pictures. It also enables you to conserve your personal filters (Mextures calls these "solutions"), which will save you a lot of time and also help you maintain a similar style for all images-- with Mextures, you could produce your own hallmark filter.

Stand-out functions:

- more than 150 original structures that can be applied in secs.
-26 outstanding image editing presets (consisting of emulation of strategies utilized in motion pictures).
- management of the filters created by you;.
- unlimited layering feature-- stack pictures on top of each other as well as fine-tune them to develop an absolutely artistic effect.
Read More
  • Share This:  
  •  Facebook
  •  Twitter
  •  Google+
  •  Stumble
  •  Digg

Make Pictures Fit Instagram (update)

 No comments   


Make Pictures Fit Instagram (update)
Make Pictures Fit Instagram: Instagram supports images in the rectangular landscape and picture orientations-- as long as you change it from the default square shape before you upload the data. To do that, tap the round grey arrow symbol in the bottom edge of the picture preview.


Make Pictures Fit Instagram
Instagram's help guide says the service supports photos as well as video clips just with facet proportions in between 1.91:1 (a straight wide-screen/landscape shape) and also 4:5 (an upright portrait shape); the traditional square shape has an element ratio of 1:1. If the photo you publish is not in among Instagram's supported element ratios, it will be chopped instantly.


When it comes to the picture top quality, Instagram does not alter the picture resolution if the image has a width from 320 to 1,080 pixels, as long as the documents remains in among the supported aspect ratios. Small, low-resolution images are bigger to a size of 320 pixels when you submit them to the solution, which could misshape them.

The majority of decent smartphones these days take relatively high-resolution resolution photos-- 12-megapixel (or far better) video cameras are common now in the flagship models from Apple, Google, LG, Samsung as well as other firms. The photos these mobile cams could generate are commonly much larger than 1,080 pixels broad, yet if you upload an image that is larger compared to Instagram's requirements, the solution resizes the picture to satisfy the maximum 1,080-pixel width.
Read More
  • Share This:  
  •  Facebook
  •  Twitter
  •  Google+
  •  Stumble
  •  Digg

What is Facebook Phone Number

 No comments   


What is Facebook Phone Number

What Is Facebook Phone Number: This my blog educates you the essentials of browsing Facebook's Help Center to repair common account issues.


What Is Facebook Phone Number

Approach 1: Utilizing Facebook Resources


1. Open the Facebook Help Center website. If you aren't currently logged right into Facebook, you'll require click the Log In button in the leading right edge of the page to enter your Facebook e-mail address as well as password.


2. Evaluation the options toolbar. This goes to the top of the screen, directly under the search bar-- you'll need to drag your computer mouse cursor over each option to see its subsections. Your alternatives include the following:


- Using Facebook - This section of the Help Center covers fundamental Facebook performance, consisting of how-tos on friending, messaging, and account production.
- Handling Your Account - Covers products such as your login and your account setups.
- Privacy and Safety - Addresses account safety, unfriending people, as well as hacked/fake accounts.
- Policies and also Coverage - Covers standard coverage (abuse, spam, and so on) in addition to handling a deceases individual's Facebook account and reporting hacked or fake accounts.
- You can also take a look at the "Questions You May Have" and "Popular Topics" sections on this page, since they cover typical concerns as well as grievances.

3. Select an appropriate section. For instance, if you're having a problem with an impostor account, you 'd pick the "Privacy and Safety" area then click Hacked and Fake Accounts.

4. Testimonial added alternatives. In keeping with the impostor account example, you might click the "How do I report an account that's pretending to be me?" web link. Doing so will bring up a collection of actions that describe how to fix your circumstance.

- For example, Facebook suggests taking care of an impostor account by mosting likely to the account's profile page, clicking ..., and also clicking Report, after that adhering to the on-screen instructions.

5. Utilize the search bar to accelerate your procedure. To do this, simply click on the search bar at the top of the Help Center page - it will say something like "Hi (Your Name), how can we help?" - and type in a few words connected to your grievance. You ought to see several tips turn up in a drop-down menu below the search bar.

- For example, you might type in "impostor account", after that click on the "How do I report an account for impersonation?" result.
- The search bar right here only links to Facebook's pre-written posts-- if you're looking for a solution to a particular concern not covered in the Help Center, miss in advance to the Area page.

6. Open the Ads Help Center page. If your organisation or page is having issues with advertisements, your concerns are generally resolved in this section.

- To explore marketing, you'll wish to click Creating Ads or Managing Ads.
- For problems with advertising, you'll should click Troubleshooting Your Ads and then select an issue on the subsequent menu.

7. Check Out the Facebook Community page. If you cannot discover your existing issue noted throughout the Help Center, your best choice is to seek it in the community forums below.

- You'll see a search bar on top of this page-- you could look up subjects (e.g., disabled accounts) from here.

Method 2: Sending a Grievance via the Bbb

1. Open Facebook's Bbb page.

2. Scroll down as well as click Submit a Complaint. This is on the reduced best side of the web page next to the Submit a Review button.

3. Click Click Here to File a Complaint. This is beneath the "I am looking to resolve a dispute with a business" directly the left side of the page.

4. Fill out the Qualification Questions form. Right here, you'll have to click the "Yes" or "No" checkbox for every of the following questions:

-Is this an employee/employer complaint?
-Is this a discrimination or civil rights complaint?
-Does your complaint allege a criminal act?
-Is this a business with a complaint for collections purposes with another business?
-Is this complaint in litigation?
-Is this complaint based solely on dissatisfaction with a price?
-Is this complaint about a purchase you wish you never made?
-Are solely seeking an apology from the business?
-Are you filing this complaint for BBB information only?

5. Click Proceed to Complaint Form. You could also click Clear & Start Over to begin filling out the type once again.

6. Click Proceed. If you intend to transform the language of the following kinds, you have to first click the "Select Language" bar in the top left edge of the display and after that click your recommended language.

7. Complete the complaint form. This will certainly differ from person to person based on one's individual details as well as the nature of one's complaint, however make sure to be as complete as possible when filling out this form. You need to consist of every one of the following:

-The problem you're encountering
-The steps you took to resolve the problem
-The issues you ran into while attempting to resolve the problem
-Any potential solutions and/or suggestions you can think of

8. Scroll down as well as click Submit Complaint.

9. Wait on an e-mail to arrive. Facebook operates West Coastline time, so expect your email to get here as necessary within three to 5 company days.

Approach 3: Submitting an Allure for an Impaired Account

1. Open the Disabled Facebook Account page. If your account hasn't been handicapped (or isn't currently impaired), you won't be able to send a charm.

2. Click the "submit an appeal" web link. This is toward all-time low of the page's paragraph alongside the "If you think your account was disabled by mistake" line.

3. Enter your Facebook email address. You can likewise utilize a phone number below.

4. Key in your full name. See to it the name provided right here straight matches the name on your account.

5. Click Choose Files. You'll also have to submit an image of an ID-- be it a driver's license, a license, or a passport photo.

- If you do not have a picture of your ID readily available, take one currently as well as send it to on your own using e-mail so you can download it to your desktop.

6. Click a file location. For example, you may click Desktop below.

7. Click your ID picture. This will certainly upload it to the Facebook kind.

8. Type details into the "Additional Info" box. This is the space where you can justify the awakening of your account. Think about consisting of details like the following:

-Why your account shouldn't have been deactivated
-Why you want your account to be reactivated
-Any other extenuating factors that might help your account be reactivated (for example, malicious interference with your account)

9. Click Send. Doing so will certainly send your form to Facebook for review. Please note that you could not get a reaction for a number of days.

- If you don't get a response within a week, attempt resubmitting your form.

Approach 4: Recouping Your Password

1. Open up the Facebook website.

2. Click "Forgot Account?". This choice is below the "Password" field in the leading right corner of your screen.

3. Enter your name, e-mail address, or contact number. Make sure you could access whichever system you prefer to go with.

4. Hit Enter.

5. Click Continue.

6. Examine your selected tool of communication for a code. For example, if you listed your telephone number, you should obtain a text with a code.

- If you choose e-mail, check your Spam folder.

7. Kind your code right into the "Enter Code" area.

8. Click Continue.

9. Click Continue once more. You can also choose to log out of your account on all tools if you assume your account has been maliciously appropriated.

10. Enter a new password.

11. Click Continue. Your password has efficiently been reset across all Facebook systems (e.g., mobile and also desktop computer alike).
Read More
  • Share This:  
  •  Facebook
  •  Twitter
  •  Google+
  •  Stumble
  •  Digg

Download Video From Facebook to Mp3

 No comments   


Download Video From Facebook to Mp3

There are Facebook to MP3 online converters which are easy to use. The most effective Facebook downloader on the web! try it currently! is recommended. Download Video From Facebook To Mp3: If you need to transform Facebook videos to MP3 in bulk, you can utilize iFunia YouTube Downloader. The software application is presently just available for Mac. It's easy to use.


Download Video From Facebook To Mp3

Methode 1:


Action 1. Go to Facebook, search videos that you wish to convert.


Action 2. Copy and also paste video URLs to the application.


Step 3. Select MP3 as the output style. Click the arrow down button to start transforming.


Methode 2:


There do exist some tools which offer this center of video clip to audio conversion, for an instance you could choose Wondershare Video Converter, which supports conversion in between social networking video such as facebook, Youtube to the audio layout, you can get from [Authorities] Wondershare Video Clip Converter Ultimate - Your Complete Video Tool Kit.

To start the conversion procedure initially you need to open up the Facebook page with video clip link page open > appropriate click the connect to copy the LINK address.


Afterwards visit the tool's main page > Under the Download Sectionclick Paste LINK drop-down symbol > there pick Download MP3alternative.


You will see a popup window appear, just paste the copied URL and also click on Download to begin the removal procedure;.


Wait for couple of secs, soon you will have your MP3 file that you could access under the completed tab. Now your MP3 file is ready as well as you could hear your preferred track at any time based on your comfort.
Read More
  • Share This:  
  •  Facebook
  •  Twitter
  •  Google+
  •  Stumble
  •  Digg

Instagram On Twitter (update)

 No comments   


Instagram On Twitter (update)

Instagram On Twitter: Attaching your Instagram account with Twitter allows you to share your Instagram images directly via your Twitter account. Unfortunately, this choice is just offered for your iphone 7 gadget, so if you're using Android, you're out of luck. You can manually sever or reconnect the accounts with your Setups application, yet this hassle-free control only appears after you first attach both accounts with the Instagram app.


Instagram On Twitter
Creating the Connection


Opening your profile in the Instagram app, selecting the gear symbol and also selecting "Share Settings" provides a list of accounts with which you can share. Touching "Twitter" and afterwards validating your selection allows you to show Twitter. Even if you've previously done this, the alternative to toggle the connection on or off might not constantly show up in the Settings app. You could solve that issue by tapping "Twitter" from the Instagram app's Share Settings, selecting "Unlink" and then reconnecting the accounts. Once attached, pick "Twitter" from iPhone's Settings app to locate the slider that toggles the connection.


More suggestions ...


Once, it was easy to share your Instagram photos by means of Twitter. Yet nowadays, sharing your Instagram images straight to Twitter just tweets out a boring old link, not that fav-worthy picture you just took.

No fears-- there's a very easy fix.

IFTTT, short for "If This Then That" is a program that lets you develop "triggers" for your various applications. IFTTT has great deals of excellent applications, yet one of them is sharing Instagram photos natively on Twitter once more.

To do so, you could create a dish-- IFTTT's name for its triggers-- for posting a picture to Twitter every single time you take an image with Instagram.

First, browse through IFTTT's internet site and produce an account. After that, visit this link and trigger the dish. You'll then be asked to trigger your Twitter and Instagram accounts, which you must go ahead and do. Then, the solution will essentially link those 2 accounts, sending a tweet every single time you publish a brand-new image to Instagram.

A couple of cautions: This setup can be a little slow, so fret not if your pictures do not turn up on Twitter instantly after you publish them on Instagram. And also if you want to briefly shut off the auto-posting, download IFTTT's mobile app, which allows you transform dishes on and off on a whim.


Read More
  • Share This:  
  •  Facebook
  •  Twitter
  •  Google+
  •  Stumble
  •  Digg

Comment Pictures On Facebook

 No comments   


Comment Pictures On Facebook

Comment Pictures On Facebook: You most likely recognized you could publish photos to Facebook in a condition upgrade, however did you know you can publish a picture in a comment you make on someone else's post on Facebook? It hasn't always been feasible however. It wasn't up until June 2013 that the social network began sustaining photo-commenting, and it's constructed right into the website and also mobile app.


Currently you could make a photo comment rather than simply typical text, or post both a text comment and a picture to illustrate it. Whatever picture you choose to upload shows up in the list of comments underneath the post to which it refers.


Comment Pictures On Facebook

This is a particularly great attribute to have for birthdays as well as various other vacation desires because photos typically state greater than words.


Previously, to add an image to a comment, you had to post a picture someplace on the internet and after that put the code that linked to the picture. It was untidy and not as easy as it is currently.


How you can Consist of an Image in a Comment on Facebook

The specific actions to do this are slightly different depending upon exactly how you access Facebook.

From a Computer System - Open Facebook in your favored internet browser on your computer system. After that:

- Click Comment on your information feed under the post you wish to respond to.
- Go into any kind of message, if you want, and after that click the camera icon at the right side of the message box.
- Pick the image or video you wish to contribute to the comment.
- Send the comment like you would certainly any other.

With the Mobile Application-- Using the applications for Android and iOS mobile devices, tap the Facebook application and afterwards:

- Tap comment beneath the post you want to Comment on to raise the online keyboard.
- Get in a text comment and also touch the camera icon at the side of the text-entry area.
- Select the image you intend to comment with then touch Done or whatever various other switch is used on your device to leave that screen.
- Faucet post to comment with the picture.

Making Use Of the Mobile Facebook Website-- Utilize this method to submit photo talk about Facebook if you're not using the mobile application or the desktop internet site, yet rather the mobile internet site:

-Tap Comment on the post that need to consist of the picture comment.
-With or without inputting message in the given text box, touch the camera icon next to the text-entry area.
-Select either Take Photo or Image Collection to pick the picture you wish to put in the comment.
-Faucet post to comment with the picture.
Read More
  • Share This:  
  •  Facebook
  •  Twitter
  •  Google+
  •  Stumble
  •  Digg
Newer Posts Older Posts Home

Blog Archive

  • ▼  2019 (502)
    • ►  July (5)
      • ►  Jul 08 (2)
      • ►  Jul 07 (2)
      • ►  Jul 06 (1)
    • ▼  February (368)
      • ►  Feb 12 (33)
      • ►  Feb 11 (21)
      • ▼  Feb 09 (37)
        • Creating A Instagram (update)
        • How Do I Sync Facebook Contacts to My iPhone
        • Followers On Instagram Cheat Update
        • Facebook Mass Friend Delete
        • How to Send Videos Over Facebook
        • How to Schedule Posts On Facebook
        • How to Put Picture On Facebook
        • How to Add Instagram On Facebook Page (update)
        • See who See Your Facebook Profile
        • Best Instagram Editing Apps
        • Make Pictures Fit Instagram (update)
        • What is Facebook Phone Number
        • Download Video From Facebook to Mp3
        • Instagram On Twitter (update)
        • Comment Pictures On Facebook
        • How to Create Ads In Facebook Updated 2019
        • How to Remove Birth Year From Facebook Updated 2019
        • Search Users On Instagram
        • Number to Contact Instagram
        • How Do U Get More Likes On Instagram
        • How Do You Post Stuff On Instagram Updated 2019
        • Link Instagram to Facebook Page Updated 2019
        • Make An Account On Instagram
        • Facebook Pokes What Do they Mean Updated 2019
        • How to Get Hundreds Of Followers On Instagram
        • How to Get Hundreds Of Followers On Instagram
        • How to Tag A Person On Facebook Updated 2019
        • Embed Instagram Feed In Website
        • See who Has Been Looking at Your Facebook Page Upd...
        • How to Tag A Person On Facebook Updated 2019
        • Facebook Mobile Website Not Working Updated 2019
        • Quick Instagram Followers
        • How Do I Cancel My Facebook Account Updated 2019
        • How to Get A Lot Of Instagram Likes
        • View Deleted Messages On Facebook Updated 2019
        • How to Get A Lot Of Instagram Likes
        • View Deleted Messages On Facebook Updated 2019
      • ►  Feb 08 (40)
      • ►  Feb 07 (45)
      • ►  Feb 06 (40)
      • ►  Feb 05 (23)
      • ►  Feb 04 (49)
      • ►  Feb 02 (25)
      • ►  Feb 01 (55)
    • ►  January (129)
      • ►  Jan 31 (78)
      • ►  Jan 30 (20)
      • ►  Jan 29 (11)
      • ►  Jan 20 (4)
      • ►  Jan 19 (3)
      • ►  Jan 18 (4)
      • ►  Jan 17 (5)
      • ►  Jan 16 (1)
      • ►  Jan 12 (1)
      • ►  Jan 11 (1)
      • ►  Jan 10 (1)
  • ►  2018 (2465)
    • ►  November (64)
      • ►  Nov 25 (4)
      • ►  Nov 24 (4)
      • ►  Nov 23 (7)
      • ►  Nov 22 (9)
      • ►  Nov 21 (11)
      • ►  Nov 19 (14)
      • ►  Nov 15 (7)
      • ►  Nov 03 (6)
      • ►  Nov 01 (2)
    • ►  October (178)
      • ►  Oct 31 (9)
      • ►  Oct 30 (1)
      • ►  Oct 26 (1)
      • ►  Oct 24 (16)
      • ►  Oct 23 (21)
      • ►  Oct 22 (26)
      • ►  Oct 19 (5)
      • ►  Oct 16 (50)
      • ►  Oct 15 (36)
      • ►  Oct 14 (12)
      • ►  Oct 13 (1)
    • ►  September (771)
      • ►  Sep 27 (58)
      • ►  Sep 26 (50)
      • ►  Sep 25 (70)
      • ►  Sep 24 (70)
      • ►  Sep 20 (50)
      • ►  Sep 19 (80)
      • ►  Sep 18 (50)
      • ►  Sep 17 (43)
      • ►  Sep 14 (81)
      • ►  Sep 13 (39)
      • ►  Sep 12 (101)
      • ►  Sep 11 (69)
      • ►  Sep 10 (9)
      • ►  Sep 09 (1)
    • ►  June (215)
      • ►  Jun 07 (13)
      • ►  Jun 06 (5)
      • ►  Jun 05 (48)
      • ►  Jun 04 (49)
      • ►  Jun 03 (50)
      • ►  Jun 02 (50)
    • ►  May (1205)
      • ►  May 30 (50)
      • ►  May 29 (50)
      • ►  May 28 (43)
      • ►  May 26 (50)
      • ►  May 25 (50)
      • ►  May 24 (50)
      • ►  May 23 (50)
      • ►  May 21 (50)
      • ►  May 20 (100)
      • ►  May 18 (92)
      • ►  May 17 (98)
      • ►  May 16 (93)
      • ►  May 15 (25)
      • ►  May 14 (25)
      • ►  May 13 (90)
      • ►  May 12 (25)
      • ►  May 11 (50)
      • ►  May 09 (25)
      • ►  May 08 (25)
      • ►  May 07 (32)
      • ►  May 06 (21)
      • ►  May 05 (18)
      • ►  May 04 (25)
      • ►  May 03 (18)
      • ►  May 02 (25)
      • ►  May 01 (25)
    • ►  April (26)
      • ►  Apr 12 (25)
      • ►  Apr 10 (1)
    • ►  March (6)
      • ►  Mar 26 (6)

Search

Copyright © Make Over Arena