• Make Over Arena

Selling Things On Facebook - Sell Items On Facebook Group

Selling Things On Facebook – Facebook is fast becoming one of the most powerful online marketing platforms for promoting businesses, cond...

Change facebook page url more than once

 No comments   

Wondering how to change your Facebook Page URL?
It’s pretty simple, though you may find at every turn, Facebook says you can’t.
I checked all of the Pages I admin, and the option to change the Page URL was readily available. Here’s how.


What’s your Facebook Page URL?

Your Facebook Page URL is the part of your web address after the https://www.facebook.com/. So in the case of my Fan Page, we’re talking about the LouiseMcom. Facebook calls this your username. It’s also often referred to as your vanity URL.
What's my Facebook username?

Important Rules & Considerations for Your Facebook Page URL

Not surprisingly, Facebook has a host of rules about usernames.
  • You can’t claim a username someone else is already using.
  • Your username should be as close as possible to your true name or the name of the business or person your Page represents (ex: John.Smith, Facebook).
  • Choose a username you’ll be happy with for the long term. Usernames are not transferable and you can only change your username once.
  • Usernames can only contain alphanumeric characters (A-Z, 0-9) or a period (“.”).
  • Periods (“.”) and capitalization don’t count as a part of a username. For example, johnsmith55, John.Smith55 and john.smith.55 are all considered the same username.
  • Usernames must be at least 5 characters long and can’t contain generic terms.
  • Your username must adhere to Facebook’s Statement of Rights and Responsibilities. source
Regarding periods and capitalization, decide how you want it to look in the address bar, because users can type it in with or without periods and capitals. I did see one article claiming that periods between words makes your URL more SEO friendly, as Google likes delimiters between words. I decided to go with just one period, as I thought it was more user-friendly.

Cautions on Changing a Facebook Page URL That’s Already Set

Maybe you’ve decided your URL is too long, or you want to make it match your Page Name.
Changing your Page URL won’t change your Page name – the title that appears under your cover photo. However, be aware that once you’ve set a vanity URL, changing it will mean that any links to your Page will no longer work. If you don’t search out and change the old links, when clicked, they’ll lead to this cute message:
How to Change Your Facebook Page URL 404

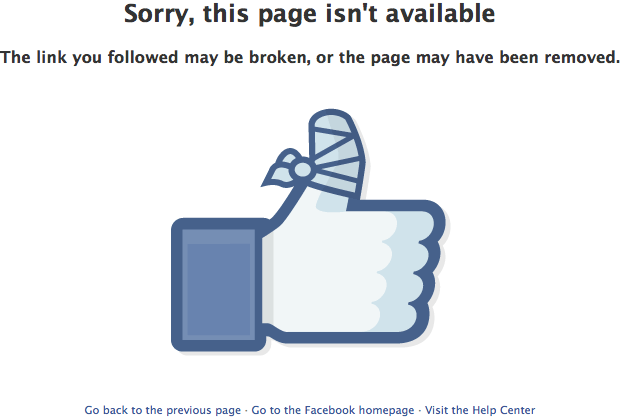
Not so cute when it means people searching for you won’t find you! Links to the tab apps (which are numerical) still worked for me.
Also be aware that you have the option to change your Page URL only one time. So don’t make a change lightly – you’re going to have to live with this one, or start a new Fan Page.

How to Change a Facebook Page URL That’s Already Been Set

Log in as the personal profile that’s an Admin of the Page you wish to change.
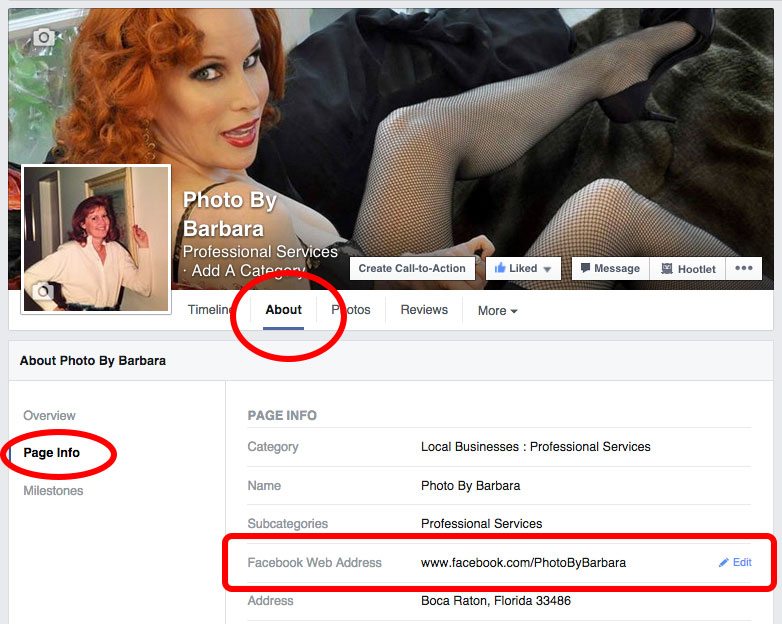
Start the process from the About tab under your Cover Photo –> Page Info.
If you haven’t already changed your URL, you’ll see the Edit button when you hover the Facebook Web Address area.
where to change your Facebook page URL step 1
Clicking the Edit button will open a small window with a link to Change web address – if you’re eligible.
where to change your Facebook page URL step 2
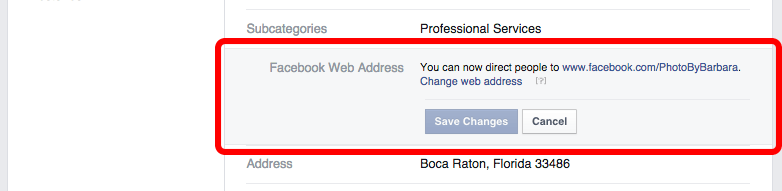
Click it and, ensuring you’re on the correct page on the dropdown, type in your preferred username. Click Check Availability.
How to Change Your Facebook Page URL
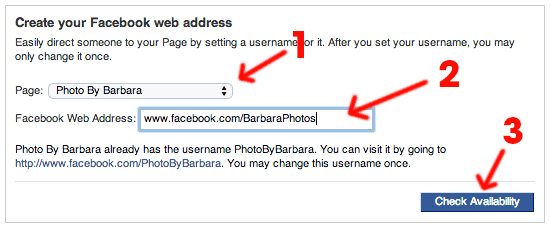
If it’s available, and you’re SURE you want to make the ONE-TIME change, click Confirm.

Will You Change Your Facebook Page URL?

What do you think? Is it worth the hassle? I deliberated for quite some time before deciding it was a necessity for me. Let me know what you think – and feel free to leave your link if you decide to change your Facebook Page URL!
Read More
  • Share This:  
  •  Facebook
  •  Twitter
  •  Google+
  •  Stumble
  •  Digg

Facebook who visited my profile the most

 No comments   

“Who viewed my Facebook profile?” or “Who are the Facebook profile visitors” etc. are the very common desire of the Facebook addicted people. Many Facebook apps are easily available in the market which claims that their user can check who viewed their Facebook profile. However, most of them are fake and use of those apps might be a threat for your Facebook profile. If you use such app anytime that claims that using their app, you can see who views your Facebook profile, don’t trust seriously. Because they can get your very personal information including Facebook login credentials with those apps.  Till now, Facebook restricts their policy on not to share such info officially to any user of Facebook.

There are high demands about the search query “how to see who viewed my Facebook profile” at different search engines like Google, YouTube, and Bing. So, various spammers and malicious app development companies target the users to steal their private information using this technique. As I already mention that those third-party apps do not provide exact results, and these apps usually do the spam post on user’s Facebook wall. You can block these annoying app requests easily.
Then, is there any real way to look who is viewing my Facebook profile? The answer is YES, but with certain limitations. In this tutorial, I’ll discuss how to see who views your profile on Facebook.

Why are People Interested in Who is Looking at My Facebook Profile?

Facebook is the most favorite social media among the people of most countries. Sometimes they use different proxy unblocker to access Facebook from restricted countries. Most of the users are young boys and girls. Sometimes, they want to unblock the website at schools, colleges if restricted and spend the whole time doing different social activities on Facebook. So, there is naturally a tendency among them to check about their Facebook profile visitor. The thing is not new, and from the age of Orkut, the trend continues. Orkut had an option which lets the user see who visited my profile, but Facebook does not have that. So, people are always interested and want to know the unknown — Is it possible to see the viewers of my Facebook profile?

How to Check Who Viewed Your Facebook Profile the Most?

The question arises in my mind too, and for your confirmation, I want to mention that there is no official way to know who viewed my profile on Facebook. Still, there are few Android applications, Chrome extension and geeky ways to see the visitor of my Facebook profile. Let see the techniques. You can easily identify your profile visitor using Facebook profile ID even if the user changes his/her name on Facebook.

Method 1: How to Track Who Viewed Your Facebook Profile – Manual Way

  1. To know who views your Facebook profile, login to the Facebook account and go to your timeline page of Facebook. If you are new on Facebook, then to go the timeline, click on your profile picture and you will reach at your timeline. The URL of Facebook timeline looks something similar to https://www.facebook.com/{your profile name}.
  2. Right click on anywhere on the opened page and select “view page source option”. If you are a Chrome user then just type Ctrl+U and the source page will open.
  3. Press Ctrl+F (‘Cmd+F’ for mac) to open the search box at the top right corner of the source page.
  4. Type “InitialChatFriendsList” there.
  5. You will find a list of numbers there which are actually the profile IDs of the people who are recently checked or visited your Facebook profile.
    find my Facebook profile viewer manually
  6. Just type add the profile id beside facebook.com URL just like the below example. You will find the person who visited your profile frequently or recently.
  7. The URL should be something like this: https://www.facebook.com/xxxxxxxxxxxxxxx/ but not like this https://www.facebook.com/xxxxxxxxxxxxxxx-x/.
  8. The small number that you will find after the ‘-‘ (e.g. 2,1, or 0) is the indication of how often a Facebook profile user sees you and who visits your Facebook profile the most.
  9. The first ID of the list is the regular visitor while the last ID is the rarest viewer of your account.
However, some people says that these are not true. But, many experts say that this is the only possible way to know who viewed my Facebook profile.

 Method 2: How to See Who Views My Facebook Profile Using Chrome Extension “Profile Visitor for Facebook”

If you are interested to know who checked your Facebook profile then “Profile visitor for Facebook” is a Chrome extension which might help you. This add-on is only for Google Chrome users or who use Chrome browser to open Facebook. When you add the extension to your browser, a new ‘Visitor’ option will be added to the blue bar of Facebook just between the Home and Friend Requests option. See the screenshot below.
find my Facebook profile visitor
The viewer who uses this “Profile Visitor for Facebook” extension and visit your Facebook profile, will be displayed when you’ll click the visitor option. If the viewer does not use the same Chrome extension, will not be shown in the list even he/she is the Facebook profile visitor.
If you are the Firefox or Internet Explorer user, then you need to visit https://profilevisitors.co/ website. Select browser from the drop-down list and install the script to add the same functionality to other browsers.
The Profile Visitor add-on is 100% free and it is a great extension which lets you see who viewed your Facebook account. Remember that you can’t find the person on Facebook without logging in.
There is an Android app at Google play store named “Who Viewed My Profile” which helps me to find those people who visited my Facebook profile the most. But this application can be used for entertainment purposes only.
Link URL:
https://play.google.com/store/apps/details?id=com.whoviewedmy.profile.fbook&hl=en

Is it Possible to See Who Viewed Your Profile on Facebook?

The answer to the topic is a debating one. Many experts in the Facebook forum have discussed a lot about this matter. Many of them have given their views on method 1 whereas many of them told that the methods are under doubt and it is impossible to find who viewed my Facebook profile. However, Facebook officially according to their policy does not disclose till now the list of people who recently visited your profile. So, try the above methods to check your Facebook profile visitor.
Read More
  • Share This:  
  •  Facebook
  •  Twitter
  •  Google+
  •  Stumble
  •  Digg

How to turn off location services on iphone 5

 No comments   

Some apps might not work unless you turn on Location Services.1 The first time an app needs to access your Location Services information, you'll get a notification asking for permission. Choose one of these options:

Image result for IOS
  • Tap Allow to let the app use Location Services information as needed. 
  • Tap Don't Allow to prevent access.
iOS devices might use Wi-Fi and Bluetooth to determine your location. GPS and cellular location are available on iPhone and iPad (Wi-Fi + Cellular) models.
     

How to turn Location Services on or off for specific apps

  1. Go to Settings > Privacy > Location Services.
  2. Make sure that Location Services is on.
  3. Scroll down to find the app.
  4. Tap the app and select an option:
    • Never: Prevents access to Location Services information.
    • While Using the App: Allows access to Location Services only when the app or one of its features is visible on screen. If an app is set to While Using the App, you might see your status bar turn blue with a message that an app is actively using your location.
    • Always: Allows access to your location even when the app is in the background.
From here, apps should provide an explanation of how the app will use your location information. Some apps might offer only two options. Learn more about privacy and Location Services.
  1. Location Services uses GPS and Bluetooth (where they're available), along with crowd-sourced Wi-Fi hotspots and cellular towers to determine the approximate location of your device.
  2. Apps won't use your location until they ask for your permission and you allow permission.
     
Read More
  • Share This:  
  •  Facebook
  •  Twitter
  •  Google+
  •  Stumble
  •  Digg

Download messenger pc

 No comments   


Facebook Messenger is now rivalling WhatsApp when it comes to sending free messages to your contacts via the internet.  If you’re not familiar with either application, they allow you to send messages using data or wi-fi.

Image result for windows

Facebook Messenger is available to anyone in the UK, not just people who have a Facebook account, and can also be used to contact groups of people and make voice and video calls – all that is required is that you need to be in the contact list of the person(s) you are messaging, and they in yours.

If you don’t already have the app on your phone or tablet, here’s how you can download it and start contacting your friends.

How do I install Facebook Messenger on my Windows PC or phone?

1. Open the Windows Store on your device.
2. Type ‘Messenger’ in the search field. A list of apps will appear.
3. Click the app that was developed by ‘Facebook Inc.’ It will be at or near the top of the list. Tap or click ‘Install/ to begin downloading Messenger. The app will begin downloading to your device. Alternatively, click on this link and then on ‘Get the app’. 
4. Once it is downloaded, launch Facebook Messenger by clicking on the icon in your Start menu, or by finding it on your homepage or in your apps list on your phone.
5. Login using your Facebook account, or if you don’t have one, tap or click on the ‘Not on Facebook?’ button on the login screen.  Follow the instructions on how to sign in using your phone number or email.
Once you’re all set up, the app will ask you if you want to allow notifications. If you intend to make voice and video calls, it’s important to allow notifications otherwise you won’t know if people are trying to call you, unless you have the app open on your device at the time of the call.
You should also be prompted as to whether you would like to import your contacts from your device into Messenger.  If allowed, the app will automatically scan your contacts for those who have Messenger so that you can contact them easily.

How do I install Facebook Messenger on my iOS device?


1. Open the App Store on your device. 
2. Tap the Search button at the bottom of the screen. This opens the app search field.
3. Type in the word ‘Messenger’ – a number of apps will appear in the search results. Find the app developed by ‘Facebook Inc’ and tap the ‘get’ button. Alternatively this link will take you straight to the relevant page.
4. Tap ‘install’.  The app should then begin downloading. Depending on your security and privacy settings, you may be asked to provide your Apple ID before your device lets you download.
5. Once it is downloaded, there should be an ‘Open’ button to tap in the App Store to start Facebook Messenger – or you can simply find the Messenger icon in your apps and tap that.
6. Once you have launched the app, you should be prompted to log in – you can use your Facebook account to do this if you have one, or create a Messenger-only account if you choose not to be on Facebook by clicking on ‘Not on Facebook?’. Follow the instructions on how to sign in using your phone number or email.

How do I install Facebook Messenger on my Android device?

1.Open the Google Play Store on your device.
2. Type ‘Messenger’ in the search field.  A list of apps will appear.
3. Find the app developed by ‘Facebook Inc’ – which should be at or near the top of the list –and select it. Alternatively click on this link to go directly to Messenger on Google Store.
4. Tap the ‘Install’ button.  You may be asked to allow permission for Messenger to access various tools on your device. If you’re happy with these, tap ‘Accept’. Depending on your security and privacy settings, you may be asked to provide your Google account password before your device lets you download the app. You may also need to be connected to a wi-fi network to download.
5. Once it has downloaded, tap the ‘Open’ button on the Messenger Google Store page. Alternatively you can find it on one of your home screens or in your list of apps - launch it by tapping the app icon.
6. Login using your Facebook account, or if you don’t have one tap on the ‘Not on Facebook?’ button on the login screen.  Follow the instructions on how to sign in using your phone number or email.
[Read more: How to download WhatsApp]

Can I use Facebook Messenger without downloading the app?

Yes, you can go to the Messenger desktop website at Messenger.com.  You can use this site to access Facebook Messenger on any device. However, you will need a Facebook account to do this.
Read More
  • Share This:  
  •  Facebook
  •  Twitter
  •  Google+
  •  Stumble
  •  Digg

How do you turn off location on iphone

 No comments   

Smartphones have a feature that helps you find where you are by using something called Location Services....
Image result for IOS
That means if you've got your smartphone on you, you never have to be lost. Even if you don't know where you are or where you're going, your smartphone knows your location and how to get you almost anywhere. Even better, if you're going out for a meal or looking for a store, your phone can make nearby recommendations.
So, whether you've got an iPhone or Android phone, we'll show you how to turn on Location Services for your device.
01
of 04

What Are Locations Services and How Do They Work?


location services
image credit: Geber86/E+/Getty Images
Location Services is the overall name for a set of related features used to determine your location (or the location of your phone, at least) and then provide content and services based on that. Google Maps, Find My iPhone, Yelp, and many more apps all use your phone's location to tell you where to drive, where your lost or stolen phone is now, or how many great burritos are within a quarter mile of where you're standing.
Location Services work by tapping into both the hardware on your phone and multiple kinds of data about the Internet. The backbone of Location Services is usually GPS. Most smartphones have a GPS chip built into them. This lets your phone connect to the Global Positioning System network to get its location.
GPS is great, but it's not always completely accurate. To get even better information about where you are, Location Services also use data about cellular phone networks, nearby Wi-Fi networks, and Bluetooth devices to pinpoint where you are. Combine that with crowd-sourced data and extensive mapping technology from both Apple and Google and you've got a powerful combination for figuring out what street you're on, what store you're near, and much more.
Some higher-end smartphones add even more sensors, like a compass or gyroscope. Location Services figures out where you are; These sensors determine what direction you're facing and how you're moving. 

02
of 04

How to Turn on Location Services on iPhone


turn on location services on iPhone
You may have enabled Location Services when you set up your iPhone. If not, turning them on is super easy. Just follow these steps:
  1. Tap Settings.
  2. Tap Privacy.
  3. Tap Location Services.
  4. Move the Location Services slider to on/green. Location Services are now turned on and apps that need them can start accessing your location right away.
These instructions were written using iOS 11, but the same steps—or very nearly the same—apply to iOS 8 and up.
03
of 04

How to Turn on Location Services on Android


turn on location services on android
Like on iPhone, Location Services are enabled during setup on Android, but you can also enable them later by doing this:
  1. Tap Settings.
  2. Tap Location.
  3. Move the slider to On.
  4. Tap Mode.
  5. Select the Mode you prefer:
    1. High accuracy: Delivers the most accurate location information by using GPS, Wi-Fi networks, Bluetooth, and cellular networks to determine your location. It's got the highest accuracy, but it uses more battery and has less privacy.
    2. Battery saving: Saves battery by not using GPS, but still uses the other technologies. Less accurate, but with the same low privacy.
    3. Device only: Best if you care a lot about privacy and are OK with somewhat less accurate data. Because it doesn't use cellular, Wi-Fi, or Bluetooth, it leaves fewer digital tracks.
These instructions were written using Android 7.1.1, but they should be fairly similar to other, recent versions of Android.

04
of 04

When Apps Ask to Access Location Services


iPhone location tracking alert
image credit: Apple Inc.
Apps that use Location Services may ask for permission to access your location the first time you launch them. You can choose to allow access or not, but some apps need to know your location to function properly. When making this choice, just ask yourself if it makes sense for the app to use your location.
Your phone may also occasionally ask if you want to keep letting an app use your location. This is a privacy feature to make sure you're aware of what data apps are accessing.
Read More
  • Share This:  
  •  Facebook
  •  Twitter
  •  Google+
  •  Stumble
  •  Digg

Create your own poll

 No comments   

Facebook is the latest social media platform to introduce polling into its feed. Though users could simply post a Facebook status, tweet or Instagram story asking a question that their followers could reply to, polling is an easier means to discovering what their followers prefer.
Twitter and Instagram paved the way with the introduction of polling as a means for users to learn what their followers favoured between any two topics. Now, Facebook members can also use polls to discover whether they should take a vacation to Spain or France, purchase an iPhone or an Android or watch Stranger Things 2 verses House of Cards.  


Not only is this new feature helpful for everyday inquiries, but polling has become a tool that allows marketers, lifestyle influencers, brands and bloggers to connect with potential buyers and readers in addition to uncovering what content their audience resonates better with.

Whether a brand, social influencer or everyday social media user looking for some helpful suggestions from your social network - here’s how to create a two-option Facebook poll with GIFs and photos.

How to create a Facebook Poll

Log in and search

To begin, log into your Facebook page and search “poll” in the search bar. If you are already logged into your account, you can also type into a search engine “Facebook poll” and be directed right to the Polls page by selecting “Make a Poll on Your Page - Facebook.com”.

Allow access

Secondly, select the Polls app from the dropdown list and click “Go to Polls”. You will then be asked for Poll’s permission to access your basic information and to access your profile information. If you hit allow, Facebook will direct you to the Polls page.
Here you can create limitless polls that can be posted on your personal profile as well as any other pages you manage.

Create new poll

Choose “Create a new poll” towards the top right of the page and choose which page you’d like to post your poll. Fill in the body of your poll, beginning with the question you’d like to receive feedback about.
Type your question in the “Question” box as well as your answers in the “Answers” box. You may only add one answer per line in the Answers section, pictured in the image below.

Customise your poll

Additional custom tools include the ability to add photos and videos to your poll by uploading basic source code information. Though it sounds complicated, the process is actually quite easy, and Facebook even offers instructions that outline the process.

To add images to your question, first locate the copy image address by right clicking on your image. You will find in the dropdown “copy image address”, which you should select. Then in your Answers box, type “<img”, paste the image address right after, and end with “>”. If you wanted a picture next to Pepsi for example, the full text on one line would read “Pepsi <imgsrc=”http://example.com/image.jpg” />
To add a video, you would follow the same process as uploading pictures. On the desired video, right click and copy “embed code”. Then in the Answers boc, instead of writing “Pepsi <img alt="" />” for images you would write “Pepsi <iframe>” for a video.</iframe>
If you know a little about HTML and CSS, you have the option of further decorating your poll’s answers with colour and font styling elements such as
,
and .
Once satisfied with your Questions and Answers content, check a box if you’d like to allow voters to add other answers or if your poll is in Right-to-Left language (such as Arabic). Choose a vote button caption - which is generally just vote - and then add tags for public pages. Tags can attract more voters if you’re interested in a wealth of opinions.

Premium options

The basic Poll option allows users to write multiple answers, shows voters’ faces and displays results ordered by popularity. Premium features can be purchased for $9.99 a month or $19.99 a year for extra options such as hiding results after voting, showing comments on the poll and blocking ads - to name a few.
Facebook also offers marketing options of posting the page’s wall, wallpost on poll’s Facebook, Twitter and G+ pages and advertisement of your poll to get more votes.

Submit poll

Finally, if satisfied with your poll and Poll Package, click “Create Poll”, invite friends to your Poll page and publish your poll.
Read More
  • Share This:  
  •  Facebook
  •  Twitter
  •  Google+
  •  Stumble
  •  Digg

Facebook for android free download apk

 No comments   


Facebook Messenger is now rivalling WhatsApp when it comes to sending free messages to your contacts via the internet.  If you’re not familiar with either application, they allow you to send messages using data or wi-fi.

Image result for IOS

Facebook Messenger is available to anyone in the UK, not just people who have a Facebook account, and can also be used to contact groups of people and make voice and video calls – all that is required is that you need to be in the contact list of the person(s) you are messaging, and they in yours.

If you don’t already have the app on your phone or tablet, here’s how you can download it and start contacting your friends.

How do I install Facebook Messenger on my iOS device?

1. Open the App Store on your device. 
2. Tap the Search button at the bottom of the screen. This opens the app search field.
3. Type in the word ‘Messenger’ – a number of apps will appear in the search results. Find the app developed by ‘Facebook Inc’ and tap the ‘get’ button. Alternatively this link will take you straight to the relevant page.
4. Tap ‘install’.  The app should then begin downloading. Depending on your security and privacy settings, you may be asked to provide your Apple ID before your device lets you download.
5. Once it is downloaded, there should be an ‘Open’ button to tap in the App Store to start Facebook Messenger – or you can simply find the Messenger icon in your apps and tap that.
6. Once you have launched the app, you should be prompted to log in – you can use your Facebook account to do this if you have one, or create a Messenger-only account if you choose not to be on Facebook by clicking on ‘Not on Facebook?’. Follow the instructions on how to sign in using your phone number or email.

How do I install Facebook Messenger on my Android device?

1.Open the Google Play Store on your device.
2. Type ‘Messenger’ in the search field.  A list of apps will appear.
3. Find the app developed by ‘Facebook Inc’ – which should be at or near the top of the list –and select it. Alternatively click on this link to go directly to Messenger on Google Store.
4. Tap the ‘Install’ button.  You may be asked to allow permission for Messenger to access various tools on your device. If you’re happy with these, tap ‘Accept’. Depending on your security and privacy settings, you may be asked to provide your Google account password before your device lets you download the app. You may also need to be connected to a wi-fi network to download.
5. Once it has downloaded, tap the ‘Open’ button on the Messenger Google Store page. Alternatively you can find it on one of your home screens or in your list of apps - launch it by tapping the app icon.
6. Login using your Facebook account, or if you don’t have one tap on the ‘Not on Facebook?’ button on the login screen.  Follow the instructions on how to sign in using your phone number or email.
[Read more: How to download WhatsApp]

How do I install Facebook Messenger on my Windows PC or phone?

1. Open the Windows Store on your device.
2. Type ‘Messenger’ in the search field. A list of apps will appear.
3. Click the app that was developed by ‘Facebook Inc.’ It will be at or near the top of the list. Tap or click ‘Install/ to begin downloading Messenger. The app will begin downloading to your device. Alternatively, click on this link and then on ‘Get the app’. 
4. Once it is downloaded, launch Facebook Messenger by clicking on the icon in your Start menu, or by finding it on your homepage or in your apps list on your phone.
5. Login using your Facebook account, or if you don’t have one, tap or click on the ‘Not on Facebook?’ button on the login screen.  Follow the instructions on how to sign in using your phone number or email.
Once you’re all set up, the app will ask you if you want to allow notifications. If you intend to make voice and video calls, it’s important to allow notifications otherwise you won’t know if people are trying to call you, unless you have the app open on your device at the time of the call.
You should also be prompted as to whether you would like to import your contacts from your device into Messenger.  If allowed, the app will automatically scan your contacts for those who have Messenger so that you can contact them easily.

Can I use Facebook Messenger without downloading the app?

Yes, you can go to the Messenger desktop website at Messenger.com.  You can use this site to access Facebook Messenger on any device. However, you will need a Facebook account to do this.
Read More
  • Share This:  
  •  Facebook
  •  Twitter
  •  Google+
  •  Stumble
  •  Digg

How to turn on the location on iphone

 No comments   

Some apps might not work unless you turn on Location Services.1 The first time an app needs to access your Location Services information, you'll get a notification asking for permission. Choose one of these options:
  • Tap Allow to let the app use Location Services information as needed. 
  • Tap Don't Allow to prevent access.2..
iOS devices might use Wi-Fi and Bluetooth to determine your location. GPS and cellular location are available on iPhone and iPad (Wi-Fi + Cellular) models.
   
Image result for IOS

How to turn Location Services on or off for specific apps

  1. Go to Settings > Privacy > Location Services.
  2. Make sure that Location Services is on.
  3. Scroll down to find the app.
  4. Tap the app and select an option:
    • Never: Prevents access to Location Services information.
    • While Using the App: Allows access to Location Services only when the app or one of its features is visible on screen. If an app is set to While Using the App, you might see your status bar turn blue with a message that an app is actively using your location.
    • Always: Allows access to your location even when the app is in the background.
From here, apps should provide an explanation of how the app will use your location information. Some apps might offer only two options. Learn more about privacy and Location Services.
  1. Location Services uses GPS and Bluetooth (where they're available), along with crowd-sourced Wi-Fi hotspots and cellular towers to determine the approximate location of your device.
  2. Apps won't use your location until they ask for your permission and you allow permission.
     
Read More
  • Share This:  
  •  Facebook
  •  Twitter
  •  Google+
  •  Stumble
  •  Digg

How to make anonymous poll on facebook

 No comments   

Facebook is the latest social media platform to introduce polling into its feed. Though users could simply post a Facebook status, tweet or Instagram story asking a question that their followers could reply to, polling is an easier means to discovering what their followers prefer.
Twitter and Instagram paved the way with the introduction of polling as a means for users to learn what their followers favoured between any two topics. Now, Facebook members can also use polls to discover whether they should take a vacation to Spain or France, purchase an iPhone or an Android or watch Stranger Things 2 verses House of Cards.....

Mobile lifestyle 61

Not only is this new feature helpful for everyday inquiries, but polling has become a tool that allows marketers, lifestyle influencers, brands and bloggers to connect with potential buyers and readers in addition to uncovering what content their audience resonates better with.

Whether a brand, social influencer or everyday social media user looking for some helpful suggestions from your social network - here’s how to create a two-option Facebook poll with GIFs and photos.

How to create a Facebook Poll

Log in and search

To begin, log into your Facebook page and search “poll” in the search bar. If you are already logged into your account, you can also type into a search engine “Facebook poll” and be directed right to the Polls page by selecting “Make a Poll on Your Page - Facebook.com”.

Allow access

Secondly, select the Polls app from the dropdown list and click “Go to Polls”. You will then be asked for Poll’s permission to access your basic information and to access your profile information. If you hit allow, Facebook will direct you to the Polls page.
Here you can create limitless polls that can be posted on your personal profile as well as any other pages you manage.

Create new poll

Choose “Create a new poll” towards the top right of the page and choose which page you’d like to post your poll. Fill in the body of your poll, beginning with the question you’d like to receive feedback about.
Type your question in the “Question” box as well as your answers in the “Answers” box. You may only add one answer per line in the Answers section, pictured in the image below.

Customise your poll

Additional custom tools include the ability to add photos and videos to your poll by uploading basic source code information. Though it sounds complicated, the process is actually quite easy, and Facebook even offers instructions that outline the process.

To add images to your question, first locate the copy image address by right clicking on your image. You will find in the dropdown “copy image address”, which you should select. Then in your Answers box, type “<img”, paste the image address right after, and end with “>”. If you wanted a picture next to Pepsi for example, the full text on one line would read “Pepsi <imgsrc=”http://example.com/image.jpg” />
To add a video, you would follow the same process as uploading pictures. On the desired video, right click and copy “embed code”. Then in the Answers boc, instead of writing “Pepsi <img alt="" />” for images you would write “Pepsi <iframe>” for a video.</iframe>
If you know a little about HTML and CSS, you have the option of further decorating your poll’s answers with colour and font styling elements such as
,
and .
Once satisfied with your Questions and Answers content, check a box if you’d like to allow voters to add other answers or if your poll is in Right-to-Left language (such as Arabic). Choose a vote button caption - which is generally just vote - and then add tags for public pages. Tags can attract more voters if you’re interested in a wealth of opinions.

Premium options

The basic Poll option allows users to write multiple answers, shows voters’ faces and displays results ordered by popularity. Premium features can be purchased for $9.99 a month or $19.99 a year for extra options such as hiding results after voting, showing comments on the poll and blocking ads - to name a few.
Facebook also offers marketing options of posting the page’s wall, wallpost on poll’s Facebook, Twitter and G+ pages and advertisement of your poll to get more votes.

Submit poll

Finally, if satisfied with your poll and Poll Package, click “Create Poll”, invite friends to your Poll page and publish your poll.
Read More
  • Share This:  
  •  Facebook
  •  Twitter
  •  Google+
  •  Stumble
  •  Digg
Newer Posts Older Posts Home

Blog Archive

  • ►  2019 (502)
    • ►  July (5)
      • ►  Jul 08 (2)
      • ►  Jul 07 (2)
      • ►  Jul 06 (1)
    • ►  February (368)
      • ►  Feb 12 (33)
      • ►  Feb 11 (21)
      • ►  Feb 09 (37)
      • ►  Feb 08 (40)
      • ►  Feb 07 (45)
      • ►  Feb 06 (40)
      • ►  Feb 05 (23)
      • ►  Feb 04 (49)
      • ►  Feb 02 (25)
      • ►  Feb 01 (55)
    • ►  January (129)
      • ►  Jan 31 (78)
      • ►  Jan 30 (20)
      • ►  Jan 29 (11)
      • ►  Jan 20 (4)
      • ►  Jan 19 (3)
      • ►  Jan 18 (4)
      • ►  Jan 17 (5)
      • ►  Jan 16 (1)
      • ►  Jan 12 (1)
      • ►  Jan 11 (1)
      • ►  Jan 10 (1)
  • ▼  2018 (2465)
    • ►  November (64)
      • ►  Nov 25 (4)
      • ►  Nov 24 (4)
      • ►  Nov 23 (7)
      • ►  Nov 22 (9)
      • ►  Nov 21 (11)
      • ►  Nov 19 (14)
      • ►  Nov 15 (7)
      • ►  Nov 03 (6)
      • ►  Nov 01 (2)
    • ►  October (178)
      • ►  Oct 31 (9)
      • ►  Oct 30 (1)
      • ►  Oct 26 (1)
      • ►  Oct 24 (16)
      • ►  Oct 23 (21)
      • ►  Oct 22 (26)
      • ►  Oct 19 (5)
      • ►  Oct 16 (50)
      • ►  Oct 15 (36)
      • ►  Oct 14 (12)
      • ►  Oct 13 (1)
    • ▼  September (771)
      • ►  Sep 27 (58)
      • ►  Sep 26 (50)
      • ►  Sep 25 (70)
      • ▼  Sep 24 (70)
        • Change facebook page url more than once
        • Facebook who visited my profile the most
        • How to turn off location services on iphone 5
        • Download messenger pc
        • How do you turn off location on iphone
        • Create your own poll
        • Facebook for android free download apk
        • How to turn on the location on iphone
        • How to make anonymous poll on facebook
        • Turn on location services iphone
        • How to turn on location on iphone 6 plus
        • Facebook application free download
        • Poll in facebook message
        • Facebook poll iphone
        • Facebook message location tracker
        • How do i turn location services off on my iphone
        • How to switch off location in iphone 6
        • Download facebook messenger for ipad
        • Facebook Free masanger download
        • Facebook free download for android
        • FB messenger download for samsung
        • How to create a poll on facebook profile
        • How to create a poll
        • How to get more followers on facebook
        • How to increase followers on fb
        • Can you make polls on facebook
        • Facebook free followers online
        • How to do a poll on facebook event
        • Download facebook on my phone now
        • Download facebook without app store
        • Download latest messenger apk
        • Messenger download apple
        • How to get followers on facebook
        • Make live polls on Facebook
        • Instagram followers booster free
        • Insta followers instagram
        • How to increase my followers on facebook
        • How to get more followers on Instagram
        • Followers instagram cheat
        • Instagram cheats for likes and followers
        • How to get facebook followers for business
        • How to get more followers on your facebook page
        • How do i create a poll on my facebook page
        • Facebook private poll creator
        • How to make a poll on facebook chat
        • How to create a poll on your personal facebook page
        • How to poll
        • Facebook login and password facebook login
        • Find Facebook email and password
        • Download messenger for android
        • Facebook app update download
        • Facebook messenger free download for iphone
        • How to retrieve my facebook account password
        • How to get back hacked facebook account with old p...
        • I forgot my password to my facebook
        • Facebook login without password
        • I lost my fb password
        • How to get on facebook if i forgot my password
        • How to change my facebook password
        • I forgot email and password for facebook
        • Download facebook messengr
        • Facebook mobile full site download
        • New fb messenger app download
        • Messenger free download
        • Facebook login free download for mobile android
        • www Facebook messenger free download
        • Facebook download free for samsung galaxy
        • How to know your instagram password
        • How to log into someone else's facebook messenger
        • Facebook bad ip: How to fix facebook access restri...
      • ►  Sep 20 (50)
      • ►  Sep 19 (80)
      • ►  Sep 18 (50)
      • ►  Sep 17 (43)
      • ►  Sep 14 (81)
      • ►  Sep 13 (39)
      • ►  Sep 12 (101)
      • ►  Sep 11 (69)
      • ►  Sep 10 (9)
      • ►  Sep 09 (1)
    • ►  June (215)
      • ►  Jun 07 (13)
      • ►  Jun 06 (5)
      • ►  Jun 05 (48)
      • ►  Jun 04 (49)
      • ►  Jun 03 (50)
      • ►  Jun 02 (50)
    • ►  May (1205)
      • ►  May 30 (50)
      • ►  May 29 (50)
      • ►  May 28 (43)
      • ►  May 26 (50)
      • ►  May 25 (50)
      • ►  May 24 (50)
      • ►  May 23 (50)
      • ►  May 21 (50)
      • ►  May 20 (100)
      • ►  May 18 (92)
      • ►  May 17 (98)
      • ►  May 16 (93)
      • ►  May 15 (25)
      • ►  May 14 (25)
      • ►  May 13 (90)
      • ►  May 12 (25)
      • ►  May 11 (50)
      • ►  May 09 (25)
      • ►  May 08 (25)
      • ►  May 07 (32)
      • ►  May 06 (21)
      • ►  May 05 (18)
      • ►  May 04 (25)
      • ►  May 03 (18)
      • ►  May 02 (25)
      • ►  May 01 (25)
    • ►  April (26)
      • ►  Apr 12 (25)
      • ►  Apr 10 (1)
    • ►  March (6)
      • ►  Mar 26 (6)

Search

Copyright © Make Over Arena