• Make Over Arena

Selling Things On Facebook - Sell Items On Facebook Group

Selling Things On Facebook – Facebook is fast becoming one of the most powerful online marketing platforms for promoting businesses, cond...

How to add a topic to pinterest

 No comments   

This teaches you how to find and follow specific Pinterest topics when you’re using an Android.

Quick Summary

1. Open Pinterest.
2. Tap the magnifying glass.
3. Search for a topic.
4. Tap a topic to select it.
5. Tap a sub-topic.
6. Tap Follow.

Steps

  1. Image titled Follow Pinterest Topics on Android Step 1
    1
    Open Pinterest. Its icon is a white letter “p” on a red background. You’ll find it on your home screen or in the app drawer.
  2. Image titled Follow Pinterest Topics on Android Step 2
    2
    Tap the magnifying glass. It’s at the top of the screen.
  3. Image titled Follow Pinterest Topics on Android Step 3
    3
    Search for a topic. Type the topic you want to follow into the search box at the top of the screen, or scroll down to view those suggested by Pinterest.
  4. Image titled Follow Pinterest Topics on Android Step 4
    4
    Tap a topic to select it. Now you’ll see this topic’s page, which includes a row of subtopics and several relevant pins.
  5. Image titled Follow Pinterest Topics on Android Step 5
    5
    Tap a sub-topic. These are at the small square image buttons at the top of the screen. Scroll right across the sub-topics to view additional options, then tap the one you want to follow.
  6. Image titled Follow Pinterest Topics on Android Step 6
    6
    Tap Follow. It’s the red button near the top-right corner of the screen. You are now following this topic.
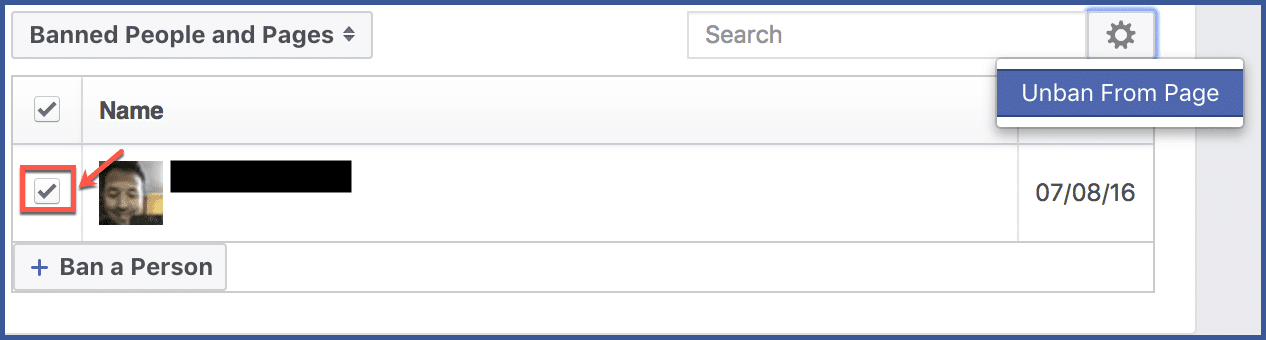
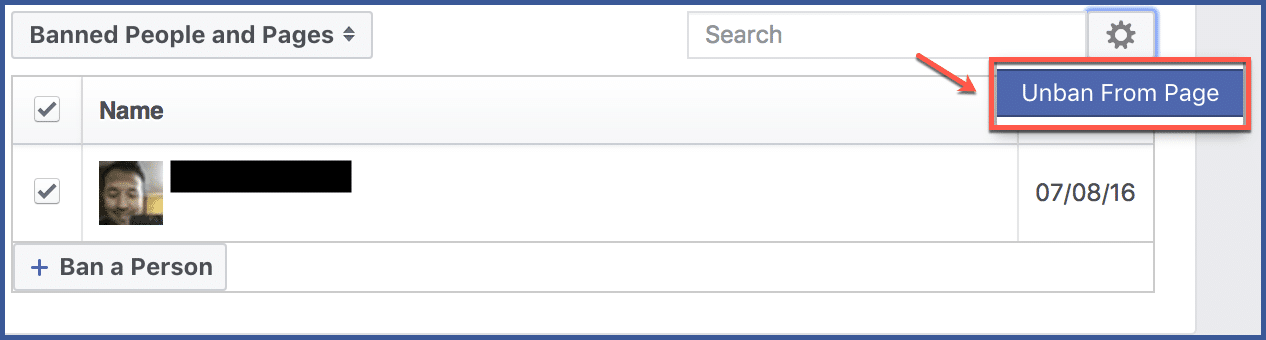
    • Tap the back button to return to the main topic. Then, repeat the process for each additional sub-topic you want to follow.
Read More
  • Share This:  
  •  Facebook
  •  Twitter
  •  Google+
  •  Stumble
  •  Digg

How to see who has unfriended me on facebook

 No comments   


Woebot offers cognitive behavioural therapy through Facebook Messenger
Update: Facebook has disabled this new feature, which was clearly not supposed to be there. "It's been fixed now," a Facebook spokesperson said in a statement. The original article is below.
Currently, Facebook does not notify you when someone unfriends you on the social network. That may soon change with the upcoming Facebook Timeline feature, which will be replacing your current Facebook profile.
Unless Facebook changes this, you can actually see who has unfriended you during any point in time you've been on the social network. Here's how (via BuzzFeed):
  1. Get the new Facebook Timeline feature. There's an official way and an unofficial way.
  2. Choose a prior year on your Facebook Timeline and click on the number of friends you connected with that year in the Friends box.
  3. Click on the "Made x New Friends" list - anyone with an Add Friend link next to their name either unfriended you, or you unfriended them.
If this is too much for you, stop now. If you can't get enough, repeat steps 2 and 3 with another year.

The Facebook Timeline feature is currently in beta, so it's very possible that Facebook will change how this feature works. It would not be very hard for the social network to only list people you are still Facebook friends with.
I've asked Facebook about this little tidbit and will update this article if I hear back. I bet this is one of the things Palo Alto will want to consider tweaking before it rolls out the Timeline to everyone.
Read More
  • Share This:  
  •  Facebook
  •  Twitter
  •  Google+
  •  Stumble
  •  Digg

How to download a video from facebook to my iphone

 No comments   

As we all know, Facebook is an endless source of excitement. Apart from connecting you with millions of users across the globe, Facebook offers you plenty of multimedia content to enjoy. However, if you need to see those funny or useful videos once again, at another time, you should save Facebook videos to iPhone. Otherwise, navigating to the same video on Facebook can be a dauting task. If you are an iPhone user and wondering how to save video from Facebook to iPhone, this article can be of a great assistance.
Once you have downloaded videos from Facebook to iPhone, you can watch them later on without having an internet connection and without taking the trouble of navigating through the pages. Although downloading Facebook video to iPhone is not a straightforward process, this article makes it easier for you. Read on if you need to know how to download videos from Facebook to iPhone.
  • Part 1: Save Facebook Videos for Later Viewing on iPhone
  • Part 2: Download Your Facebook Archive including Videos
  • Part 3: Save Videos from Facebook to iPhone with Apps
  • Tip: Export Data from iOS Devices

Part 1: Save Facebook Videos for Later Viewing on iPhone

If you want to save Facebook videos for later viewing on your iOS device, you can do it pretty easily. However, this method doesn’t allow you to save videos to the device locally; instead, the videos will be saved on your Facebook profile itself. You don’t need to use any app to get this done.
  1. Launch your Facebook account using your iOS device. Then, go to the video you need to save.
  2. When the video plays, you will see three dots at the top righthand side and tap on it.
  3. Select “Save Video” option.
  4. Now, your video will be saved and you can view at whenever you need.
  5. save-facebook-video-to-iphone
To view the video, you can simply launch the app and go to more button located at the bottom of the screen. Then select “Saved” option. If the video is not available there, just go to the “Video” tab to locate the clip.

Part 2: Download Your Facebook Archive including Videos

Facebook lets you download all the stuff posted including photos and videos in the form of a ZIP archive. To download this archive, you can do the following.
  1. Go to your Facebook account on the computer -> Settings menu -> General option. 
  2. Click on the option called “Download a copy of your Facebook data”.
  3. Follow the onscreen instructions to proceed.
  4. Once the file is ready to be downloaded, you should get an email and click on it to confirm.
  5. The file will be stored in your Mac. Extract the ZIP file. Open the “index.htm” in a web browser and click on Photos or Videos link.
  6. Right-click on any file and save it to your computer.
  7. download-facebook-archive

Part 3: Save Videos from Facebook to iPhone with Apps

Method 1: With MyMedia

To save Facebook video to iPhone easier, you can use a third-party app too. In this case, we will be using an app called MyMedia.
  1. Download MyMedia and launch it.
  2. Go to the video you need to download. Click on share button and select the “Copy Link”.
  3. Select “Browser” tab on MyMedia app and go to fbdown.net using any web browser.
  4. Paste the link you copied a little earlier and tap “Download” button.
  5. Download the video either in Normal or HD mode.
  6. Save it using an appropriate name.
  7. Tap back button and tap on Media tab.
  8. Tap the name of the video and select “Save to Camera Roll”.
  9. mymedia-file-manager

Method 2: With Browser and File Manager for Documents

  1. Download Browser and File Manager for Documents and open it.
  2. Type in pickvideo.net on the address bar.
  3. Tap on Facebook option.
  4. Paste the link of the video on the search box and hit Download.
  5. Once the download is completed to go the files tab to view the downloaded files. You can tap on Save Video option and save it on the iOS device.
  6. download-facebook-videos-with-browser-file-manager

Tip: Export Data from iOS Devices

If you need to export the most important data from your iOS device to the computer you are using, you should use a trusted software like iMyFone D-Port. As of this writing this software doesn’t support exporting Facebook data for now. However, such feature will be integrated soon to this software.
Try It FreeTry It Free

Main Features of iMyFone D-Port

  1. It can selectively export more than 18 file types from any iOS device
  2. It can backup the entire device or certain file types only
  3. It can access and view both iTunes and iCloud data
  4. It is compatible with all the modern iOS devices and iOS versions like iOS 12/11/10 and etc
Choose the data type(s)
We expect that you would make the best use of this article and get to know how to download videos from Facebook to iPhone easily. We appreciate if you can share your experience with us by leaving a comment.
Read More
  • Share This:  
  •  Facebook
  •  Twitter
  •  Google+
  •  Stumble
  •  Digg

How to reset password on instagram with phone number

 No comments   

To recover your password, start by opening the Instagram app and tappingForgot password?, for iOS users, orGet help signing in, for Android users.
On the login screen, tap the Username tab, and enter your Instagram username or the email address that you used when signing up for your account. If you do not remember either of these, you will need to use another method.
Once you have entered your information, tap Send Login Link:

You will receive at the email address that you used to sign up for Instagram a link to reset your password. Click this link in the email, and you will be taken to a page that will prompt you to enter a new password.
Choose a new code, and save your changes. The next time that you log into Instagram, be sure to use this new code.

Recover Your Password via SMS

If you are using an Android device, you can choose to reset your password via SMS. Open the Instagram app, and on the login screen, tapGet help signing inbelowLogin. Tap theSend an SMSoption.
You will receive an SMS at the phone number that you have registered with Instagram. Follow the instructions in the message to reset your password.
N.B. This option is not available for iOS users.

Recover Your Account via Facebook

Instagram gives you the option to log into your account using your Facebook credentials. On the login screen, tap eitherGet help signing in, if you use Android, orForgot password?, for iOS users. At the bottom of the screen that pops up, selectLog in with Facebook. (For iOS users, this option is also available on the first login screen.)
When prompted to allow Instagram to connect you using your Facebook account, select Continue:


Getting Additional Login Help

On Android

If you are having trouble resetting your password because you don't remember your email address, phone number, or Facebook account, Instagram can provide you with additional help.

Tap Use Username or Email, then enter your username or your email address. Next, tap the right arrow in the top-right corner. Tap Need more help?, then follow the on-screen instructions.

On iOS

Open the Instagram app, then tapForgot password?:


Toward the bottom of the page, tapNeed more help?belowSend Login Link, then follow the on-screen instructions:

Read More
  • Share This:  
  •  Facebook
  •  Twitter
  •  Google+
  •  Stumble
  •  Digg

How to activate instagram account

 No comments   

This teaches you how to turn back on your Instagram account after you've temporarily deactivated it, as well as how to appeal an Instagram-disabled account. If your account has been deleted, your only option is to create a new account.

Image result for instagram

 1
Reactivating an Account

  1. 1
    Make sure your account has been deactivated for long enough.After choosing to deactivate your account, Instagram typically requires a few hours to finish the process. During this time, you cannot reactivate your account.
    • If your account has been deactivated for more than a day, you should be able to log back in without any trouble.
  2. 2
    Know that you cannot reactivate a deleted account. If you chose to delete your Instagram account, you won't be able to reactivate it after deletion.
  3. 3
    Open Instagram. Tap the Instagram app icon, which resembles a multicolored camera.
  4. 4
    Enter your username, email address, or phone number. Do so in the top text field. You can use any of these credentials so long as they're associated with the account you want to reactivate.
    • Depending on the screen to which Instagram loads, you may first have to tap a Log In button or link in order to view the login page.
  5. 5
    Enter your password. Do this in the "Password" text box.
    • If you don't remember your password, you'll need to reset it.
  6. 6
    Tap Log in. It's at the bottom of the screen. As long as your login credentials are correct, doing so will log you into Instagram and reactivate your account.
  7. 7
    Follow any on-screen instructions. Depending on how long your Instagram account has been deactivated, you may have to accept updated Terms of Use or verify your phone number before you can proceed to your account.
    • Logging back into your account reactivates it, so you shouldn't have to perform any reactivation steps after logging in.

 2
Appealing a Disabled Account

  1. 1
    Verify that your account is suspended. Open the Instagram app and try logging in with the correct credentials. If you see a message which says "Your account has been disabled" (or something similar) appear after tapping Log in, Instagram has disabled your account for violating the Terms of Use.[1]
    • If you just see an error message (e.g., "Incorrect password or username"), your account hasn't been disabled by Instagram. Try troubleshooting for a fix.
  2. 2
    Open the Instagram appeal form. Go to https://help.instagram.com/contact/606967319425038 in your computer's web browser. You can use this form to request that Instagram allow you to access your account.
  3. 3
    Enter your name. In the "Full name" text box near the top of the page, enter your first and last name as it appears on your Instagram account.
  4. 4
    Enter your username. Type your Instagram username into the "Your Instagram Username" text box.
  5. 5
    Enter your email address and phone number. Do so in the "Your email address" and "Your phone number" text boxes, respectively.
  6. 6
    Enter your appeal request. In the last text box on the page, type in a brief message explaining why you think your account should not be deactivated. When writing your appeal, remember the following guidelines:
    • Explain that your account was deactivated, and you believe the deactivation to be a mistake.
    • Avoid apologizing, as doing so implies some form of fault.
    • Keep your tone pleasant, and refrain from using harsh language.
    • End your appeal with a "Thank you!".
  7. 7
    Click Send. It's a blue button at the bottom of the page. Doing so will send your appeal to Instagram; if they choose to reactivate your account, you'll be able to log in when notified.
    • You can repeat the appeal process several times per day until Instagram reaches a decision.

 3
Troubleshooting Login Issues

  1. 1
    Try logging in with your email or phone number. If attempting to log in with your username isn't working, consider using your email address or your phone number.
    • Likewise, you might try logging in with your username if you usually use your email or phone number.
    • Your password needs to be correct regardless of your selected login credential.
  2. 2
    Reset your password. If you can't remember the correct password for your Instagram account, you can reset it from your phone or computer.
  3. 3
    Turn off your phone's Wi-Fi when logging in. If the Instagram app (not your login information) is the problem, using cellular data instead of Wi-Fi can resolve some login issues.
  4. 4
    Use a different platform to access Instagram. Your phone or computer may have cached information which is preventing you from logging into your account; if so, using a different phone, computer, or browser to log into your account may fix this problem.
  5. 5
    Uninstall and reinstall the Instagram app. In some cases, reinstalling Instagram will resolve login issues caused by the app.
    • If your Instagram app is out-of-date, doing this will also make sure that you have the most recent version of the app.
  6. 6
    Consider whether you violated Instagram's Terms of Use. If you're receiving a message that says your account doesn't exist, your account may have been deleted by Instagram due to a Terms of Use violation.
    • Common violations include posting nudity, bullying other users, promoting harmful products, and fraud.[2]
    • Terms of Use violations often result in your account being suspended or deleted without warning.
Read More
  • Share This:  
  •  Facebook
  •  Twitter
  •  Google+
  •  Stumble
  •  Digg

Find out if someone blocked you on facebook

 No comments   

Getting blocked on Facebook is not fun for anyone, but if you also use Facebook for your small business, getting blocked can take on a whole new dimension in terms of unnerving experiences. Facebook makes the act of blocking someone a confidential matter and does not offer any tools to help you discover if you have been blocked or not. However, with a bit of detective work, you can usually determine if you have been blocked. Remember that just because someone is no longer visible in your list of friends does not necessarily mean you have been blocked. You may have been "unfriended," the person may have terminated their account or Facebook may have suspended their account.
Image result for facebook

Search Results

If someone has blocked you, rather than simply discontinued your friendship, his name will not show up in your account's search results. Try typing the person's name in the search field at the top of your Facebook home page. If you don't find that person, you may have been blocked. However, he may have simply changed his security settings to prevent anyone but friends from searching for him. Try logging out of Facebook or toggling to your business account (click the arrow in the upper right corner and select "Log In As"). Try searching for the person again. If the person is not visible in a public search or from your business account, you may have been blocked. If the person is visible in a public search, but not visible in a search from your personal account, you've been blocked.

Mutual Friend List

Mutual friends can be a good indicator to see if you have been blocked. Navigate to a profile of someone who was a mutual friend with the person you suspect has blocked you. A list of some of her current friends is on their profile page. Click the "See All" link at the top of the list. A search field appears at the top of the page, which you can use to type the person's name. If the person's profile appears, you have not been blocked. If it doesn't appear, you may have been blocked. While few people have their friends listed publicly, if you can find such a person, try logging out of Facebook and looking at their list of friends. If the person is visible there, but not when you were logged in, you have been blocked.

FB Block in Wall Posts

If you can remember any posts the person has placed on your profile, business page or a mutual friend's page in the past, finding those posts now can indicate whether you've been blocked. If you have been blocked, the wall posts will still be visible, however his profile picture will be replaced with a question mark. Additionally, the person's name will be in black text and will no longer be a clickable link to his profile page.

Other Methods

So far, all of the above methods are ways you can determine if you have been blocked without drawing attention to yourself. To determine without a doubt if you have not been blocked, try sending a Facebook message to the person. If you receive a reply, you have not been blocked. You can also ask mutual friends if they have seen the person on Facebook recently. If no one has, the person may have terminated her account, or may have been suspended from Facebook. Lastly, you can ask your friends, or the person directly, whether you have been blocked.
Read More
  • Share This:  
  •  Facebook
  •  Twitter
  •  Google+
  •  Stumble
  •  Digg

How to search a photo on facebook

 No comments   


Did you have picture of someone and want to know more about them? Maybe you'd like to know their name, birth date, email address, where they work, or if they're single.
Using the method described below, you may be able to find their Facebook profile, and if they've made the information you want public, you'll find the answers you're looking for.
Is this creepy? Only if you're a creep.

Ways to Find a Person Via Their Photo

  1. The hard way: Locate the number Facebook uses to identify the photo and try to search Facebook for it (see instructions below).
  2. The easiest way: Use Google Images to find all the places where that photo is used online (see video and text tutorials below). Google Images will also find photos that are like the one you uploaded.
  3. Use Tineye to do a reverse image search. (Upload or paste the photo's URL.) Tineye will only return results for the exact same image.

Using a Photo to Find a Person's Profile on Facebook

  1. First step is to took at the file name of the picture. On most web browsers, you can right-click the photo and select View Photo or View Image.
  2. Find the file name. It might end with .jpg or .png and if it's from Facebook, it will have "fb" somewhere towards the beginning.
  3. See how the file has three sets of numbers separated by underbars (_) or periods? Locate the middle number. For example, you might see a URL that includes something that looks like this:
    fbid=65602964473589&set=a.101484896592068.2345.10000116735844&type
  4. Locate is the middle number. In the example above, I'm calling "101484896592068" the middle number. This number is the profile ID from a Facebook user's profile. In this example the number is 15 digits long, but yours might be longer or shorter. It shouldn't have a decimal, though.
  5. Copy and paste the following into your web browser's address bar: https://www.facebook.com/photo.php?fbid=
  6. At the end, without a space, copy the profile ID number you found: https://www.facebook.com/photo.php?fbid=101484896592068
  7. Go to the address and you should see the profile of the Facebook user from the picture!
Now you try. You have a photo with these numbers: 49231_618193578354315_9532_n.jpg. Can you find the profile on Facebook?
This method only works if they have a public Facebook account and the photo you have is one they've posted on Facebook. If their photos are private, then it won't work.

Using Google Images to Find Someone

  1. Go to Google Images.
  2. In the search bar, on the left, you'll see a little camera icon. When you touch it, a drop-down menu should say "Search by Image." Click that.
  3. You should see two choices: Paste the URL of the image or Upload. Choose one.
    a. If you already downloaded and have the photo on your computer, then choose "upload" and then browse your computer to find the image. After you upload, Google will search all its pages for a match.
    b. If you are using a photo you found online, then right click that image. Several options will drop down: Choose "Copy Image Location," then go back to Google Images and paste that in the search bar.
  4. Hit "Search" and you should see a list of all the pages where that photo appears. Scroll down and see if any of the sites give you more information about the person.
Read More
  • Share This:  
  •  Facebook
  •  Twitter
  •  Google+
  •  Stumble
  •  Digg

Facebook page block user

 No comments   

Spam is a nuisance, especially when certain users continuously publish it on your Facebook page. You can, however, ban individual followers from posting on your page, liking your posts, posting comments, and messaging and liking your page.

How to Ban Someone Who Likes Your Page

Step 1: Go to “Settings.”
Step 2: Select “People and Other Pages” in the left-hand column.
Step 3: Search for the user you want to ban and click to check the box next to their name.
Step 4: Select the gear icon and choose “Ban From Page.” Click “Confirm.”

Ban Someone from a Comment on a Post

Step 1: Hover over a comment by the user and select “…” located at the right. Select “Hide Comment.”
Step 2: Click “Ban [Name].”

Ban Someone from Messaging Your Page

Step 1: Select “Inbox” at the top of your Page.
Step 2: Choose the message from the person you want to ban on the left.
Step 3: Select the “Mark as spam” icon.

Ban Someone from a Post

Step 1: Choose “Posts” from the left-hand column of your Page.
Step 2: Select “Visitor Posts” at the right-hand side of your Page.
Step 3: Locate the post by the user you want to ban and select the “…” icon.
Step 4: Click “Ban From Page,” then “Confirm.”

Unban Someone From Your Page

Step 1: Go to “Settings.”
Step 2: Go to “People and Other Pages.”
Step 3: Select the “People Who Like This Page” dropdown and choose “Banned People and Pages.”
Step 4: Click to check the box next to the user you want to unban.
Step 5: Click the gear icon and choose “Unban From Page,” then click “Confirm.”
Read More
  • Share This:  
  •  Facebook
  •  Twitter
  •  Google+
  •  Stumble
  •  Digg

How to get more fans on my facebook page

 No comments   

The 10 steps below demonstrate with a real example how to get more than 10,000 fans on your Facebook business page.

Image result for facebook 
To take advantage of this for business purposes, you need to have a lot of fans (followers) on your Facebook business page. Let’s see below why having many Facebook fans is important.

What is the importance of having many Facebook fans on your business page?

It indicates popularity – It goes without saying that the number of fans reveals how popular a website is. A Facebook business page with 100,000 followers is more popular than a page with 1,000 fans and this leads to a number of other benefits (described below).
It indicates trust – If you can’t understand the relationship between Facebook fans and business trust, have in mind that the US State Department spent $630,000 to increase their Facebook Fans from 100,000 to 2 million during the years 2011-2012 (See related post from marketingland).
Why did they do this? Because in today’s World a successful business, website or blog needs to have a lot of Facebook fans. Five Years ago this did not make any difference but in the 21st century, social proof is important.
More fans, more visits – The more fans you have, the greater is the number of people that will see your posts in their timeline and possibly visit your website.
THE COMPLETE SEO GUIDE A step-by-step guide on how to increase your traffic in 60 days or less. Learn how to practically build a successful website or blog.The ONLY SEO Guide you will ever need to read!
DOWNLOAD NOW
While this is true, it should be noted that not all your fans will see your posts.
As already explained in a previous post, How to increase your Facebook Page Organic Reach, only a small percentage of your followers (no more than 4 %) will see your status updates.
This number can vary, but what is important to understand now, is that if you have 10,000 fans and you post a new update, it will be seen organically by a max of 300-400 people.
THE COMPLETE SEO GUIDE A step-by-step guide on how to increase your traffic in 60 days or less. Learn how to practically build a successful website or blog.The ONLY SEO Guide you will ever need to read!
DOWNLOAD NOW
Facebook Organic Reach Chart
It’s good for SEO as well – Although officially Google does not admit that social media is a ranking factor, many studies show that popular websites on Facebook are more likely to perform better in search, than not so popular websites (other factors being equal).

How to go from 0 to 10,000 Facebook fans

Now that you are convinced that having a lot of Facebook fans is important for your website and business, let’s see step-by-step how to go from 0 to 10,000 fans.
Note: These are the exact same steps I followed to increase the facebook followers of my fitness blog’s facebook page. Currently the page has more than 100K fans and it continuous to grow organically.
Facebook Page with more than 100K Likes

Step 1: First things first – you need to have a Facebook business page

It may sound silly for the experienced but for beginners to social media this may be something new: A personal Facebook page is different from a business page.
If you want to have friends on Facebook to share your holiday photos then you need to create a personal page but if you want to have fans and followers for your website or business then you need to create a Facebook business page.
So, the first step is to ensure that you create a Facebook business pageand the second step is to make sure that your page is properly optimized.

Step 2: Optimize your Facebook business page

When we talk about Facebook business page optimization we mean choosing a friendly page title (username), writing a catchy description (in the short description field), providing accurate information for long description, company overview, mission (see screenshot below) and of course posting interesting content – this is the most important optimization tip of all.
Facebook Business Page Optimization Tips
The quality of the content posted on your Facebook business page will also determine it’s success or failure.
Having an optimized Facebook page makes it easier to attract new fans or more likes from ads as we will see below.

Step 3: Take advantage of your personal Facebook account

I mentioned in step 1 above that you need to have a business page and not a personal page, but you still need to have an active personal facebook account.
Here is why:
After you post an update on your business page, one of the ways to increase exposure and likes, is to share that post on your personal page as well.
People you have as friends on your personal page are more likely to ‘like’ and ‘interact’ with the post shared from your business page and this will increase the engagement factor of your posts.
As a result, facebook will show your posts to more fans (organically).
So, one of the ways to increase the number of people that view your posts and go past the 4% of you fan base is to share and promote the post on your personal page.
It goes without saying that the greater the number of friends the bigger will be the visibility of the post.
Also, make sure that you invite all your existing friends (and new ones) to like your Facebook business page. Do that every time you gain a new ‘friend’.

Step 4: Add the Facebook Like box on your website

Facebook like Box above the fold
This is again social media marketing 101 but you need to have the Facebook like box on your website for 3 reasons:
#1 – It’s a way to associate your website with the Facebook business page. In other words it is a way to ‘tell’ search engines that this is your official Facebook business page.
#2 – When you get a lot of fans, this is something you should be proud off and something to show to your users (as explained above this means popularity, trust and social proof).
#3 – It’s a good way to grow your fan base organically. Your readers can follow your website by clicking the LIKE button without having to go to Facebook.
Hint: For optimum results, position the LIKE box above fold (on the sidebar).
Hint 2: You can also popup the like box to new users (for example, after they spend 60 seconds on a page, after they scroll down to the bottom or after they try to leave your page – while this works well in terms of getting new likes, you should be careful not to make it too distracting for your users.)

Step 5: Follow these tips to increase post engagement

So far, we have created an optimized Facebook business page, added friends to our personal Facebook page and placed the like box in a prominent position on our website.
The next natural step is to start sharing content to keep your fans happy and maybe manage to convert them from fans > web site visitors > customers.
Some simple rules to follow that will increase the user engagement with your facebook business page:
#1 – Share relevant content: Share content that your fans expect to see in your page. For example, if your website is about Social media, share content related to social media and not about sports or anything else you might like. If your users want to read sports news, they know where to find them.
#2 – Don’t forget that they follow your business page to get updates about your website (and niche) and not about your social gatherings: If you want to get social, then use your personal Facebook page, your business page is about your website.
#3 – As a rule thumb, I use my business page to share content from my niche only, if I need to share something which is not related to my niche, I use my personal page.
#4 – Don’t be too promotional: Sharing promotional content (all the time) on your Facebook page will drive your fans away. When you have a promotion to share or something that might benefit your fans, you can do so but don’t overdo it.
Try to post interesting, shareable content that is related to your niche, even if this does not come directly from your website. Keep a balance between promotional and content that your followers might want to read.

Step 6: Share interesting and high quality content (not just links)

I made some tests regarding the impact of descriptions when doing a Facebook update and found out that Facebook posts with ‘lists’ get more likes than posts with just links. Let me give you an example to understand what I mean.
When you want to share a post from your website on Facebook, you go to Facebook status updates and enter the webpage URL.  It looks something like this:
Normal Facebook post
You can share this post without adding any additional information. If your title and images are good, you will get a number of likes depending on the time you make the post, number of fans etc.
If one the other hand, you enrich your post by adding more information and particularly a list, then other things being equal, you are more likely to gain more likes and shares.
Facebook Post with list
For me this makes sense because people that see a title and image in their timeline may not ‘Like It’ since it provides no value to them (don’t forget that the average user is presented with hundreds of postings in their timeline every time they login to Facebook).
On the other hand when you give them valuable, high quality and easy to read information (like a list), they will click the LIKE button because they read something useful without having to leave their timeline.
Note: It is a known fact that people have a tendency of LIKING a post without reading it so give them reasons to do so; your website visits may not increase but the engagement factor of your posts will rise.

Step 7: Share images, videos and emotions

If you take a look at some of the most popular Facebook pages, you will notice that they tend to share images, videos, infographics, charts etc, along with their usual text only postings.
This type of content gets more likes and shares and as a result the page gets more fans and followers.
In a recent study by Buzzsumo, they identified that the most shared and liked content on Facebook, has the following characteristics:
facebook viral elements

Step 8: Provide incentives to get more fans & followers

Why should someone follow your Facebook business page?
You need to give incentives to facebook users to follow your page. A few ideas to consider:
Quality updates – This is the best incentive you can give your users. Before posting anything on your page, you need to make sure that it provides value to your audience. When you do this consistently, you existing followers will share it with their friends and this will attract more users.
Run a contest – Many websites run contests on Facebook and giveaway different gifts. The ‘price’ for joining the content is to LIKE the page first. There are various tools to do that but have in mind that if you don’t have a known brand this many not be so successful.
Content upgrades – If you have a blog, you can use ask users to LIKE your page to get an updated version of your post. This requires extra tools but it is something worth testing out.

Step 9: You need to promote your own content and page

When you create your business page don’t expect that it will magically get thousands of fans. Besides the tips outlined above, you also have to promote your business page in places other than Facebook.
A few ideas to consider that worked for my case:
Promote in other social media networks – If you have accounts with other social media channels e.g. Google+, Pinterest etc. you can periodically ask your followers to join you on Facebook as well. Be polite and explain to them the benefits from doing so.
Promote in Twitter – Besides posting about your Facebook page on other social media networks, you can take advantage of twitter’s interactive features.
When you get a new twitter follower, send them a private (personalized) message and ask them to follow you on facebook (both your personal and business pages).
This method although it is time consuming, (I did it manually and not using any tools) it can produce really good results.
Promote in your newsletter – If you have a newsletter or if you communicate with your readers via email, make sure that you ask them to follow your Facebook page.
Do not just write the FB URL below your signature but ASK them politely to LIKE your business page.

Step 10: Facebook ads is a must

Increase fans with facebook ads
I have saved one of the easiest and most effective ways to increase your Facebook fans for last, since it is the only one that it’s not free.
Facebook offers a self-service ad platform which you can use to either increase your fan base (promote your page), boost your posts, get more leads, increase conversions or perform a number of other actions (as shown in the image above).
The procedure is pretty simple and straightforward. Basically you select a page you own, select your goal (promote your page), select your audience (based on country, age, other demographics and interests) and then set your daily budget and duration.
The cost per campaign depends on a number of factors. The best way to assess if Facebook ads is a good solution to increase your fan base, is to run a pilot campaign for a couple of days.
Spend $10-$20 dollars per day and run the campaigns for a fixed duration (at least a week). At the end, you can decide if the cost per like is something you are willing to pay for.
I had great results with Facebook ads both for my websites and for client websites and I run campaigns every month (for a few days) to boost my facebook likes.
It should be noted that with Facebook ads you don’t buy likes but views. Many people believe that what you pay for is Facebook likes but in reality you pay Facebook to show your ad to more Facebook users.
If what you are advertising is interesting, then more people will hit the like button so spend some time and think about the message you want to display in your ad as well as the image to use.

Conclusion

Having a big number of Facebook fans on your business pages is very important for credibility and social promotion purposes.
If this wasn’t important in the first place, then nobody would care and the US State Department wouldn’t have to spend $630 thousands for Facebook campaigns.
Once you do the necessary optimizations to your business page (steps 1 and 2 above), then the easiest way to get more followers is to use Facebook ads. With a bit of A/B testing you can get to 10,000 fans with no more than $1,000 (spread into a period of months).
Once you do everything properly and provided that you have a great product or service, you can grow your fans to 100,000+ like I did with the Facebook Page of my fitness blog.
Read More
  • Share This:  
  •  Facebook
  •  Twitter
  •  Google+
  •  Stumble
  •  Digg
Newer Posts Older Posts Home

Blog Archive

  • ►  2019 (502)
    • ►  July (5)
      • ►  Jul 08 (2)
      • ►  Jul 07 (2)
      • ►  Jul 06 (1)
    • ►  February (368)
      • ►  Feb 12 (33)
      • ►  Feb 11 (21)
      • ►  Feb 09 (37)
      • ►  Feb 08 (40)
      • ►  Feb 07 (45)
      • ►  Feb 06 (40)
      • ►  Feb 05 (23)
      • ►  Feb 04 (49)
      • ►  Feb 02 (25)
      • ►  Feb 01 (55)
    • ►  January (129)
      • ►  Jan 31 (78)
      • ►  Jan 30 (20)
      • ►  Jan 29 (11)
      • ►  Jan 20 (4)
      • ►  Jan 19 (3)
      • ►  Jan 18 (4)
      • ►  Jan 17 (5)
      • ►  Jan 16 (1)
      • ►  Jan 12 (1)
      • ►  Jan 11 (1)
      • ►  Jan 10 (1)
  • ▼  2018 (2465)
    • ►  November (64)
      • ►  Nov 25 (4)
      • ►  Nov 24 (4)
      • ►  Nov 23 (7)
      • ►  Nov 22 (9)
      • ►  Nov 21 (11)
      • ►  Nov 19 (14)
      • ►  Nov 15 (7)
      • ►  Nov 03 (6)
      • ►  Nov 01 (2)
    • ►  October (178)
      • ►  Oct 31 (9)
      • ►  Oct 30 (1)
      • ►  Oct 26 (1)
      • ►  Oct 24 (16)
      • ►  Oct 23 (21)
      • ►  Oct 22 (26)
      • ►  Oct 19 (5)
      • ►  Oct 16 (50)
      • ►  Oct 15 (36)
      • ►  Oct 14 (12)
      • ►  Oct 13 (1)
    • ▼  September (771)
      • ►  Sep 27 (58)
      • ►  Sep 26 (50)
      • ▼  Sep 25 (70)
        • How to add a topic to pinterest
        • How to see who has unfriended me on facebook
        • How to download a video from facebook to my iphone
        • How to reset password on instagram with phone number
        • How to activate instagram account
        • Find out if someone blocked you on facebook
        • How to search a photo on facebook
        • Facebook page block user
        • How to get more fans on my facebook page
        • How can you see archived messages on messenger
        • Get more likes on facebook posts
        • How to change location in iphone
        • Deleted facebook chats
        • How to check archived messages
        • How to get all your deleted messages back on facebook
        • Who reviewed my facebook profile
        • How to return the deleted messages on facebook
        • Get more likes on facebook page
        • How to recover deleted messages in messenger
        • Who has been on my facebook profile
        • How to retrieve deleted messages from facebook mes...
        • How to retrieve archived messages from messenger
        • How to get the deleted conversation in facebook
        • How to check who viewed your facebook profile rece...
        • How can i see who watched my fb profile
        • How to view who viewed your facebook profile
        • Can i see who views my facebook profile the most
        • Who has been on my facebook profile
        • How to find out if someone viewed your facebook pr...
        • How can i find my facebook username
        • iPhone 6s location services always on
        • How do u retrieve deleted messages on facebook
        • How to look archived messages on facebook
        • How do i get archived messages on facebook
        • Access location services of Iphone
        • How do i look up deleted messages on facebook
        • Is there a way to retrieve deleted fb messages
        • How to get to location services on iphone
        • Contact facebook technical support
        • How do i contact facebook about my account
        • Turn off your location on iphone
        • Facebook help desk contact number
        • Where do archived messenger messages go
        • Archived messages in messenger app
        • Can i look at deleted facebook messages
        • How to change location in iphone
        • Where is the list of blocked numbers on iphone
        • How can i contact someone at facebook
        • Read archived messages facebook
        • Contact facebook via email
        • How do i find my archived messages on facebook
        • How to get free page likes
        • Facebook customer contact number
        • How to look at archived facebook messages on iphone
        • How to archive messages on facebook
        • How to promote your facebook page to get more likes
        • Likes for facebook pictures
        • How to increase facebook likes fast
        • How to increase facebook likes fast
        • How do i unarchive a message on messenger
        • How do you get archived messages back on facebook
        • How do you contact facebook customer service
        • Facebook contact info email
        • How do you delete your facebook account from your ...
        • How to contact facebook help center
        • Change facebook business page url
        • Facebook account instagram: How do I link my Insta...
        • How do i contact facebook about my account
        • Change fb email address
        • Facebook lite logout
      • ►  Sep 24 (70)
      • ►  Sep 20 (50)
      • ►  Sep 19 (80)
      • ►  Sep 18 (50)
      • ►  Sep 17 (43)
      • ►  Sep 14 (81)
      • ►  Sep 13 (39)
      • ►  Sep 12 (101)
      • ►  Sep 11 (69)
      • ►  Sep 10 (9)
      • ►  Sep 09 (1)
    • ►  June (215)
      • ►  Jun 07 (13)
      • ►  Jun 06 (5)
      • ►  Jun 05 (48)
      • ►  Jun 04 (49)
      • ►  Jun 03 (50)
      • ►  Jun 02 (50)
    • ►  May (1205)
      • ►  May 30 (50)
      • ►  May 29 (50)
      • ►  May 28 (43)
      • ►  May 26 (50)
      • ►  May 25 (50)
      • ►  May 24 (50)
      • ►  May 23 (50)
      • ►  May 21 (50)
      • ►  May 20 (100)
      • ►  May 18 (92)
      • ►  May 17 (98)
      • ►  May 16 (93)
      • ►  May 15 (25)
      • ►  May 14 (25)
      • ►  May 13 (90)
      • ►  May 12 (25)
      • ►  May 11 (50)
      • ►  May 09 (25)
      • ►  May 08 (25)
      • ►  May 07 (32)
      • ►  May 06 (21)
      • ►  May 05 (18)
      • ►  May 04 (25)
      • ►  May 03 (18)
      • ►  May 02 (25)
      • ►  May 01 (25)
    • ►  April (26)
      • ►  Apr 12 (25)
      • ►  Apr 10 (1)
    • ►  March (6)
      • ►  Mar 26 (6)

Search

Copyright © Make Over Arena